Engineering
Jun 22, 2026
Engineering
Backend.AI on DGX Spark: Open source installation guide

Kyujin Cho
AI Platform Architect

Sion Kang
Software Engineer

Yubin Kim
Software Engineer

Jinho Heo
Technical Writer
Jun 22, 2026
Engineering
Backend.AI on DGX Spark: Open source installation guide
Kyujin Cho
AI Platform Architect
Sion Kang
Software Engineer
Yubin Kim
Software Engineer
Jinho Heo
Technical Writer
This guide walks you through installing Backend.AI on a single DGX Spark node using the built-in Terminal User Interface (TUI) installer. It uses the Gemma 4 12B model as an example. The instructions are based on Backend.AI 26.4.9. Note that the interface and steps may change slightly in future releases as the software evolves.
About Backend.AI
Backend.AI is an open-source cluster platform that enables multiple users to securely share computing resources, including AI accelerators such as NVIDIA GPUs, for running AI and ML workloads. It uses a single codebase to operate across environments ranging from a single server to large-scale, multi-site clusters with thousands of nodes, helping reduce infrastructure complexity.
User and Administrator Roles
Users interact with Backend.AI through a web browser, where they can launch environments such as JupyterLab, VS Code (Web), or an SSH terminal to develop code and run experiments on GPUs. When users submit resource requests to the queue, the scheduler automatically provisions containers as GPUs become available, enabling batch training workloads.
Trained models can be exposed as HTTP endpoints with autoscaling support for serving and inference. Users can also store and share datasets, models, and results using VFolders (virtual folders), which are isolated at the project or group level.
Administrators define and manage domains, projects, users, key pairs, and resource policies to control who can access which resources and in what capacity. They can integrate private container registries to restrict and manage allowed container images, and configure policies for resource allocation, isolation, and scheduling across GPU and CPU resources. Administrators also monitor system activity by tracking usage, audit, and access logs.
Backend.AI Microservices Architecture

User requests enter the system through an entry point and are forwarded to the control plane. The control plane processes these requests and orchestrates container execution in the data plane. All daemons rely on Halfstack as a shared infrastructure layer, where system state and configuration are centrally managed.
User Plane: The Interface Between Users and the System
- Webserver (:8090): Serves as the entry point for management and control traffic. It delivers static assets for the Web UI, manages login sessions, and acts as an API reverse proxy that forwards client requests to the Manager's REST or GraphQL APIs.
- App Proxy Worker: Handles application traffic originating from user containers. For example, it receives requests for applications such as Jupyter and forwards them to the appropriate user kernel container.
Control Plane: Orchestration and Management
- Manager: The central control daemon of the system. It handles compute session scheduling, exposes API endpoints, and enforces RBAC-based access control. It also manages the full session lifecycle, from creation to termination. The Manager processes requests forwarded by the Webserver and performs read and write operations on PostgreSQL, Redis, and etcd to maintain metadata and system state. When a session needs to be created, it sends an RPC request to the Agent. If an application needs to be exposed externally, it requests route creation from the App Proxy Coordinator.
- Storage Proxy: Acts as a gateway for VFolders (virtual folders). It handles storage-related operations such as creating and deleting folders and files, as well as uploading and downloading data. Both the Manager and the Web UI access storage through this component.
- App Proxy Coordinator: A daemon responsible for generating application routing rules. It receives requests from the Manager, creates backend definitions and routing rules, and distributes them to App Proxy Workers. This design separates route generation from actual traffic handling.
Data Plane: Execution Layer
- Agent: Runs on each compute node and is responsible for container execution. It manages container lifecycle operations, tracks resource usage, and provides kernel-runner functionality. In response to RPC requests from the Manager, it launches or controls user kernel containers using
docker exec. The Agent reports its status and availability to Redis through heartbeats and records node registration information in etcd. - User kernel container: The runtime environment where user code is actually executed. Frameworks and tools such as Jupyter and PyTorch run inside this container. The Agent creates and manages the container, and the required storage is mounted according to instructions from the Manager. External application traffic is forwarded to this container through the App Proxy Worker.
Halfstack: Shared Infrastructure Layer Used by All Daemons
- PostgreSQL (:8100): Stores persistent metadata. Structured data such as users, sessions, and VFolders are stored here.
- Redis (:8110): Handles asynchronous messaging and caching. It is used for inter-daemon event delivery and transient state information such as Agent heartbeats.
- etcd (:8120): A distributed key-value store that stores cluster configuration data. Node registration information and some routing-related data are recorded here.
Compute Session Creation Flow
When a user connects to the Webserver over HTTPS, the request is forwarded to the Manager. The Manager performs scheduling and then sends an RPC request to the Agent to create a session. The Agent launches the user kernel container using docker exec. If storage is required, the Agent mounts it into the container.
Application traffic follows a separate path. The Manager requests route creation from the App Proxy Coordinator, which generates routing rules and delivers them to the App Proxy Worker. The App Proxy Worker then forwards incoming user requests to the appropriate kernel container based on those rules.
Each component shares state through PostgreSQL, Redis, and etcd rather than relying on direct point-to-point connections. As a result, each layer and component can be scaled independently.
Roles by Deamon
| Daemon | Startup Command |
|---|---|
| Webserver | ./backendai-webserver web start-server |
| Serves WebUI static assets, manages user login sessions, and acts as a reverse proxy between the browser and the Manager API. The entry point that external users reach first (:8090) | |
| Manager | ./backendai-manager mgr start-server |
| Control plane. Provides REST/GraphQL API, handles session scheduling (Sokovan), manages agent/storage registration, enforces permissions and RBAC, integrates container registries, and manages domain/project/user metadata. The central point for all operational decisions | |
| Agent | ./backendai-agent ag start-server |
| Container executor on each node. Receives sessions from the Manager and launches Docker containers (kernels), measures CPU/memory/GPU resource usage, and starts services via kernel-runner (jupyter/ttyd, etc.). GPU node = agent | |
| Storage-Proxy | ./backendai-storage-proxy storage start-server |
| Gateway for vfolder (user data volume) mount, permissions, and quota. The layer through which vfolders are attached to containers. Also provides an SFTP upload endpoint | |
| App-Proxy Coordinator | ./backend.ai app-proxy coordinator start-server |
| When a user launches an app in a container (e.g., Jupyter), this daemon determines which URL maps to which container port and records it as a Traefik routing rule in etcd. The control plane between Manager and Worker | |
| App-Proxy Worker | ./backend.ai app-proxy worker start-server |
| Traefik-based entry point. Reads rules registered by the Coordinator and forwards user HTTP/WebSocket/TCP traffic to the appropriate container:port. The daemon that actually receives traffic when users access apps like Jupyter | |
Dependency Stack (HalfStack)
| Component | Default Port | Role |
|---|---|---|
| PostgreSQL | 8100 | Persistent metadata for users, sessions, VFolders, domains, and more |
| Redis | 8110 | Session scheduling queue, event dispatching, and Agent heartbeats |
| etcd | 8120 | Cluster configuration and dynamic discovery (Agent registration, App-Proxy routing rules) |
| MinIO (--enable-storage) | — | Object storage backend |
| Observability stack (--enable-observability) | — | Prometheus, Grafana, Loki, Tempo, Pyroscope + OTel collector |
1. Prerequisites
Execution location: The DGX Spark node/server where you will install Backend.AI
1.1 Tools and Runtime
Prerequisite: Docker and Docker Compose must be installed.
docker ps >/dev/null && echo "docker OK"
1.2 Port Availability
The TCP ports used by Backend.AI's foundational dependencies must be available:
- PostgreSQL (
8100) - Redis (
8110) - etcd (
8120)
The TCP ports used by Backend.AI's core components must also be available:
- Manager (
8091) - Webserver (
8090) - App Proxy (
10200-10500) - Agent (
6009) - Storage Proxy (
6021-6022)
1.3 Dependencies and vLLM Image Download
sudo apt update && sudo apt install git-lfs
curl --proto '=https' --tlsv1.2 -fsSL https://static.pantsbuild.org/setup/get-pants.sh | bash
curl -LsSf https://astral.sh/uv/install.sh | sh
After running these commands, restart your SSH connection and install Python 3.13.7:
uv python install 3.13.7
Now download the vLLM image you will use for this guide:
docker pull cr.backend.ai/multiarch/vllm:0.23.0-cuda12.9-ubuntu22.04
1.4 Download Installation Files
Download the source code and installation files for the latest stable version of Backend.AI Open Source:
git clone https://github.com/lablup/backend.ai -b 26.4.4 && cd backend.ai
git lfs install && git lfs pull
wget https://github.com/lablup/backend.ai/releases/download/26.4.4/backendai-install-linux-aarch64 && chmod +x backendai-install-linux-aarch64
sudo apt update
1.5 Check DGX Spark IP Address
Determine the IP address used to access the DGX Spark from your computer. In most cases, this is the address to the right of the @ symbol in your SSH command. For example: ssh dgx@192.168.2.24
2. Installation
Run the following command to start the interactive installer:
./backendai-install-linux-aarch64 install --accelerator cuda
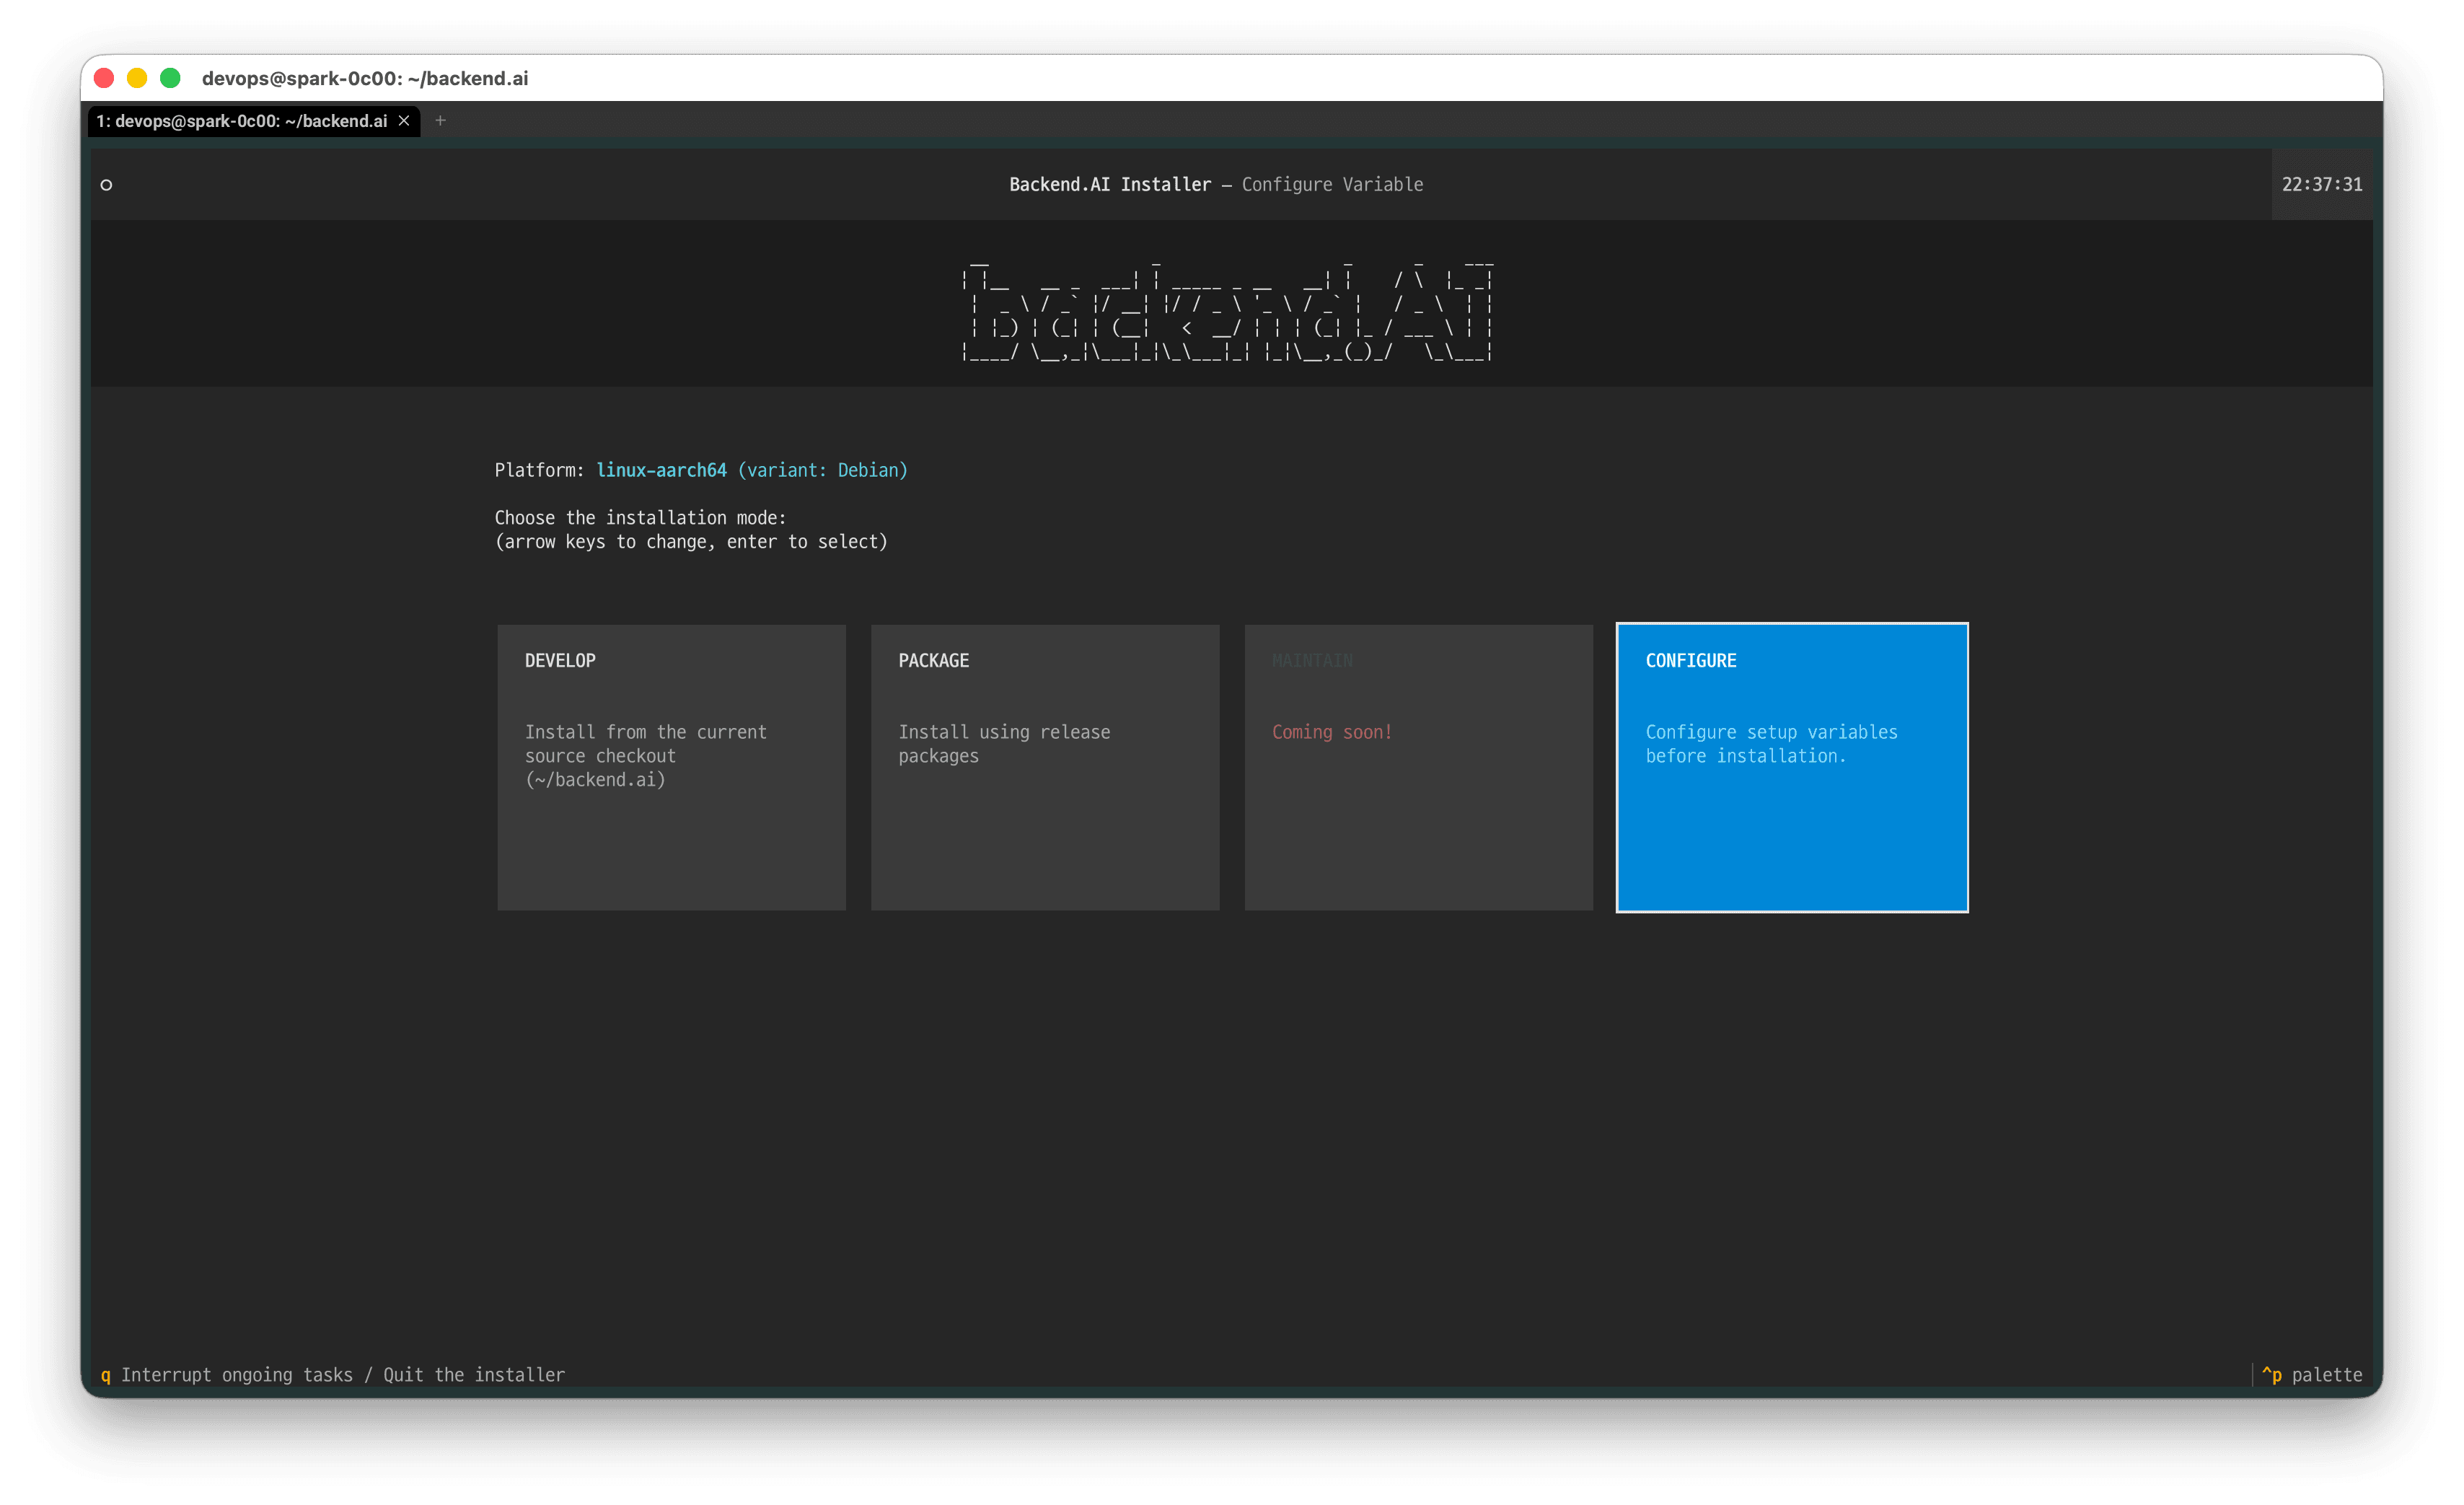
The installation screen above will appear. Before continuing with the installation, use the keyboard arrow keys to navigate to 'CONFIGURE' and press Enter to enter the Backend.AI installer's configuration mode.
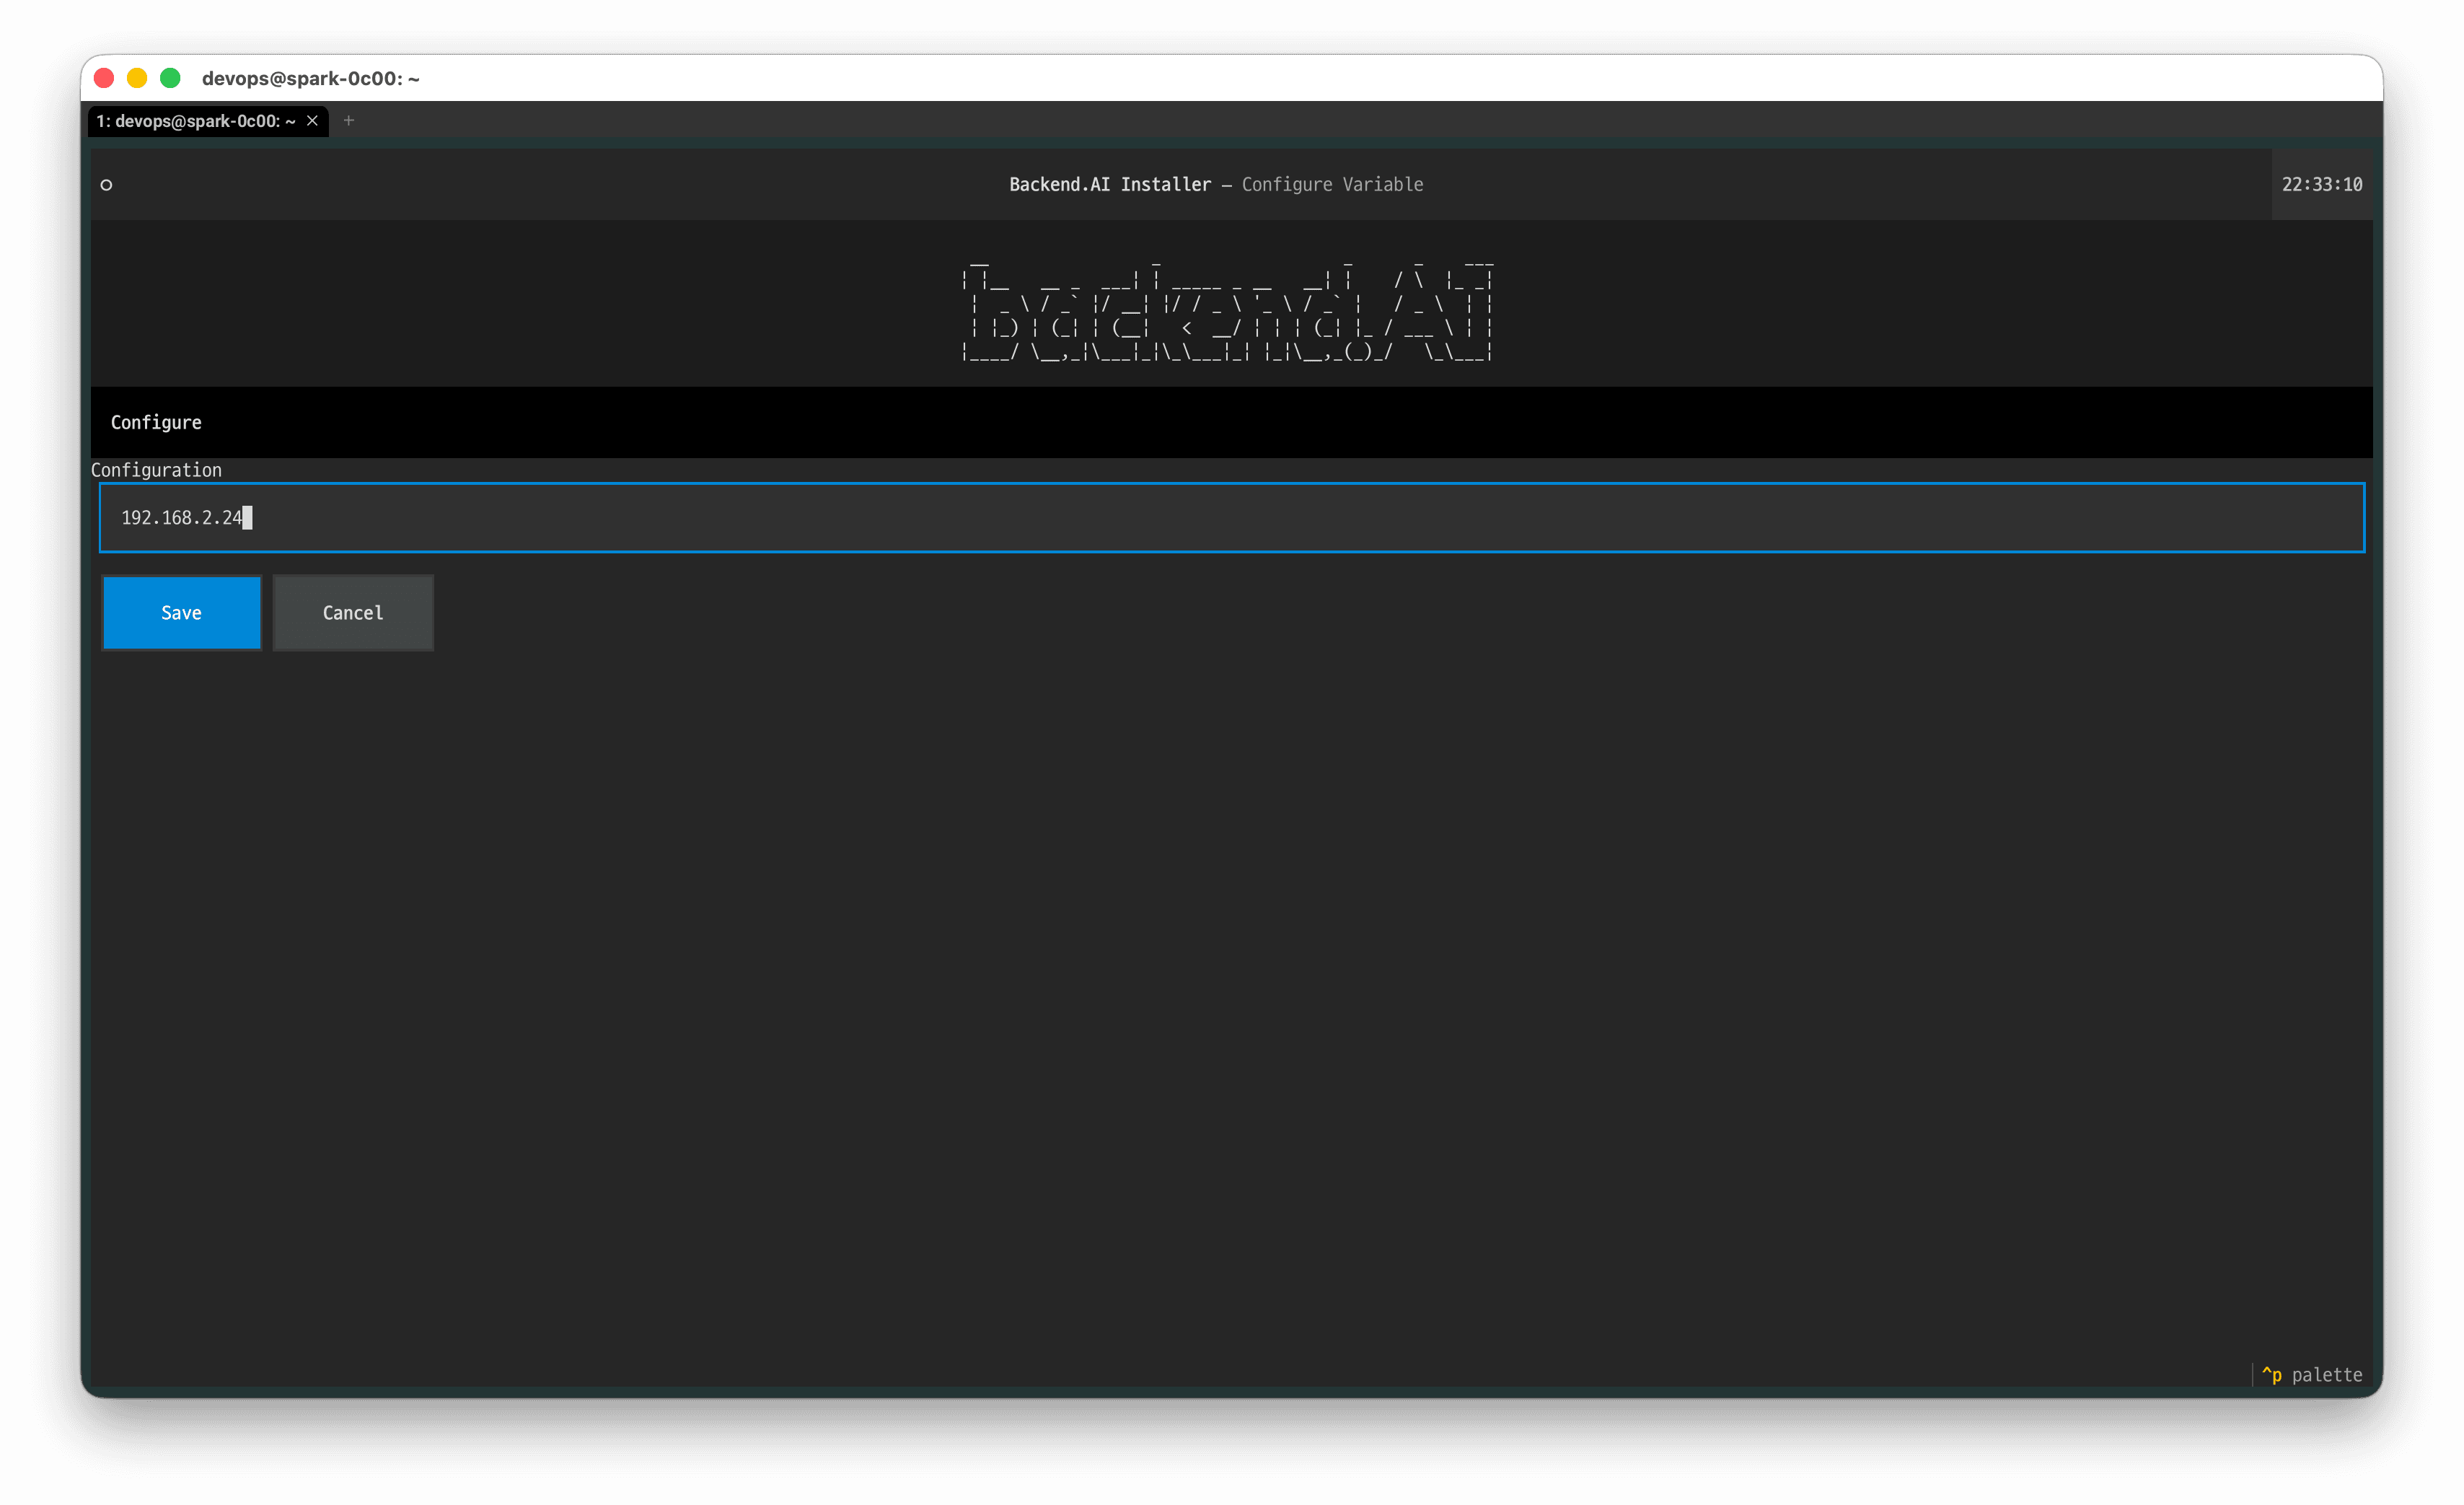
Enter the DGX Spark IP address you confirmed in step 1.5, then select 'Save'.
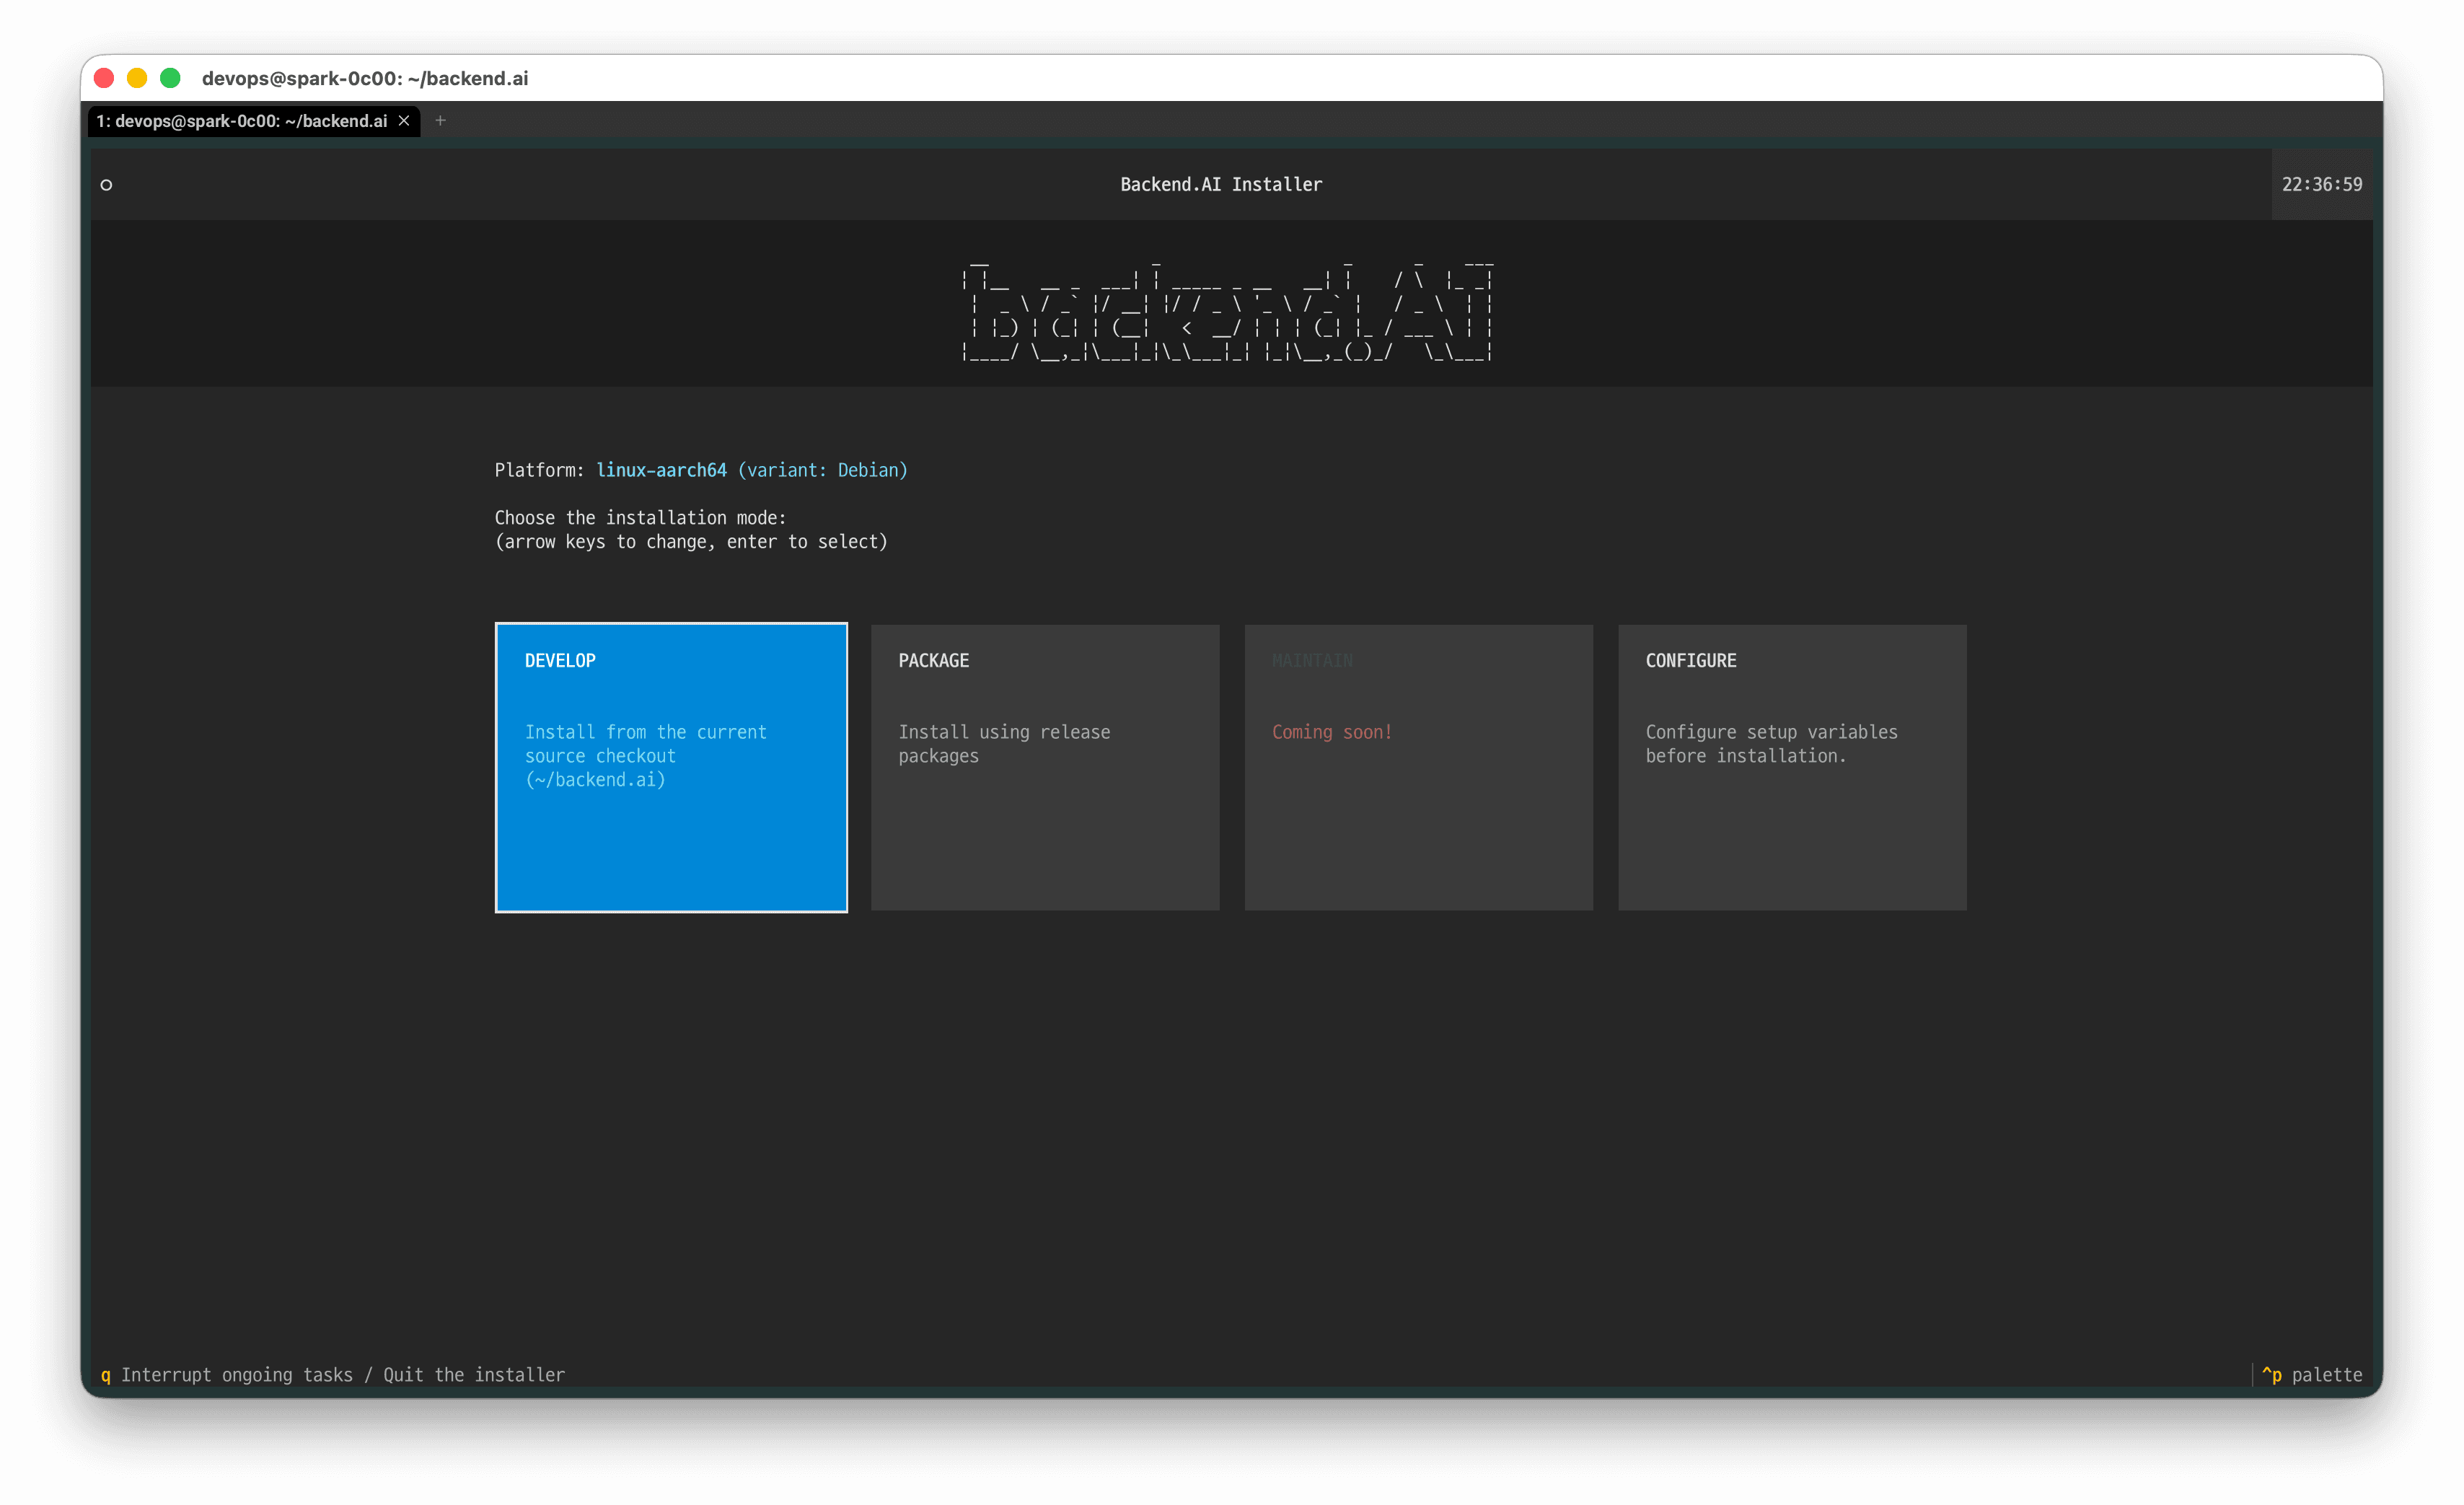
Use the keyboard arrow keys to navigate to 'DEVELOP' and press Enter to start installing the Backend.AI package version.
NOTE: Versions 26.4.0 through 26.4.4 have a known bug where PACKAGE installation does not work correctly.
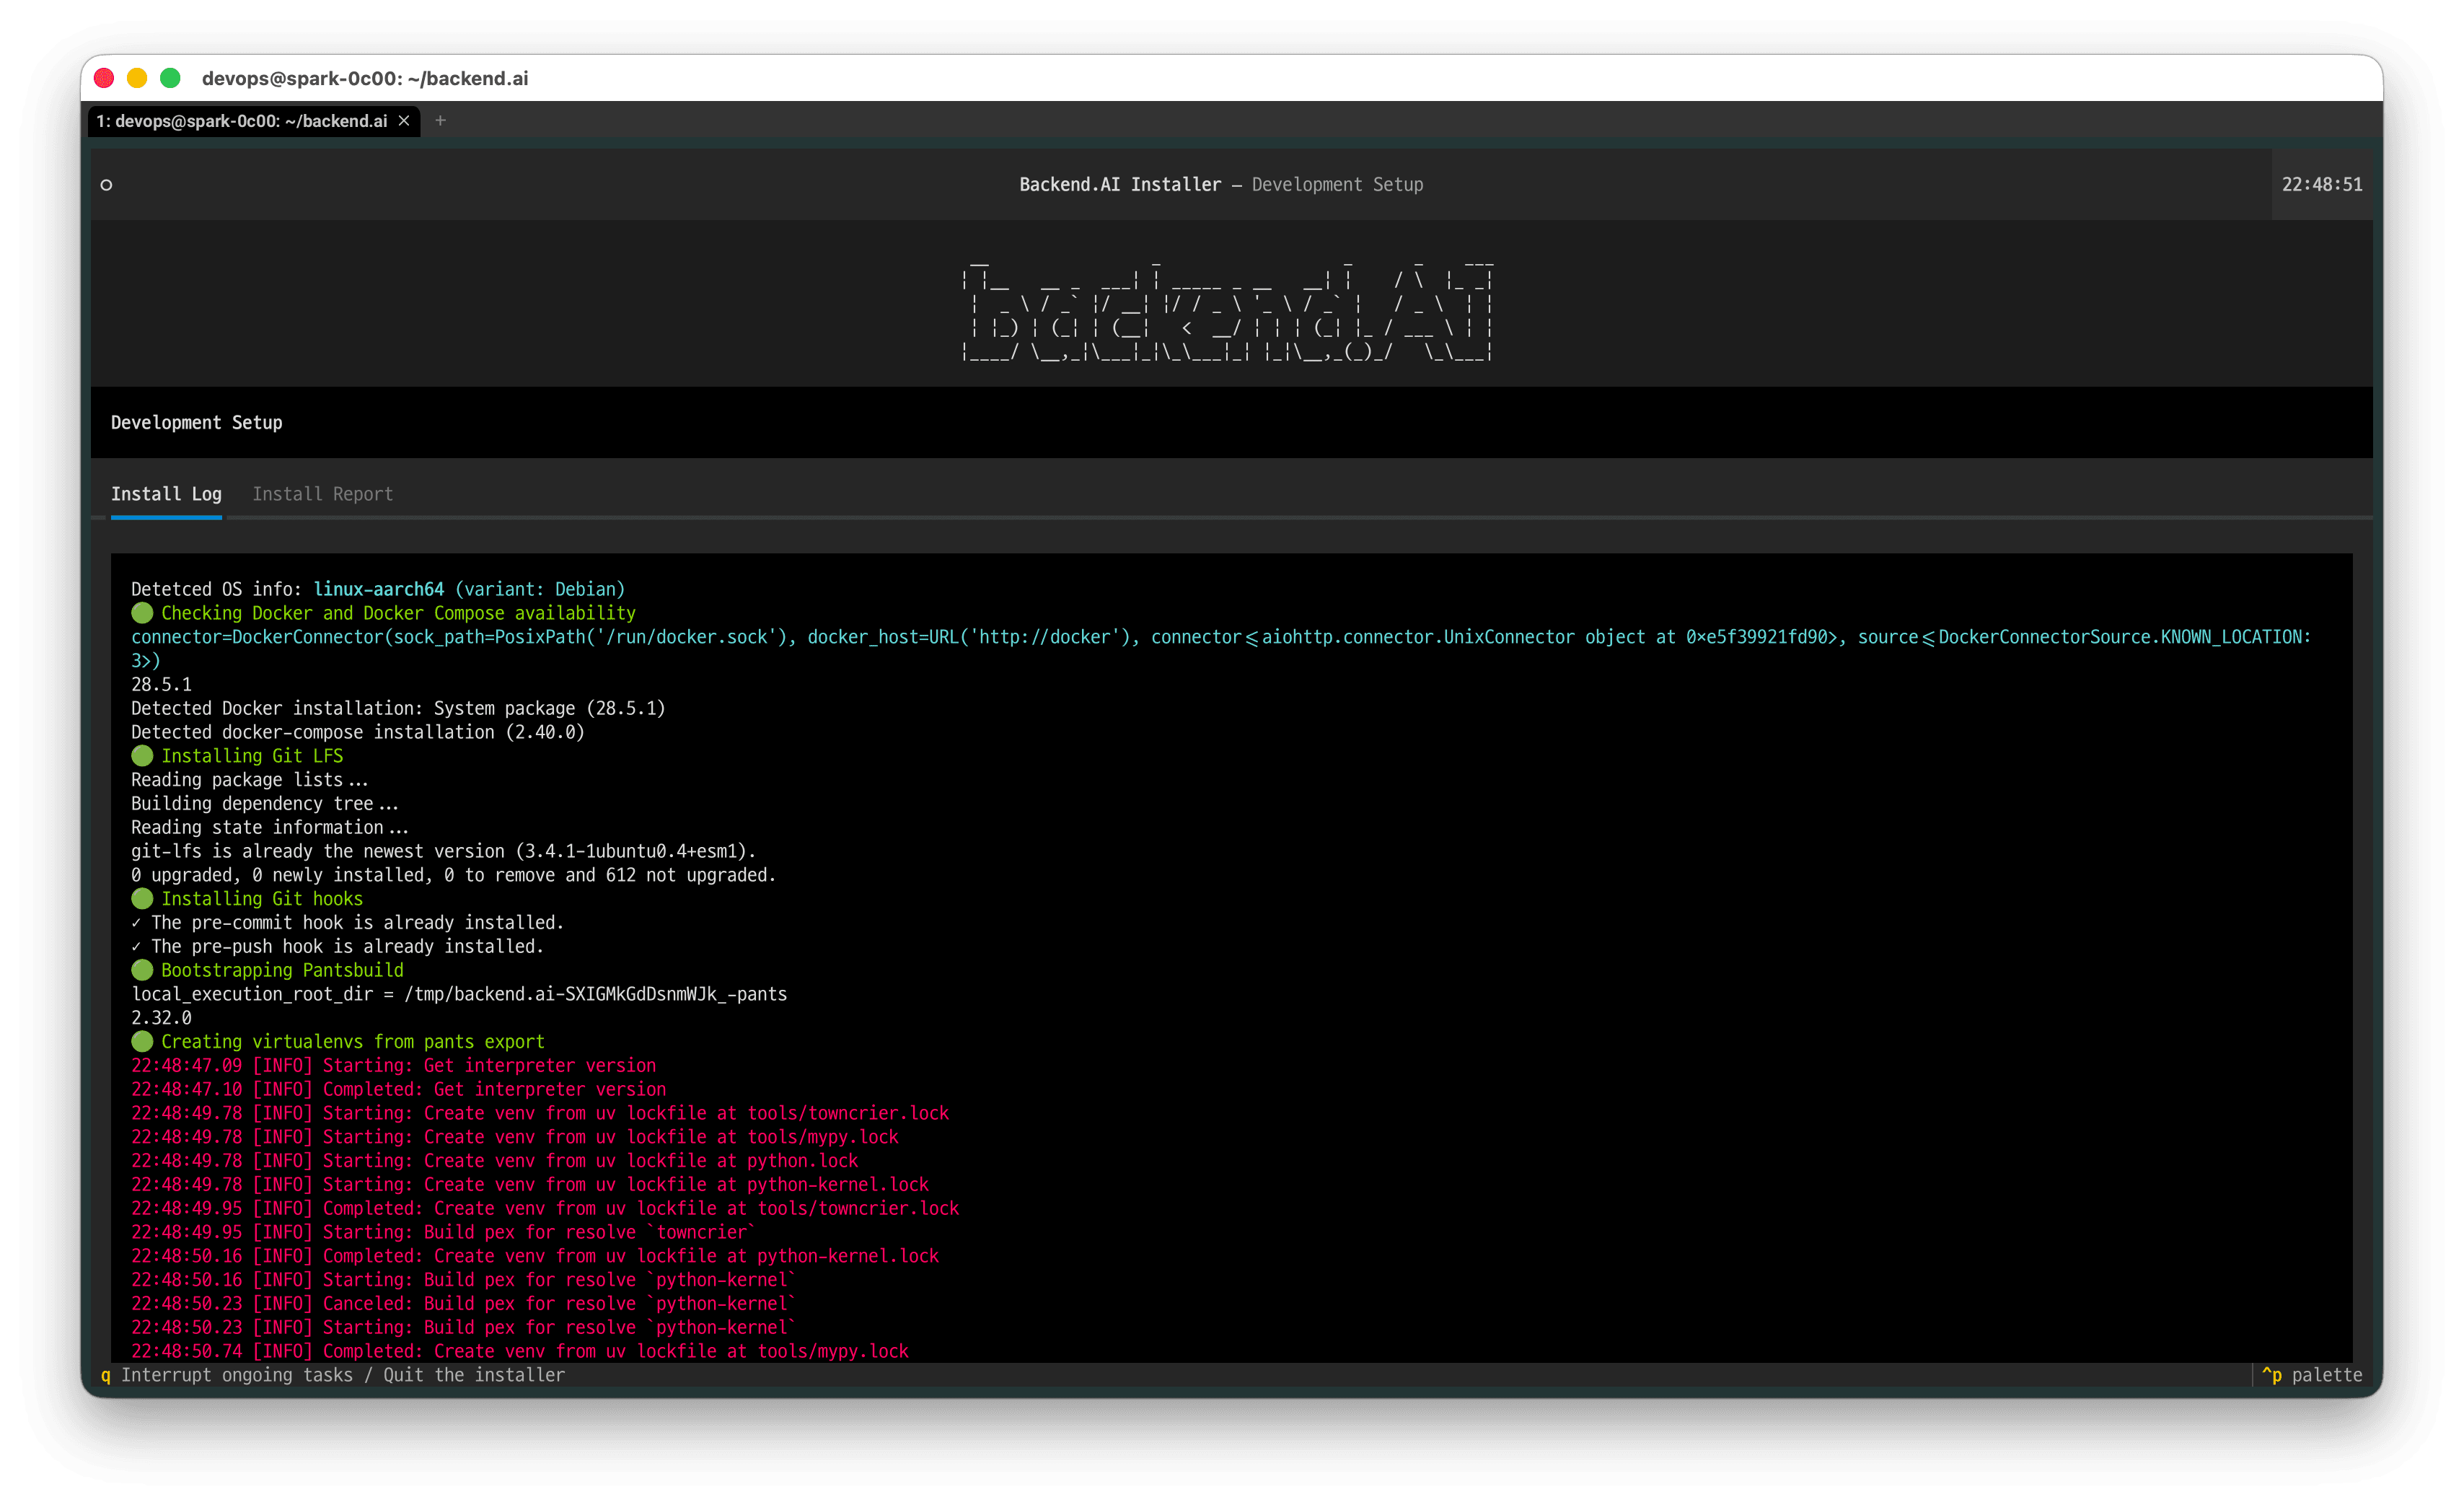
The installation proceeds automatically. When installation completes, an Install Report will be provided.
3. Post-Installation
Execution location: The node where Backend.AI was installed
3.1 Installation Output Files
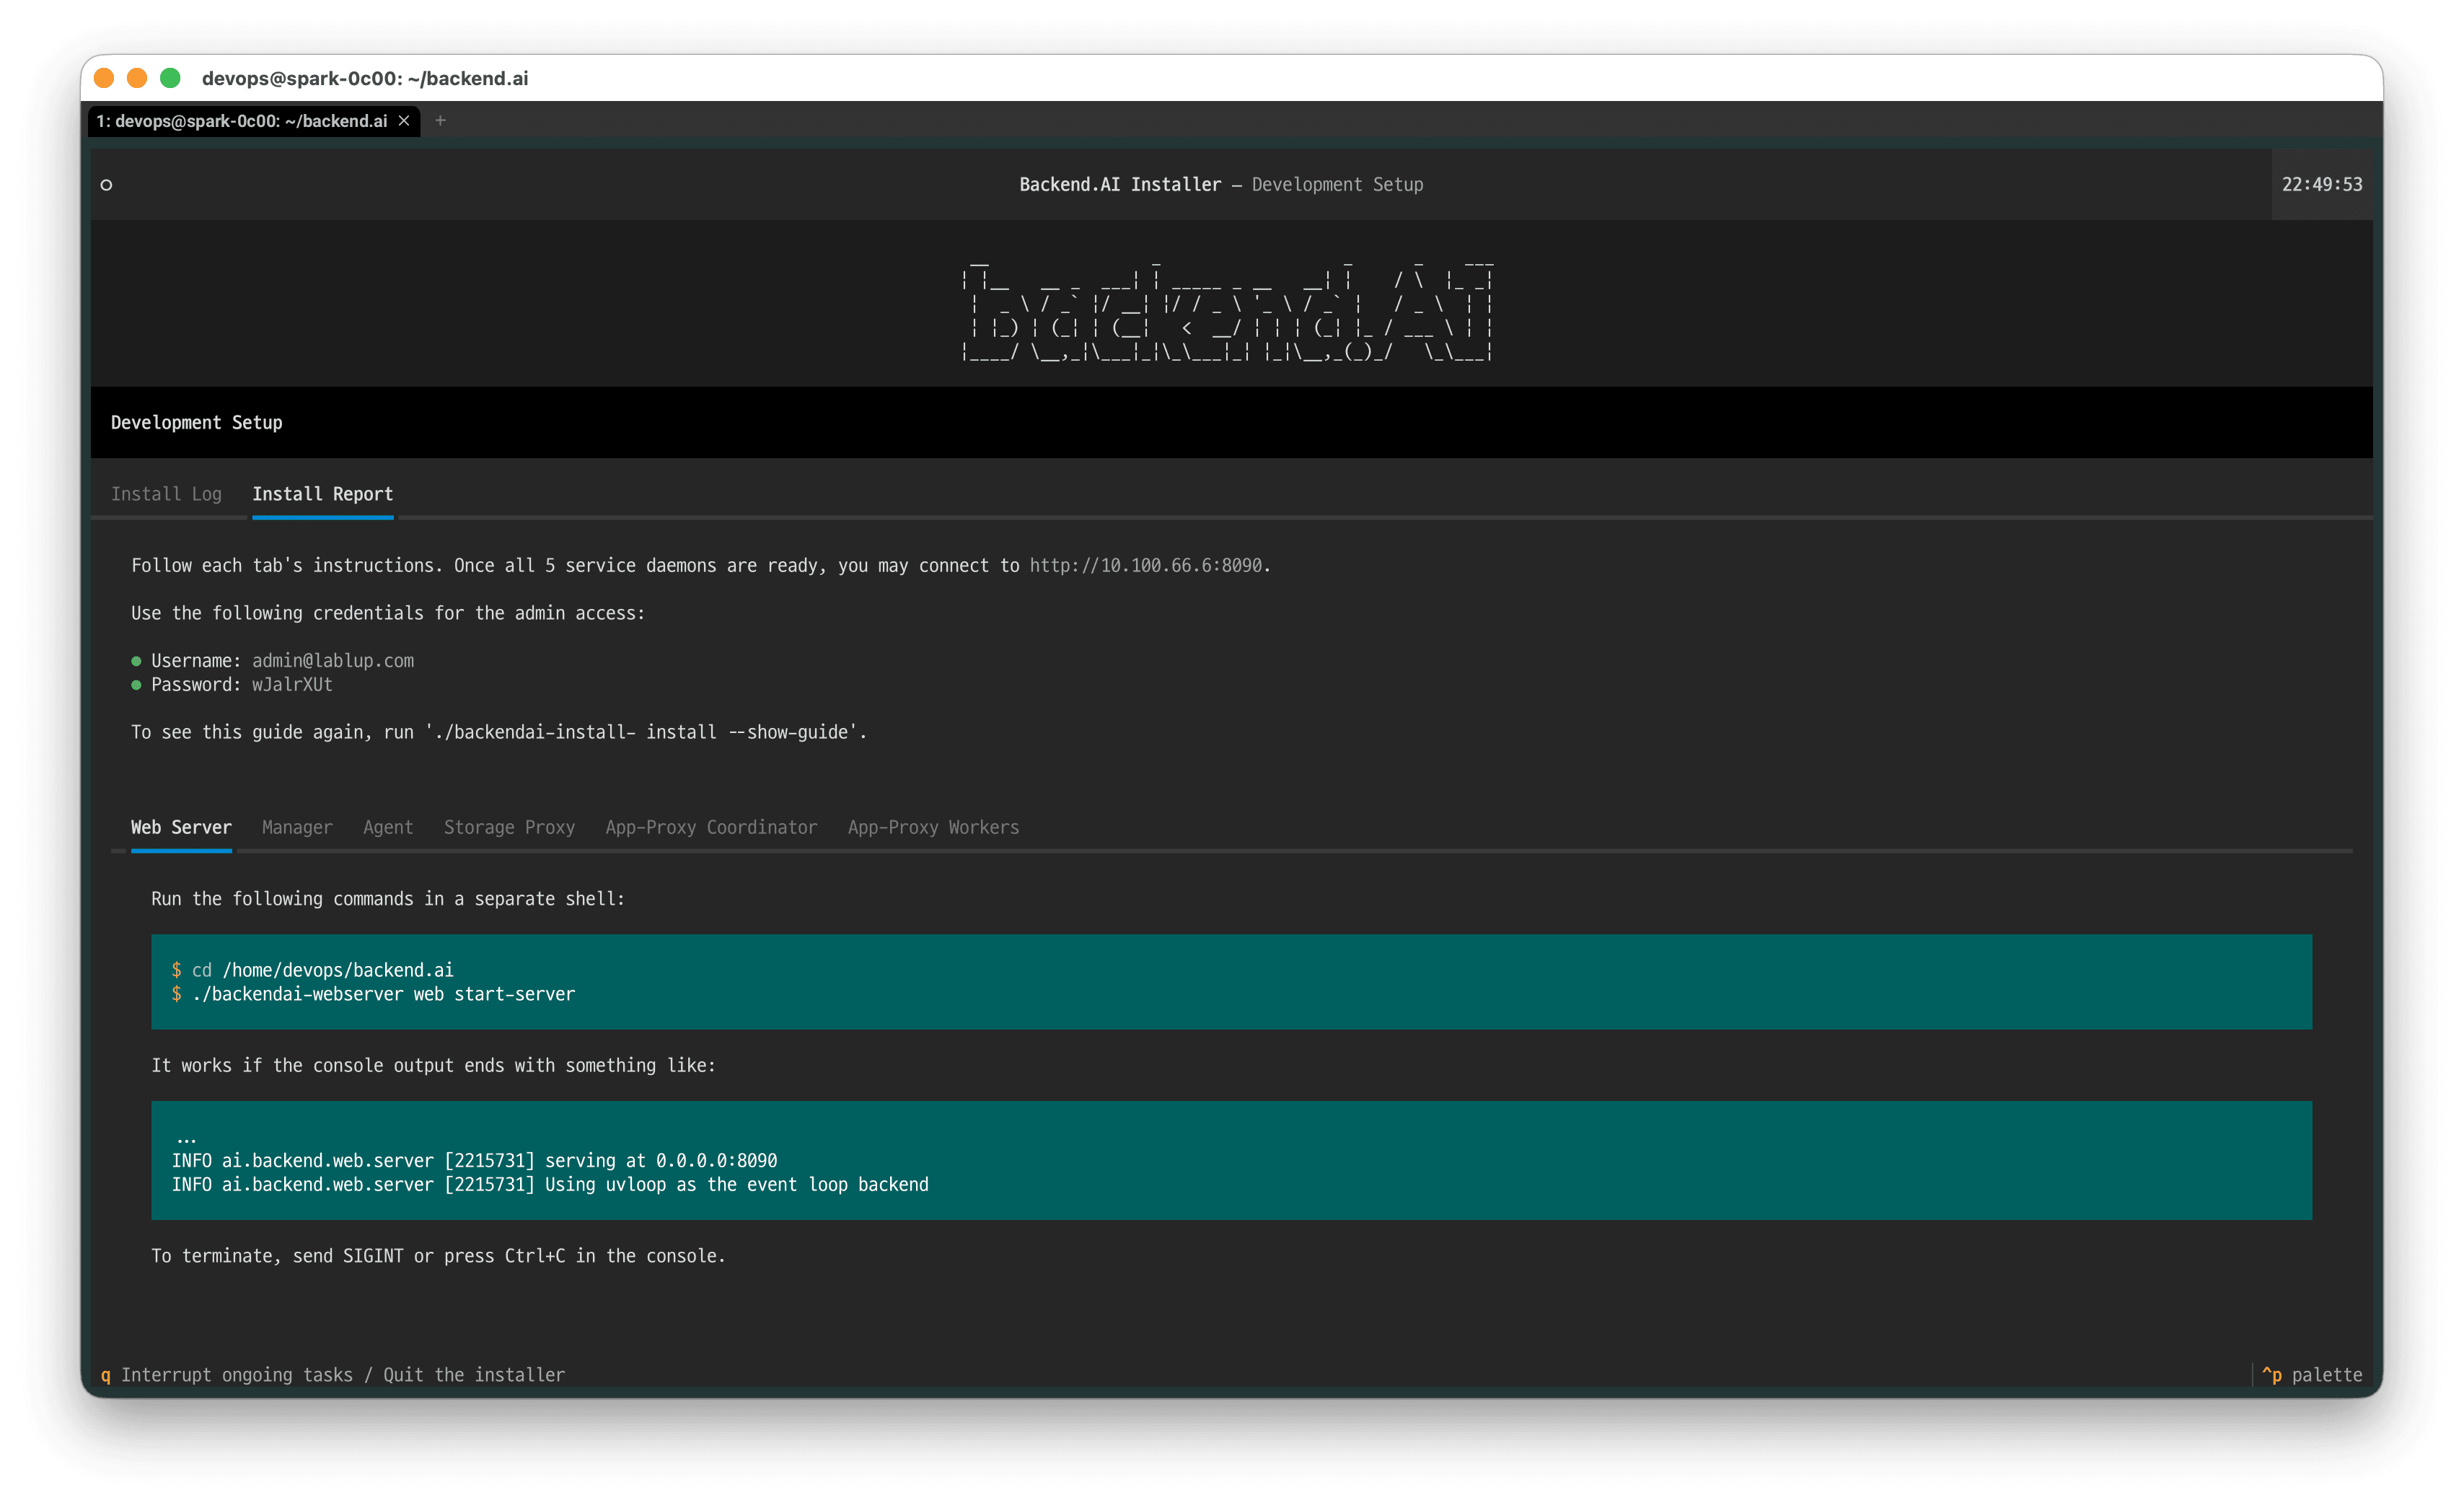
- After installation completes, an
INSTALL-INFOfile is created in the current directory. You can review the initial access instructions by reading the welcome message displayed after installation or by opening this file. If you want to see the welcome message again, run the following command:
./backendai-install-linux-aarch64 install --show-guide
Run the following command under the backend.ai source code folder to initialize the database:
$ ./py -m alembic -c alembic-appproxy.ini upgrade head
INFO  [alembic.runtime.migration] Context impl PostgresqlImpl.
INFO  [alembic.runtime.migration] Will assume transactional DDL.
INFO  [alembic.runtime.migration] Running upgrade  -> 5c6942374c62, initial tables
INFO  [alembic.runtime.migration] Running upgrade 5c6942374c62 -> e81f833e28fa, create circuits table
INFO  [alembic.runtime.migration] Running upgrade e81f833e28fa -> 6e38326a056a, rename misrepresentative column names
INFO  [alembic.runtime.migration] Running upgrade 6e38326a056a -> a06b7ba8f4bd, add worker.wildcard_traffic_port column
INFO  [alembic.runtime.migration] Running upgrade a06b7ba8f4bd -> 0dd436073e84, add wokrer.status column
INFO  [alembic.runtime.migration] Running upgrade 0dd436073e84 -> 825d283e0743, add circuit.runtime_variant column
INFO  [alembic.runtime.migration] Running upgrade 825d283e0743 -> 66f87e010f90, add worker.traefik_last_used_marker_path
INFO  [alembic.runtime.migration] Running upgrade 66f87e010f90 -> 7dbbc087108e, separate use_tls into tls_listen and tls_advertised
INFO  [alembic.runtime.migration] Running upgrade 7dbbc087108e -> a1b2c3d4e5f6, add endpoint health check table
/home/devops/backend.ai/src/ai/backend/appproxy/coordinator/models/alembic/versions/a1b2c3d4e5f6_add_endpoint_health_check_table.py:67: SAWarning: Column 'endpoints.id' is marked as a member of the primary key for table 'endpoints', but has no Python-side or server-side default generator indicated, nor does it indicate 'autoincrement=True' or 'nullable=True', and no explicit value is passed.  Primary key columns typically may not store NULL.
  op.execute(insert_query)
Open the webserver.conf file in the backend.ai source code folder using your preferred text editor. Then change the max_memory_per_container value from 64 to 128 and save the file.
3.2 Start Services
After installation, start tmux. Then launch the following service daemons after moving to <target-path>.
./backend.ai web start-server --debug
./backend.ai mgr start-server --debug
./backend.ai ag start-server --debug
./backend.ai storage start-server --debug
./backend.ai app-proxy-coordinator start-server --debug
./backend.ai app-proxy-worker start-server --debug
./backend.ai app-proxy worker start-server -f app-proxy-worker-tcp.toml --debug
3.3 Access
- WebUI:
http://<DGX Spark IP address confirmed in step 1.4>:8090 - Default administrator account:
- Username:
admin@lablup.com - Password:
wJalrXUt
- Username:
In production environments, it is recommended to change the default password immediately after the first login.
4. Run a Model with vLLM
4.1 Create a Model Folder
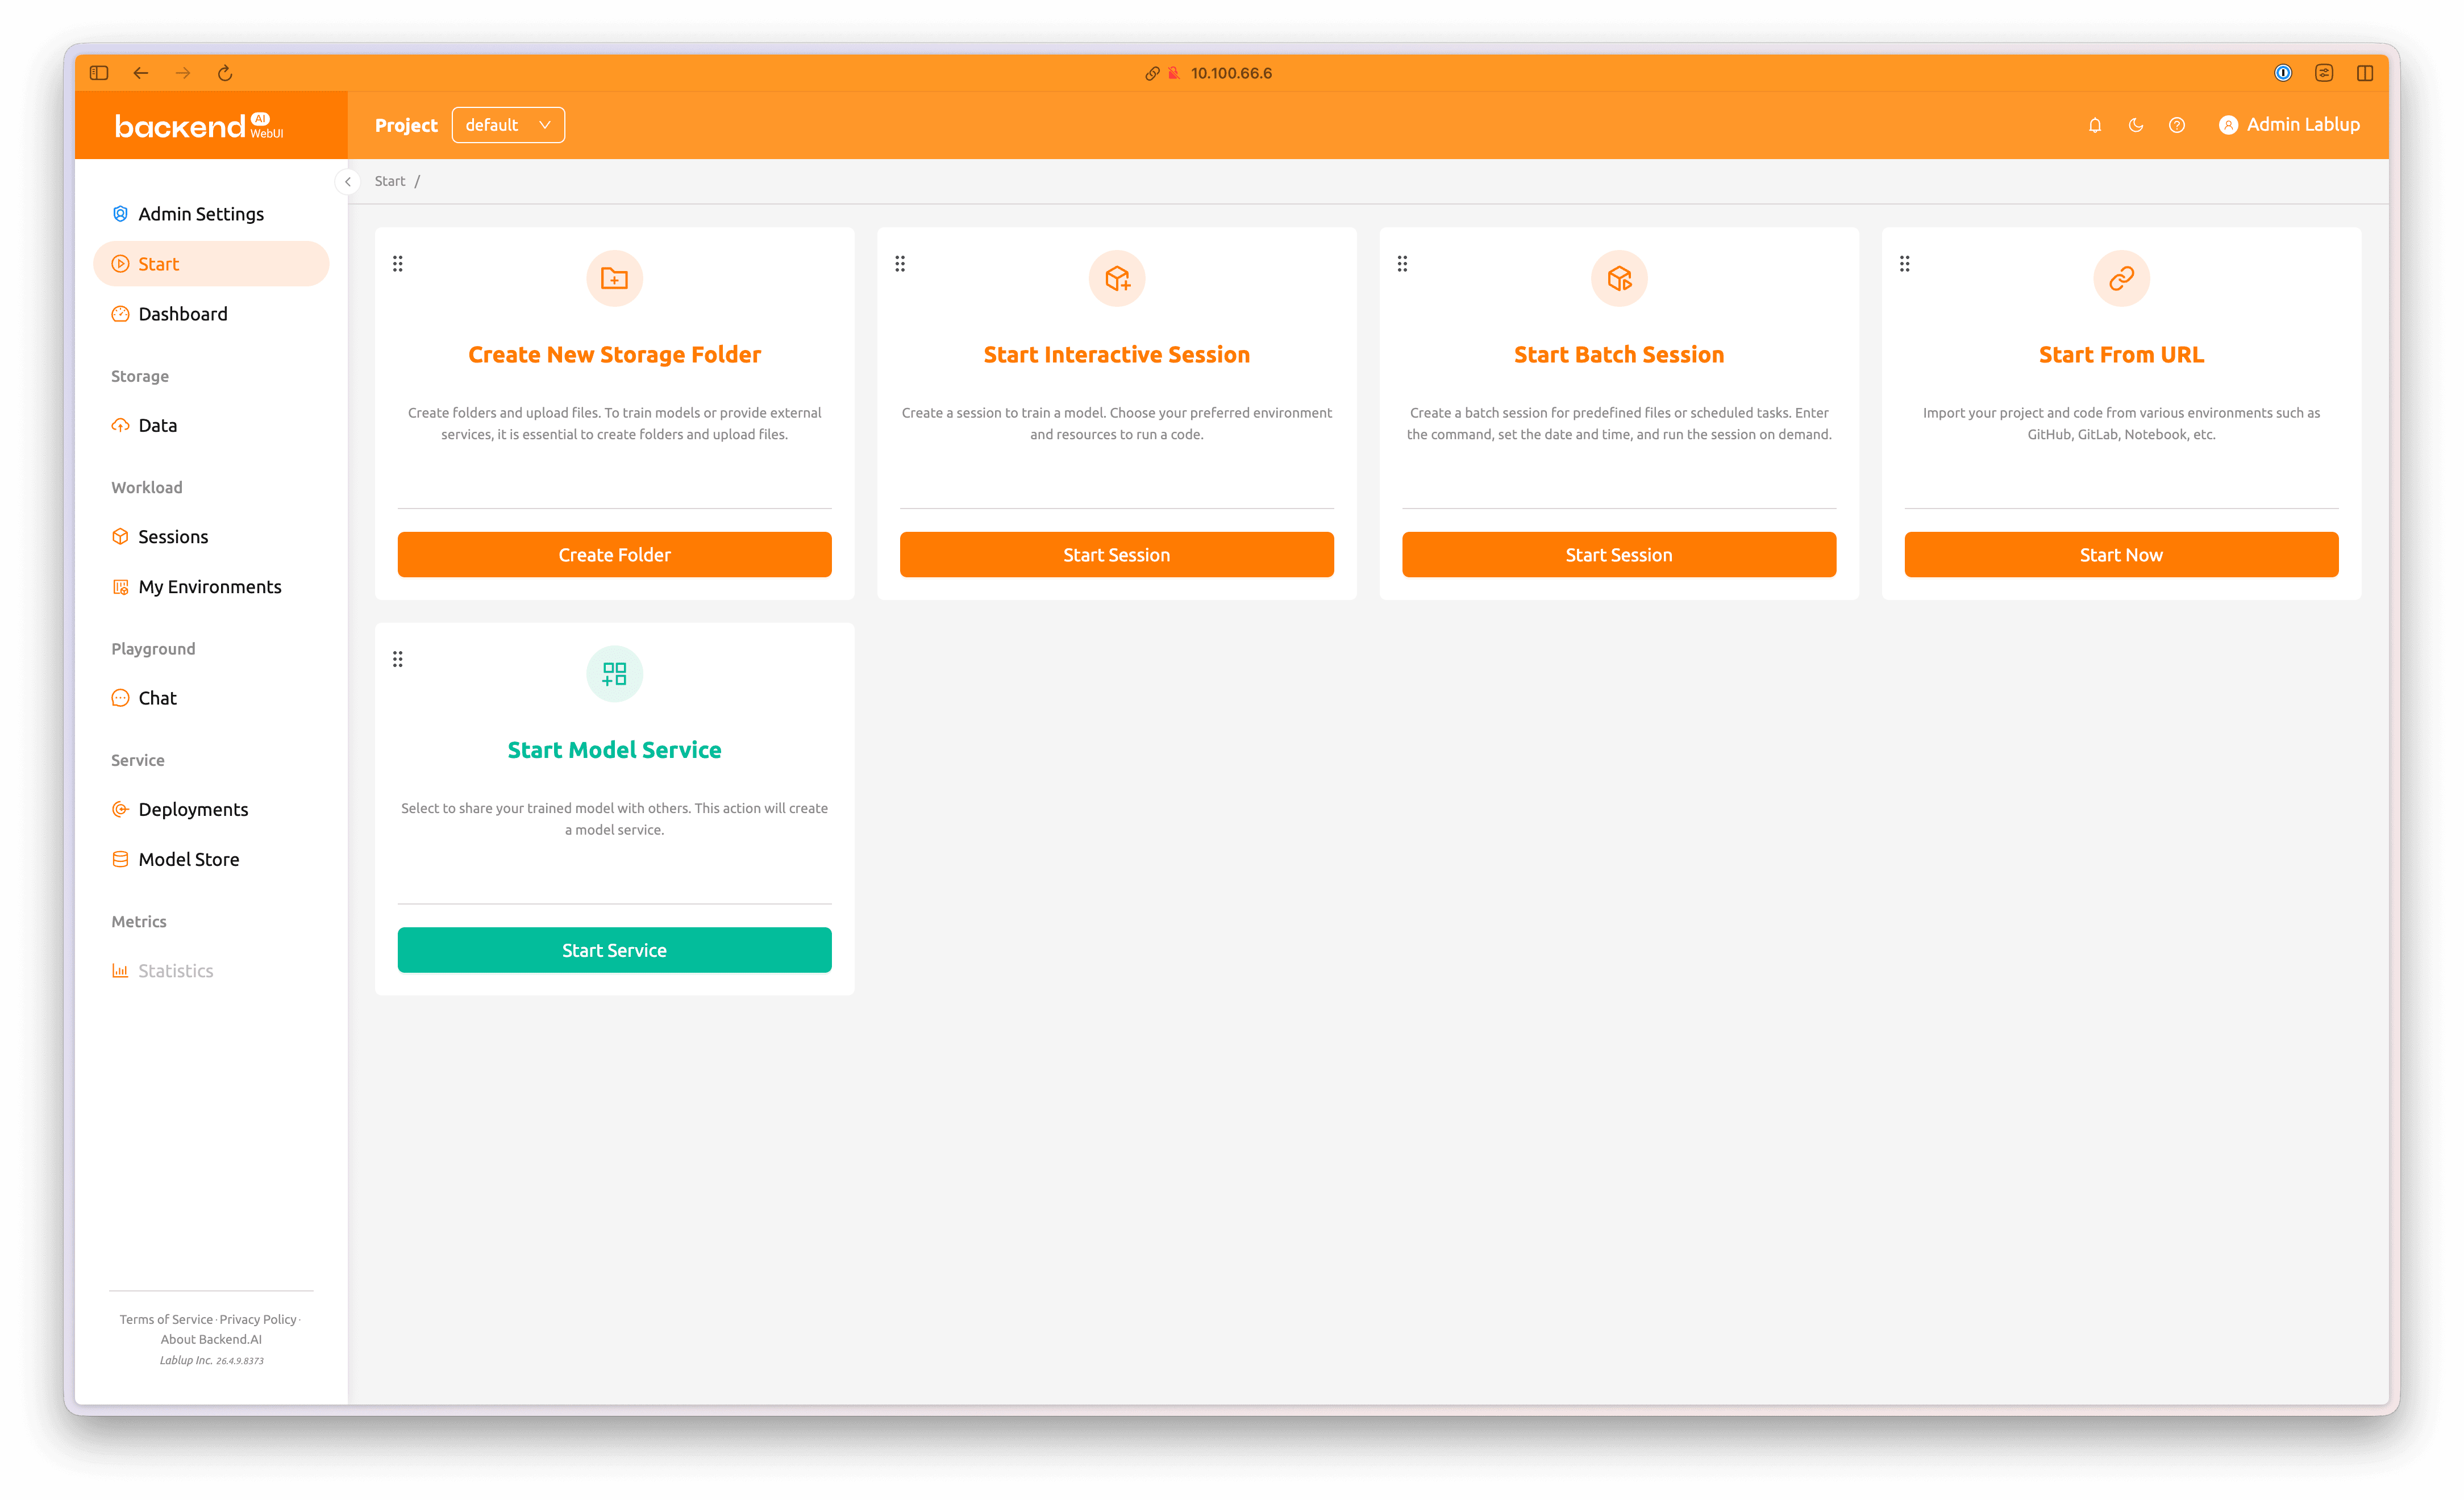
Access the Backend.AI WebUI and log in using the initial administrator credentials. Click the Data tab in the left panel, then select Create Folder to open the dialog for creating a new model folder. You can also click Create Folder directly from the Start page.
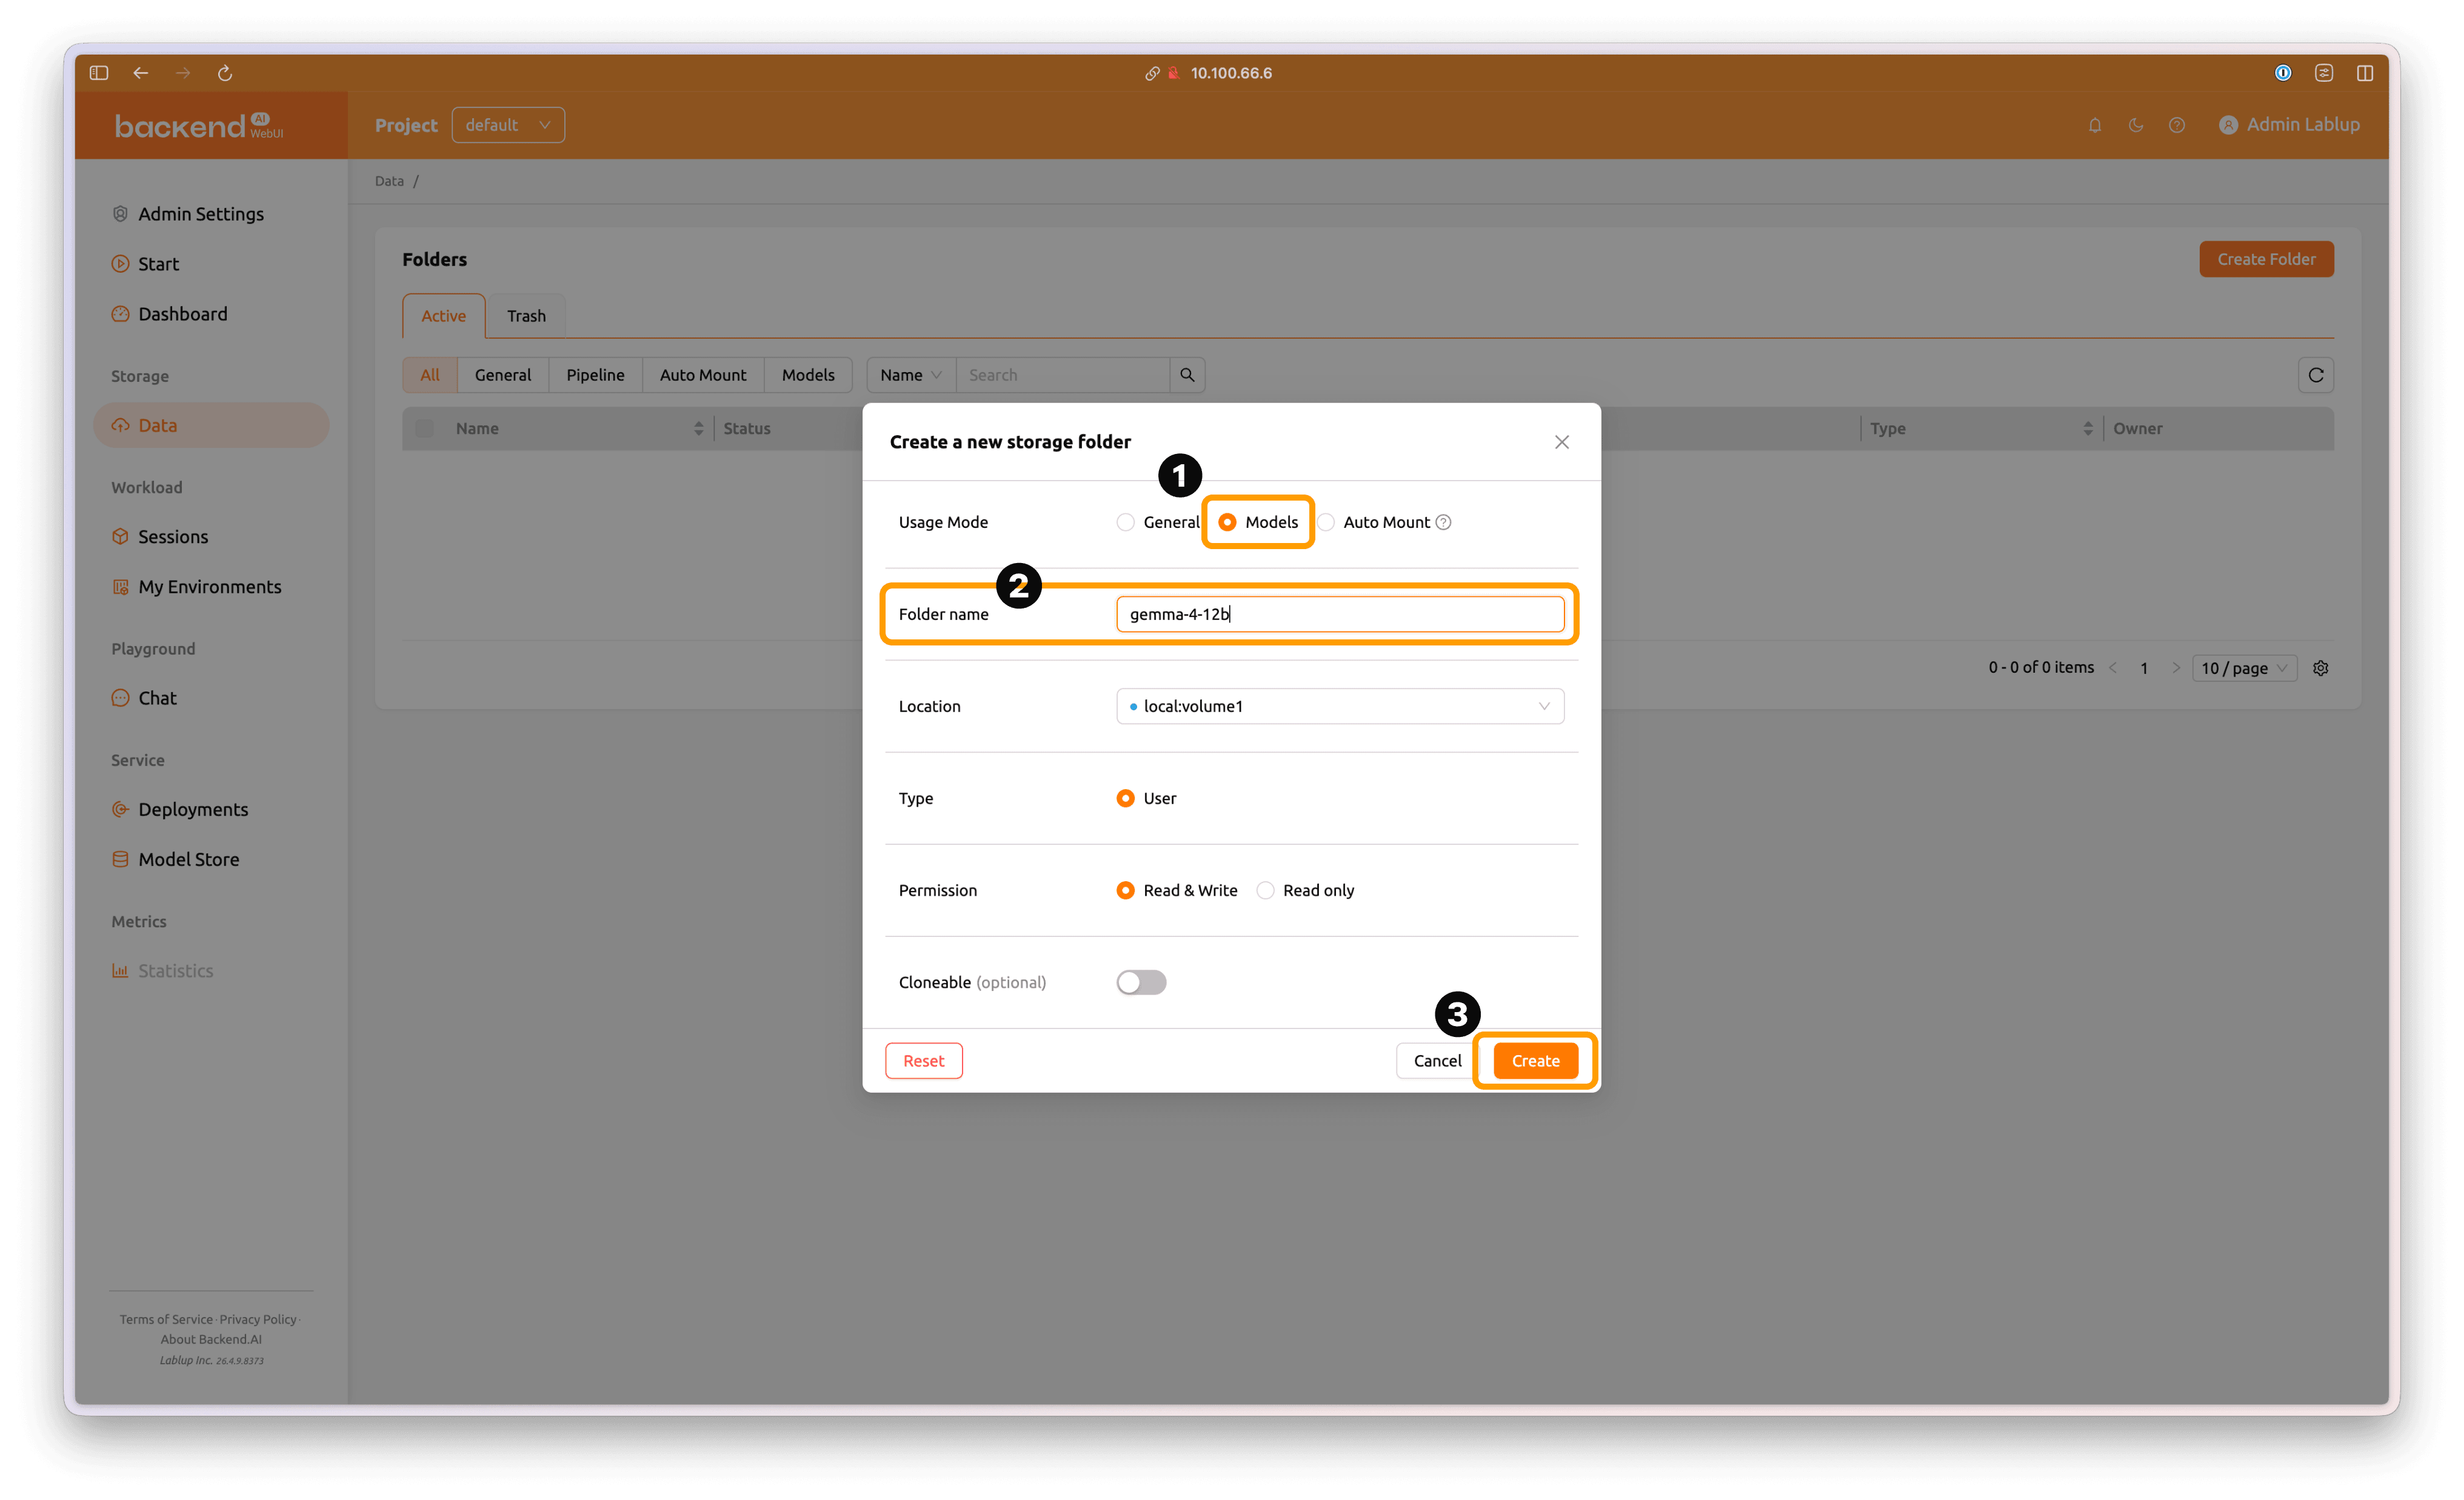
Select Model as the folder type, then enter an appropriate folder name. Click Create to create the model folder.
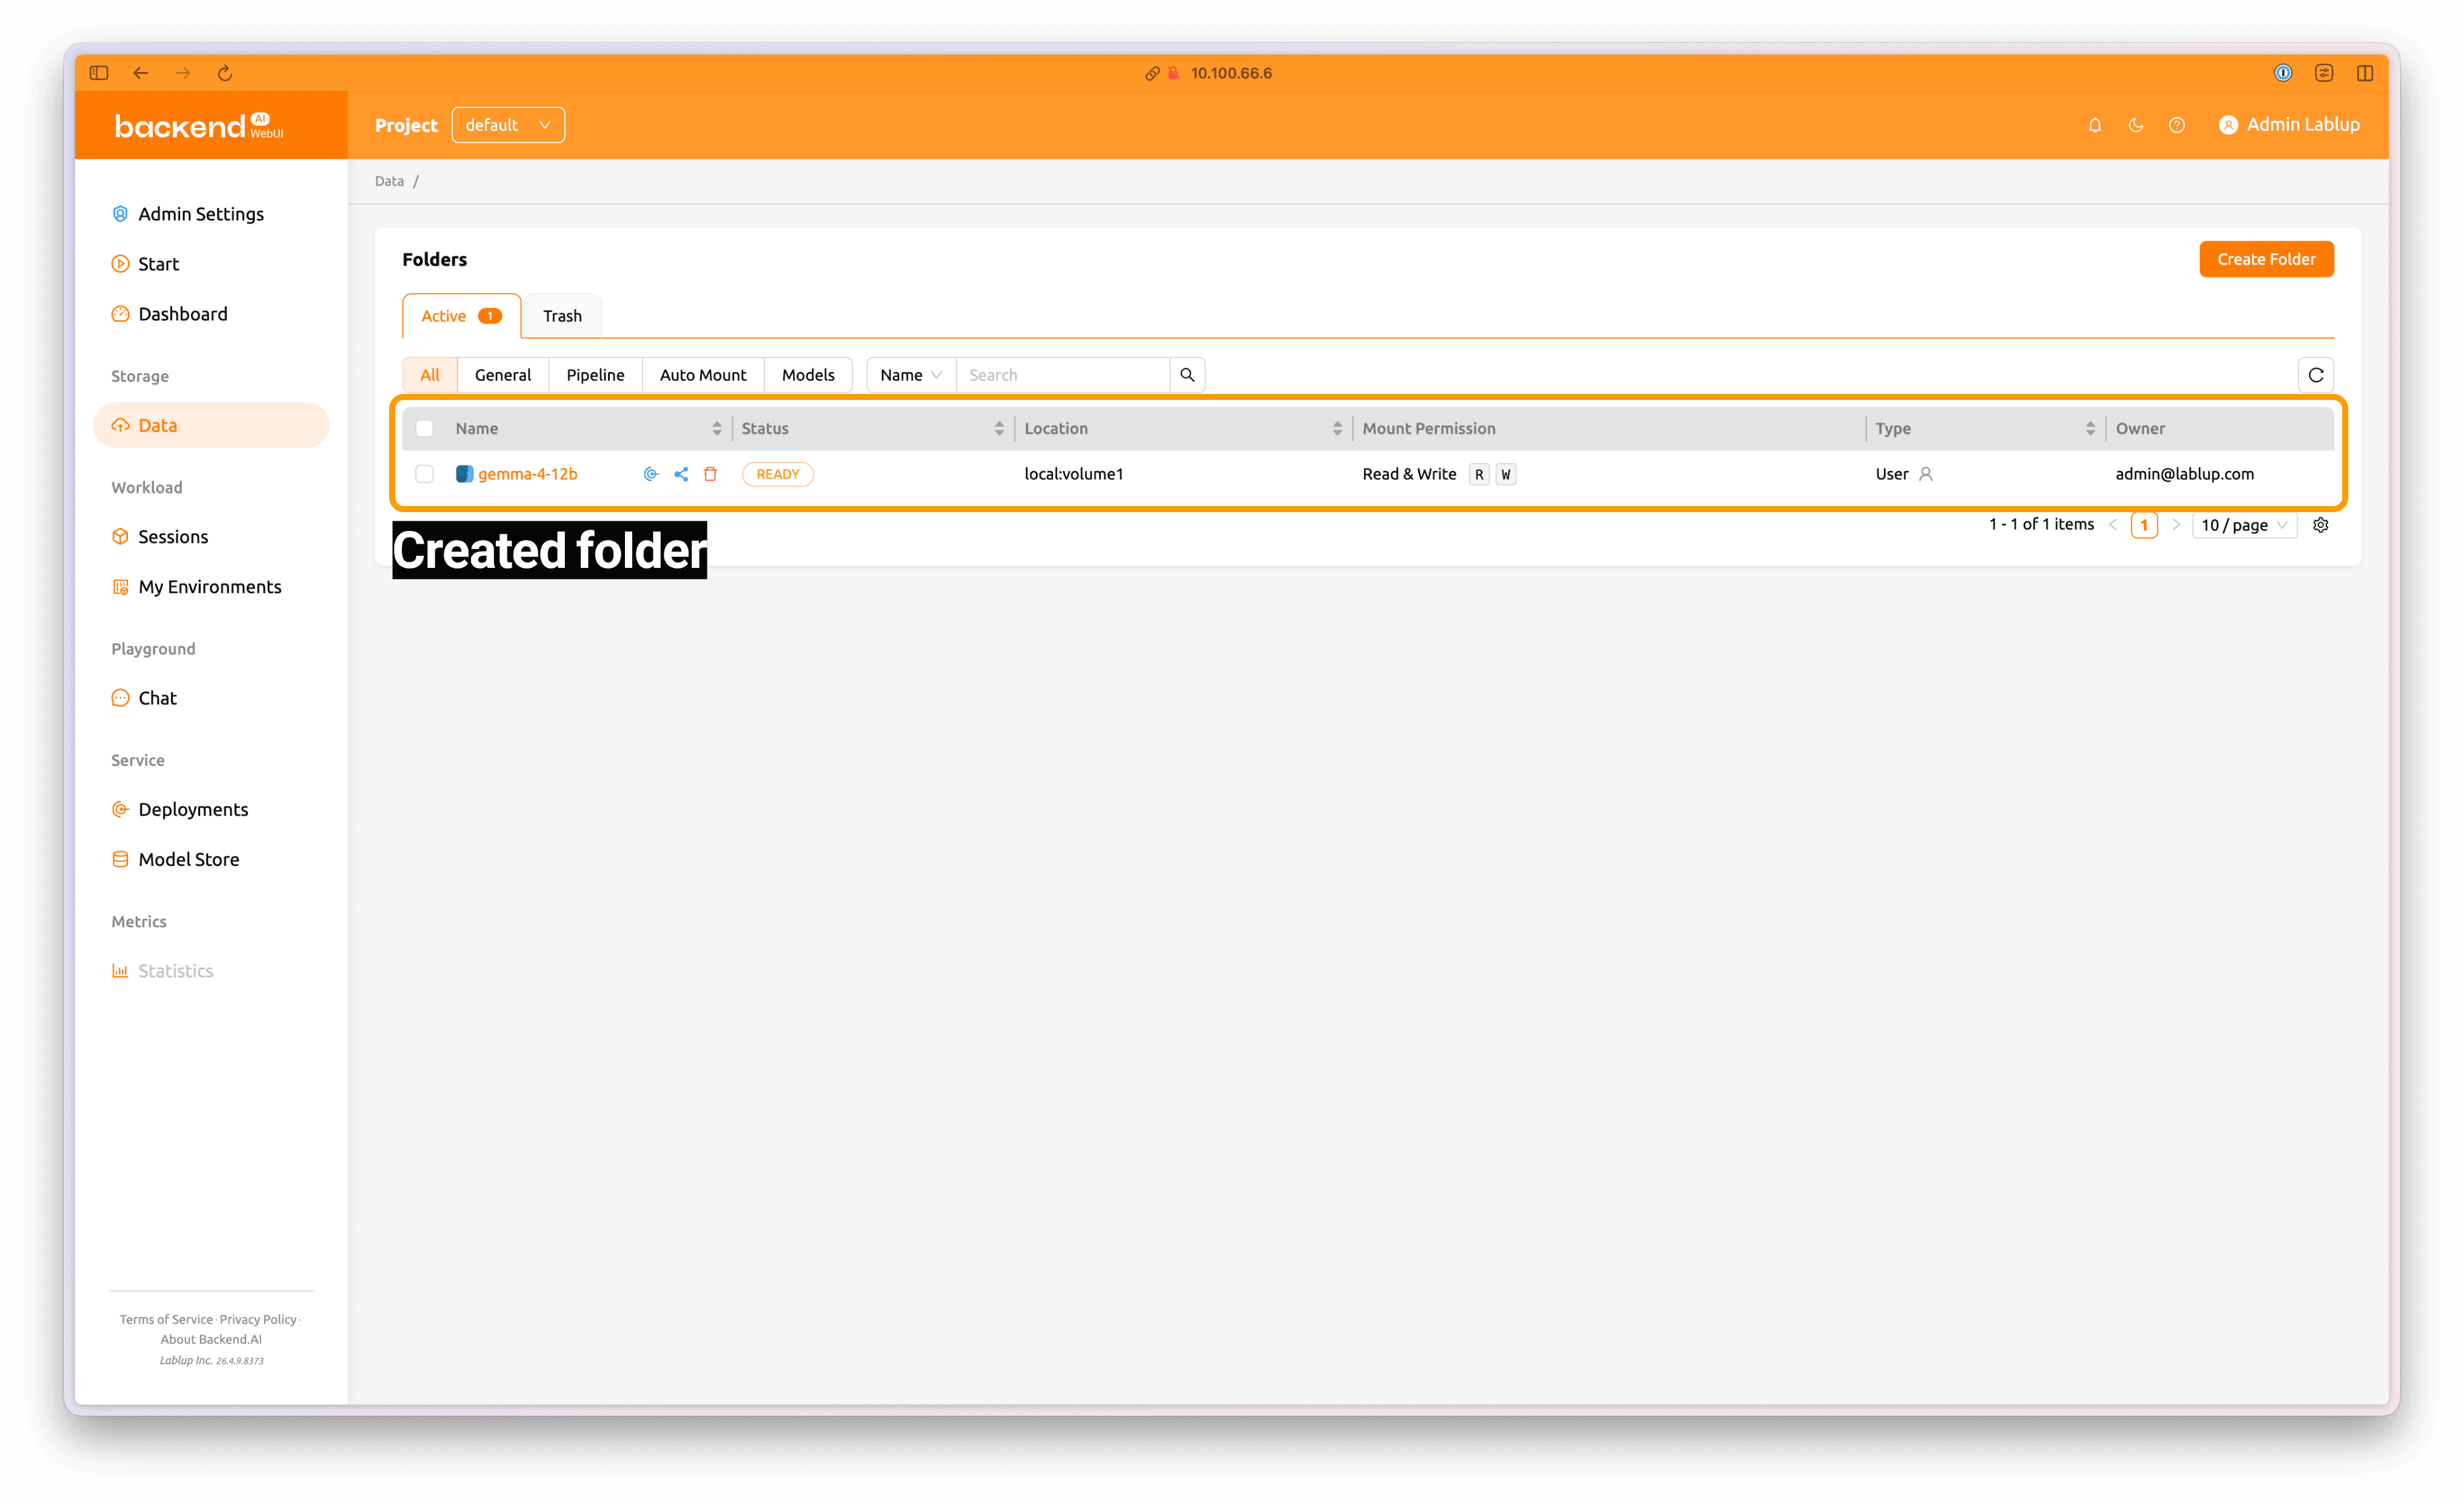
The folder has been created.
4.2 Create a Backend.AI Session
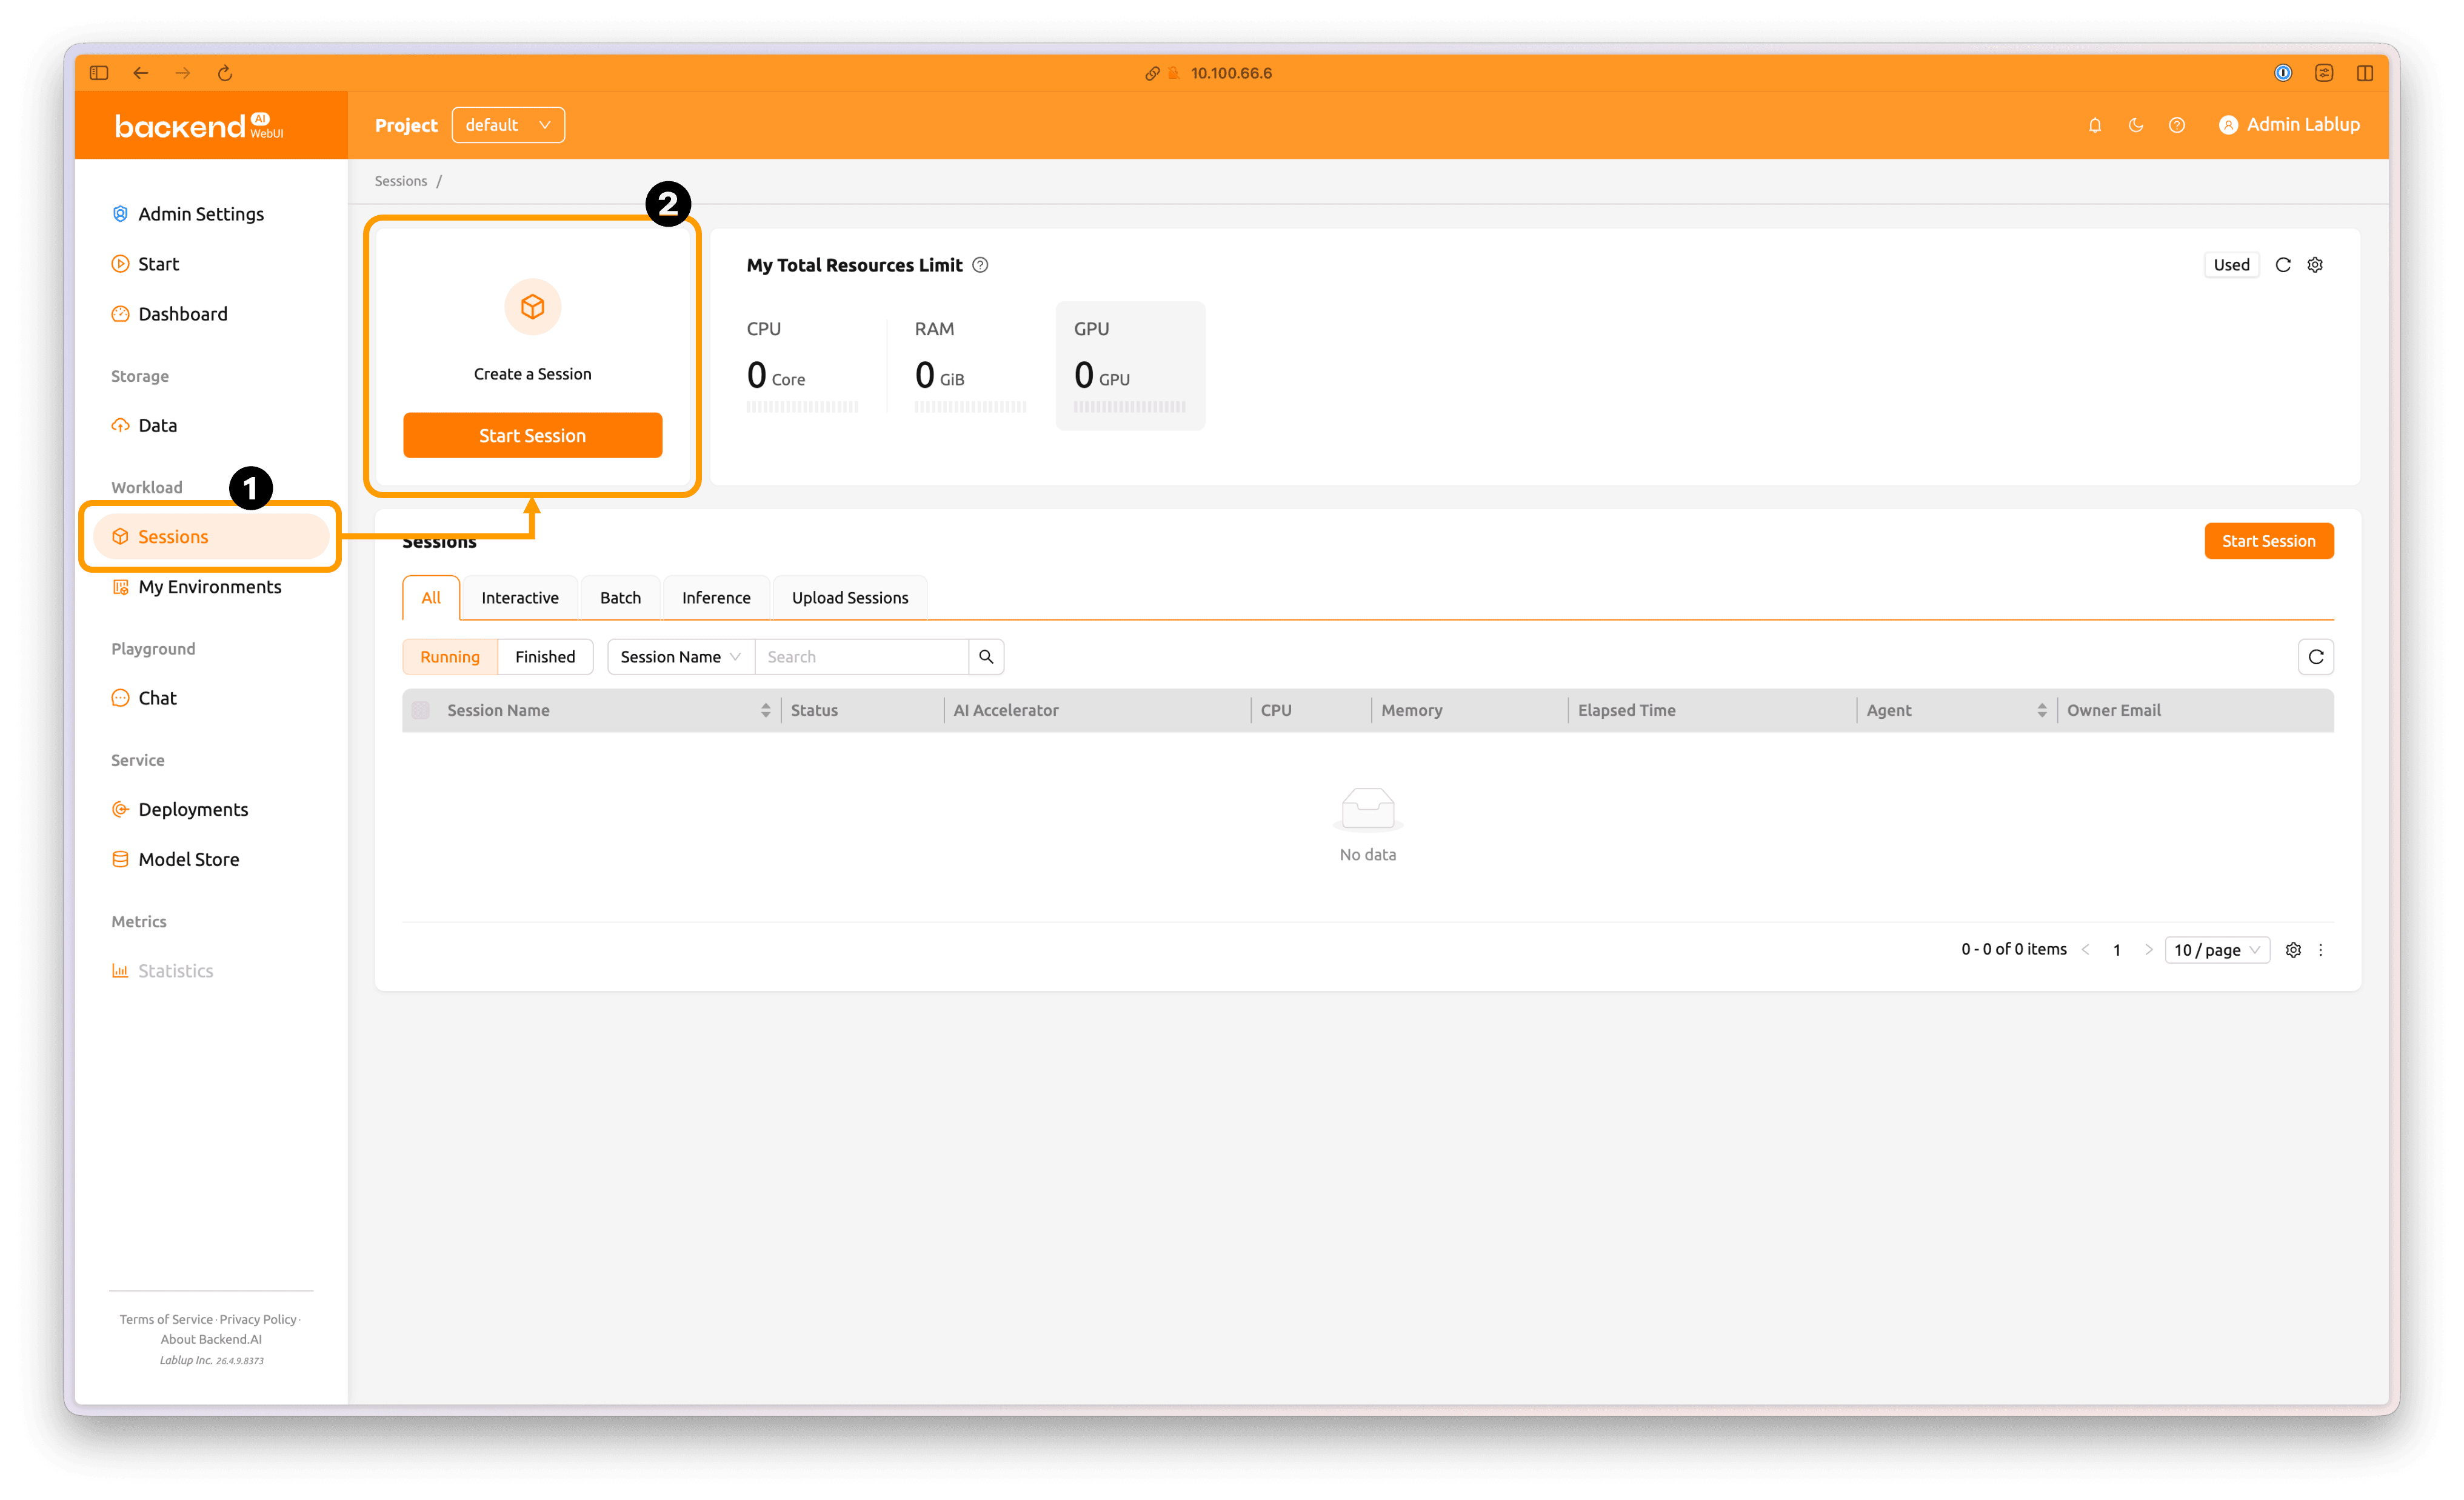
Click the Session tab in the menu to open the session page. Then click Start Session at the top of the page to open the session creation flow.
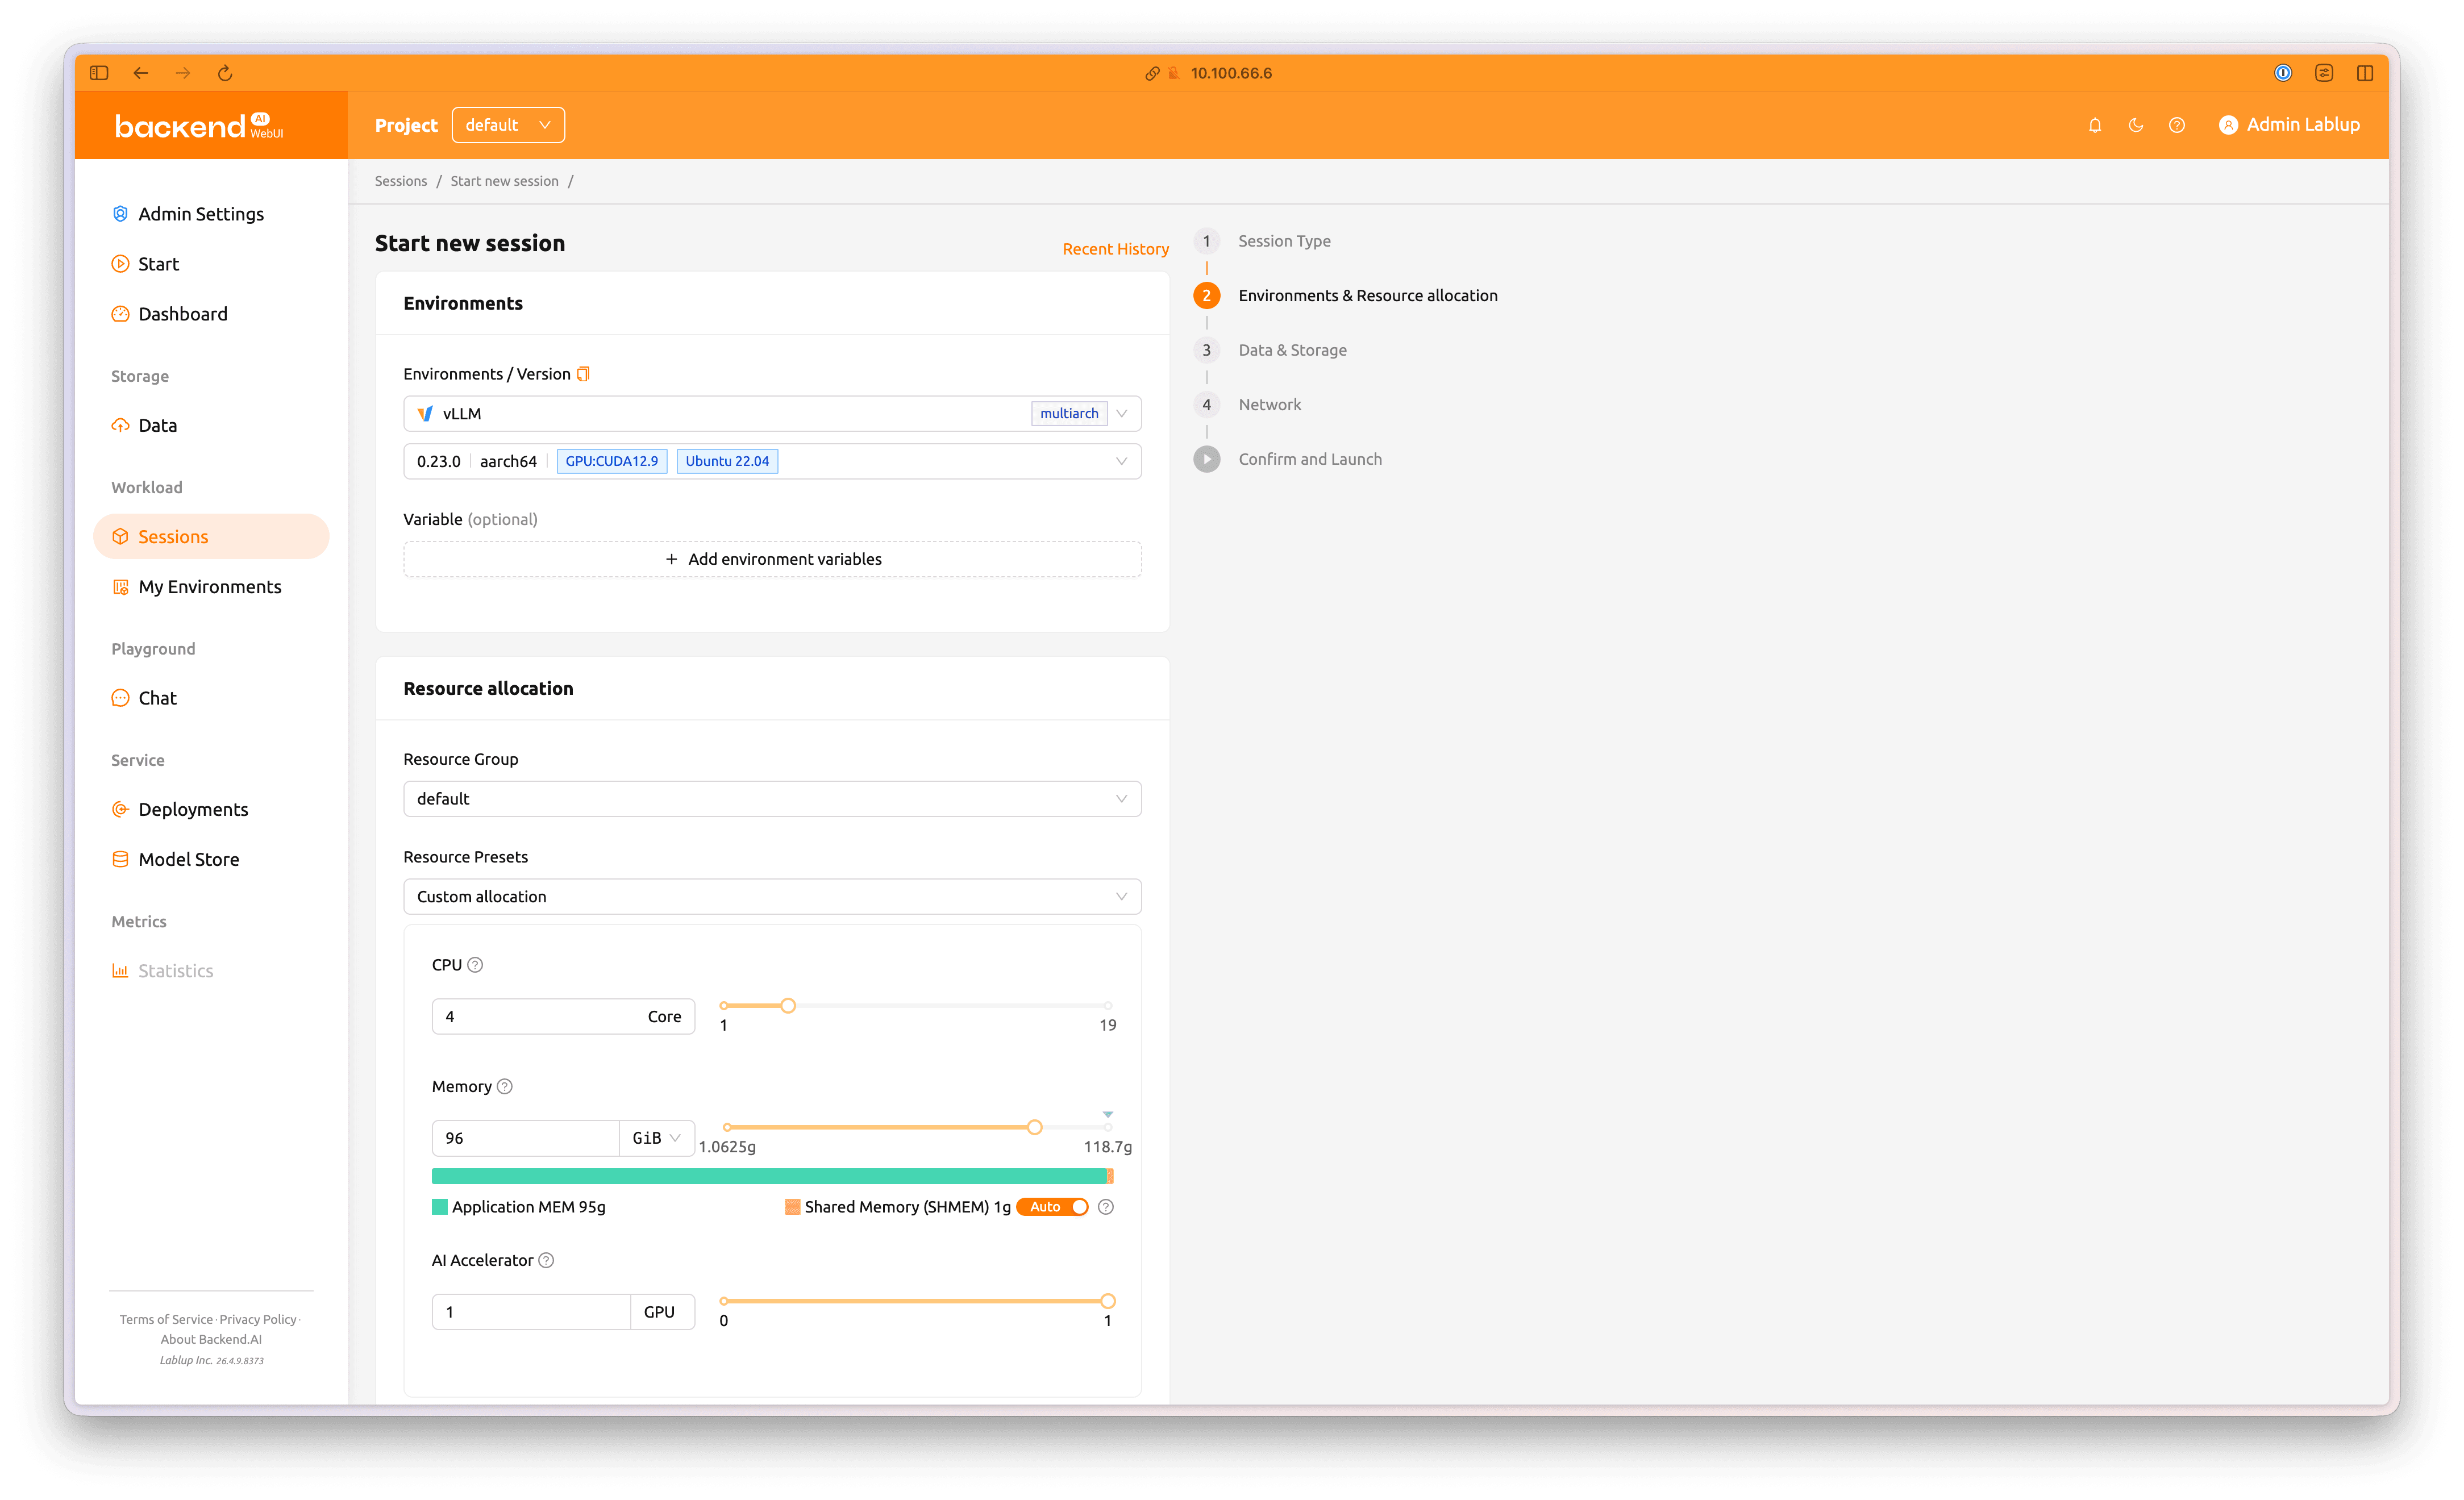
In step 2, Environments & Resource allocation, configure the session resources and image as follows:
- Environments / Versions:
vLLM, 0.23.0 | aarch64 | CUDA 12.9 | Ubuntu 22.04 - Resource Group:
default - Resource Preset:
Custom allocation - GPU:
4Core - Memory:
96GiB - AI Accelerator:
1GPU
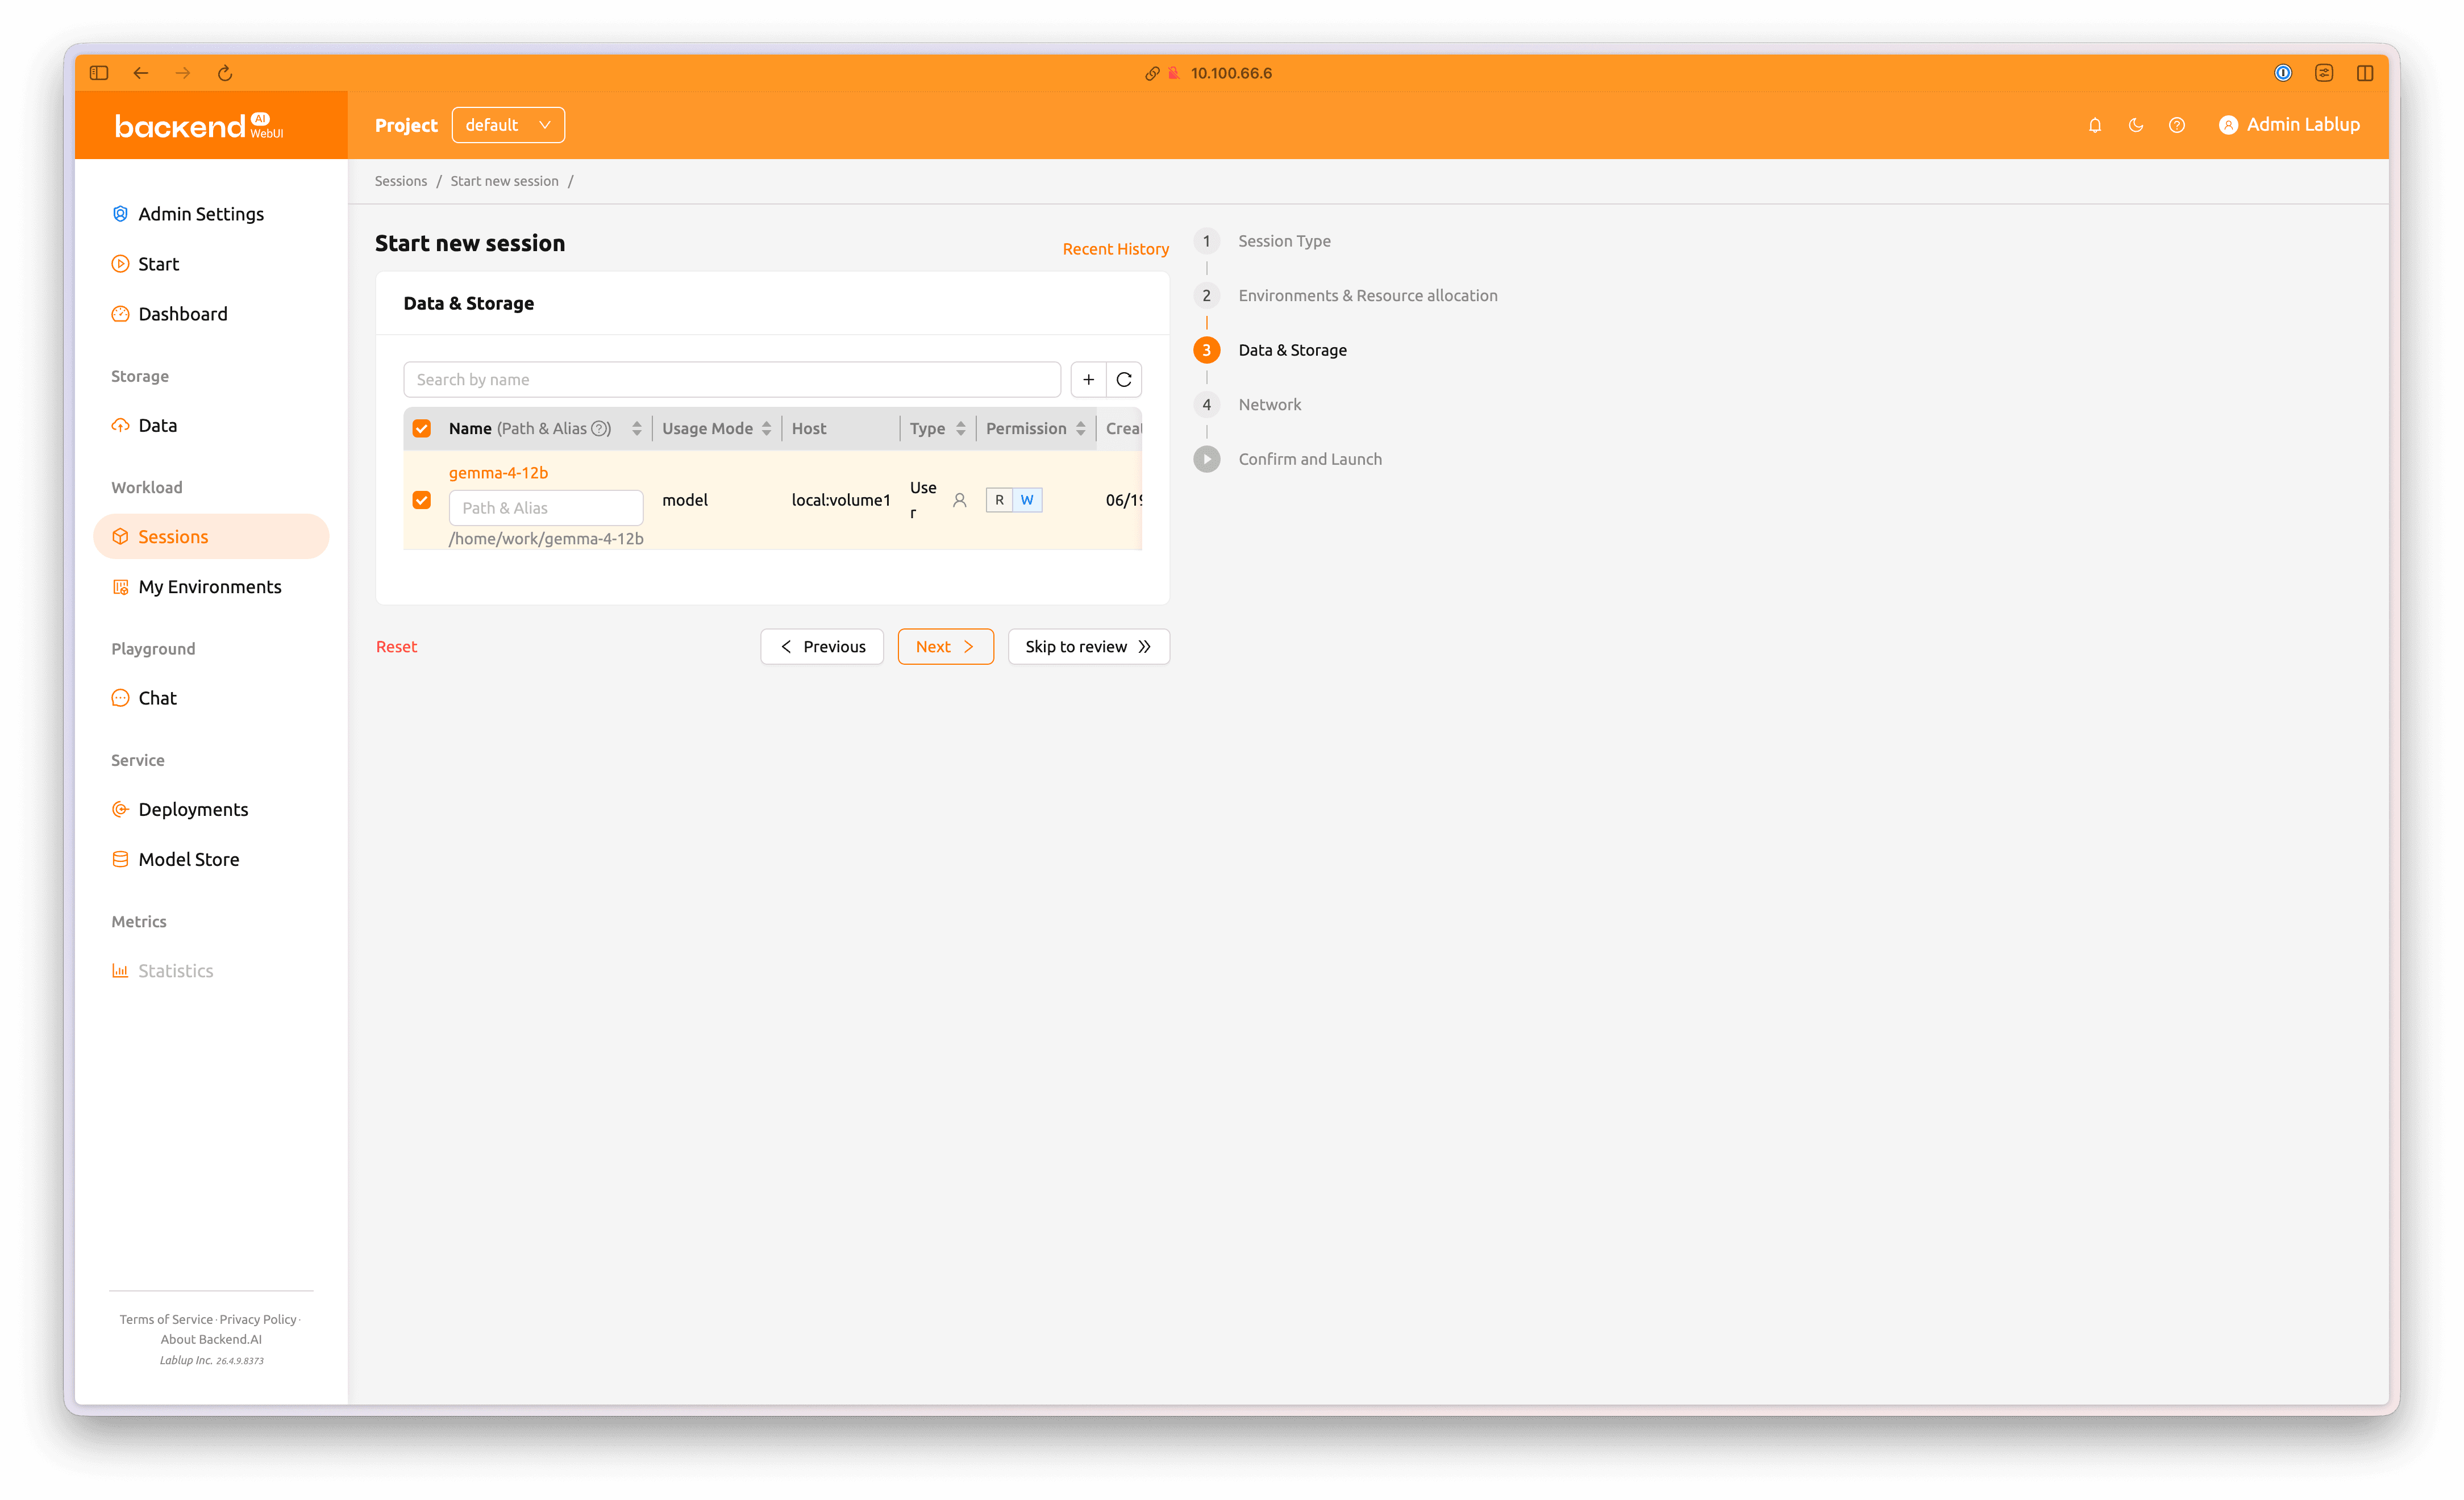
In step 3, Data & Storage, select the gemma-4-12b folder created earlier and mount it.
Then click Skip to review to proceed to the final step.

Finally, review all settings to make sure they are correct, then click Launch to start the session.
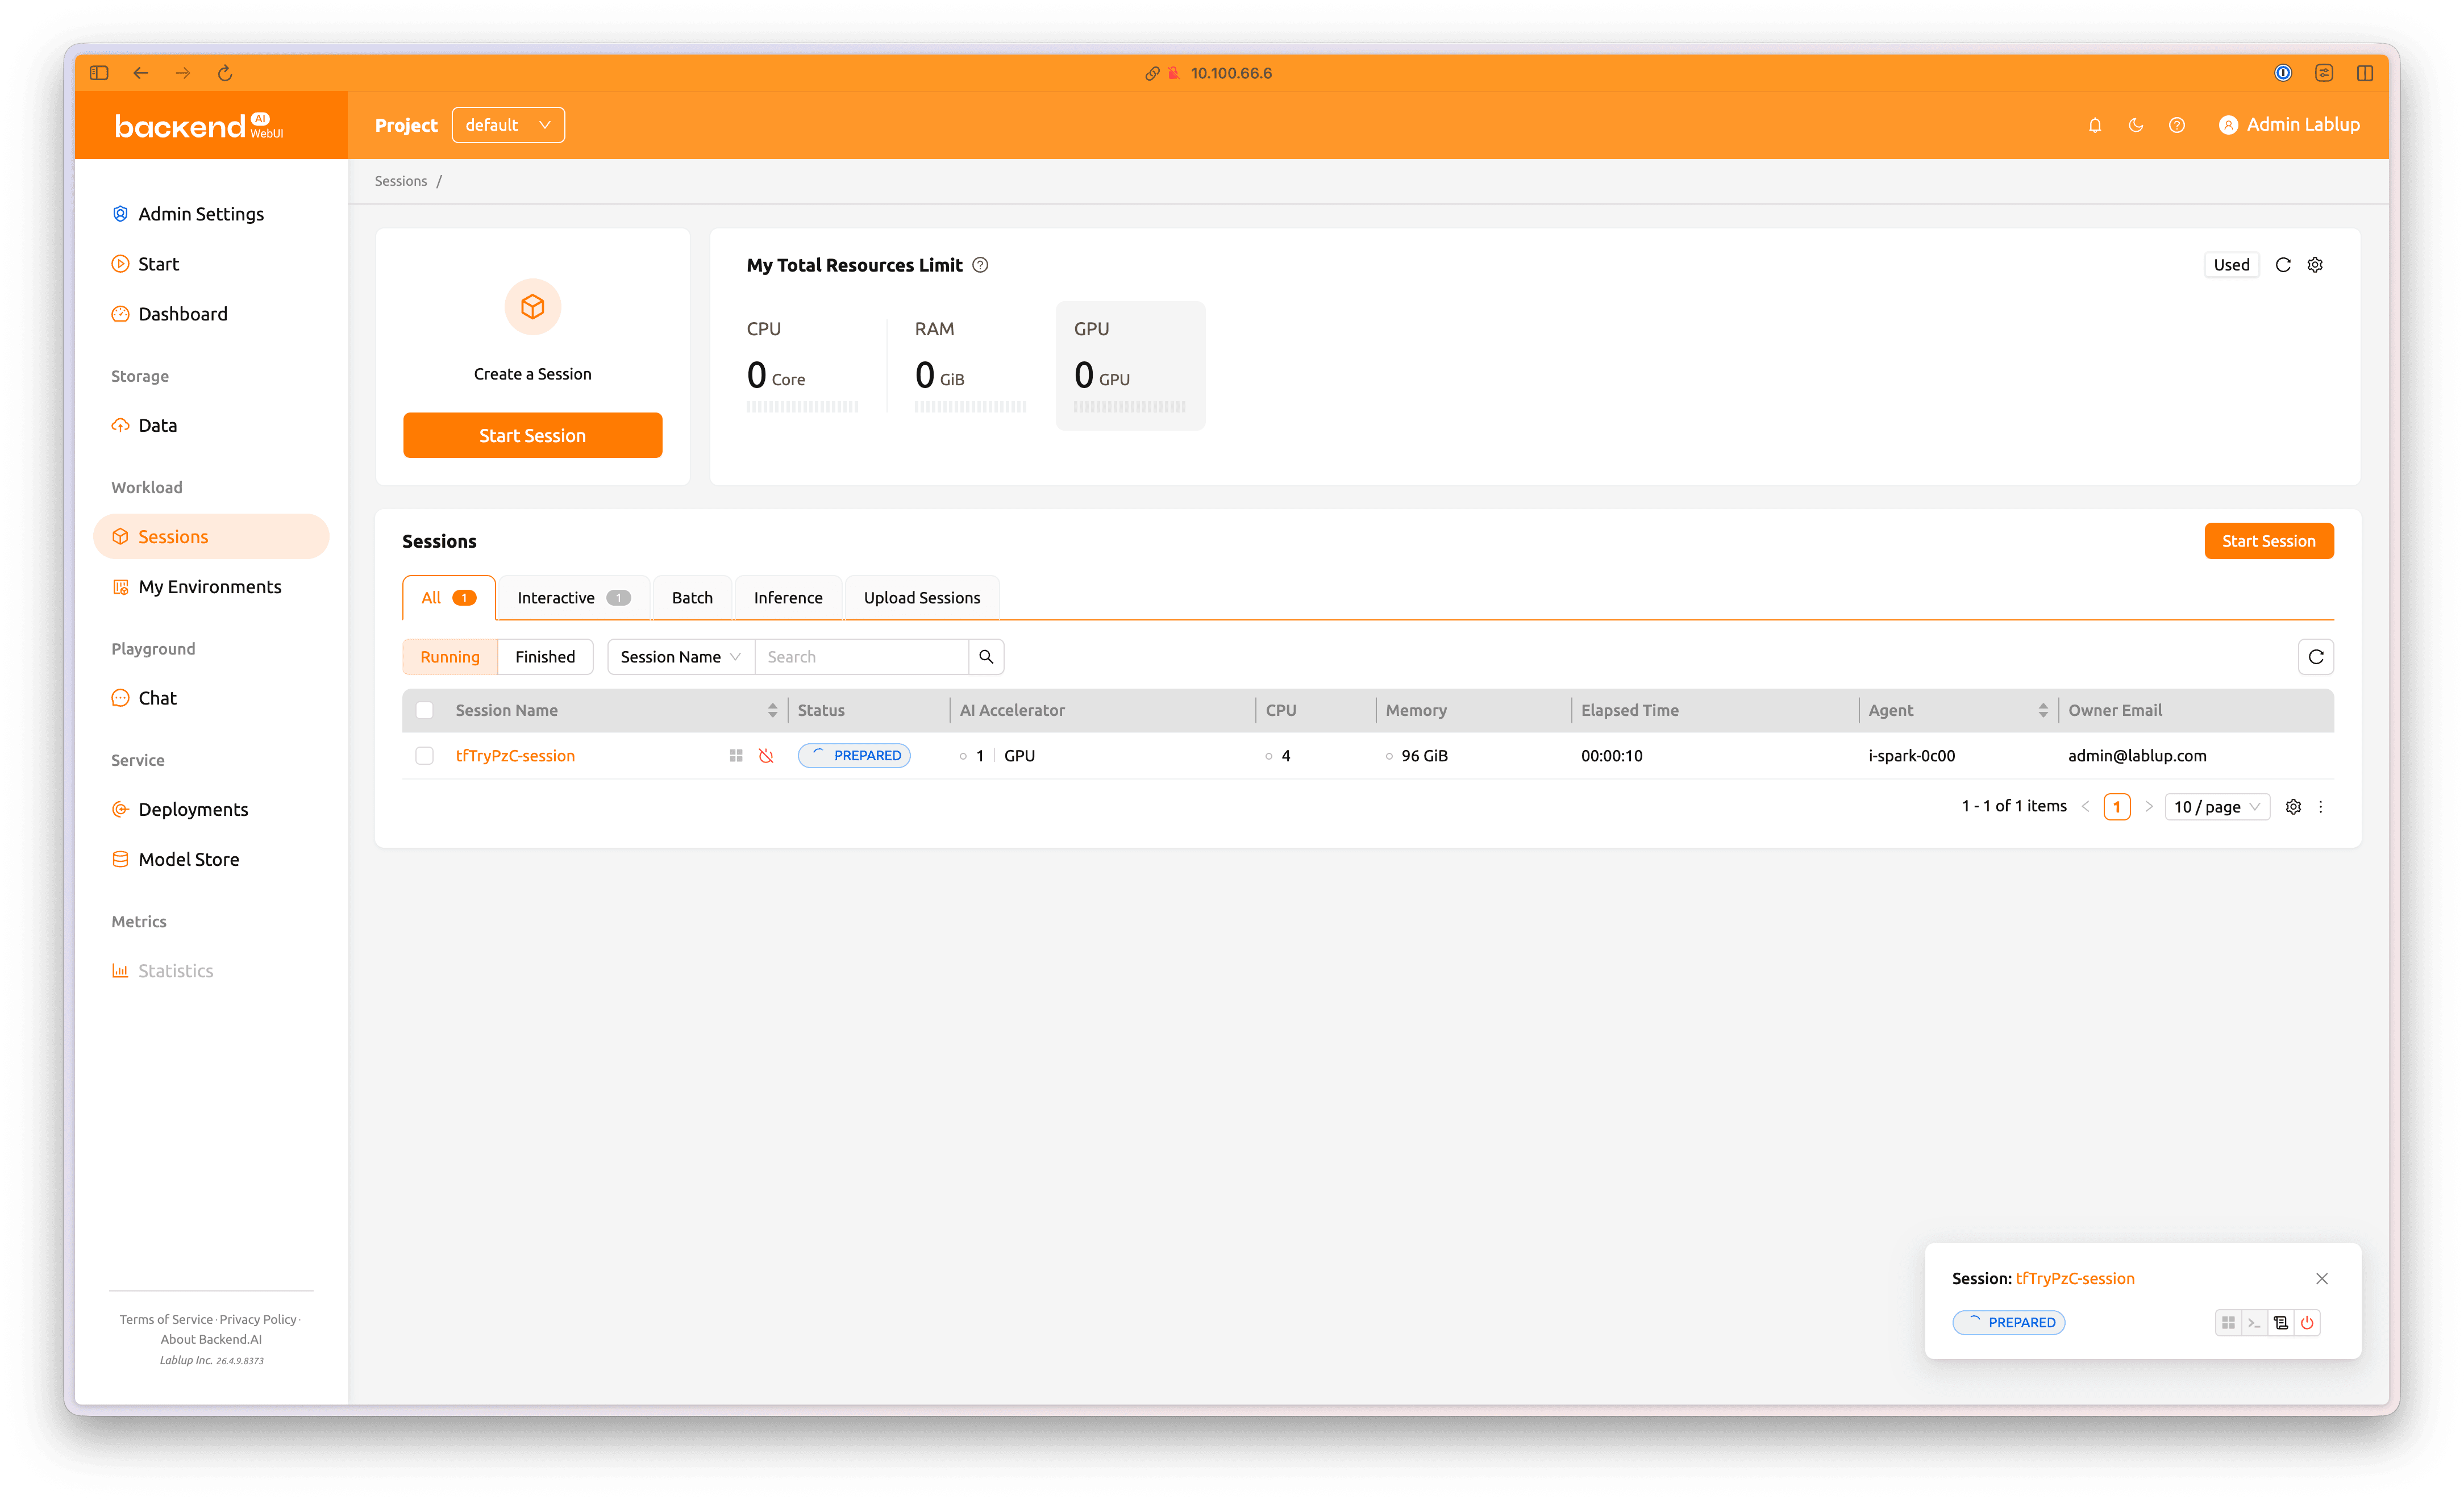
The session has been submitted and is waiting to start. When the session is queued, its status appears as PREPARED, and the loading spinner is shown.
Click the session name to view more detailed information.
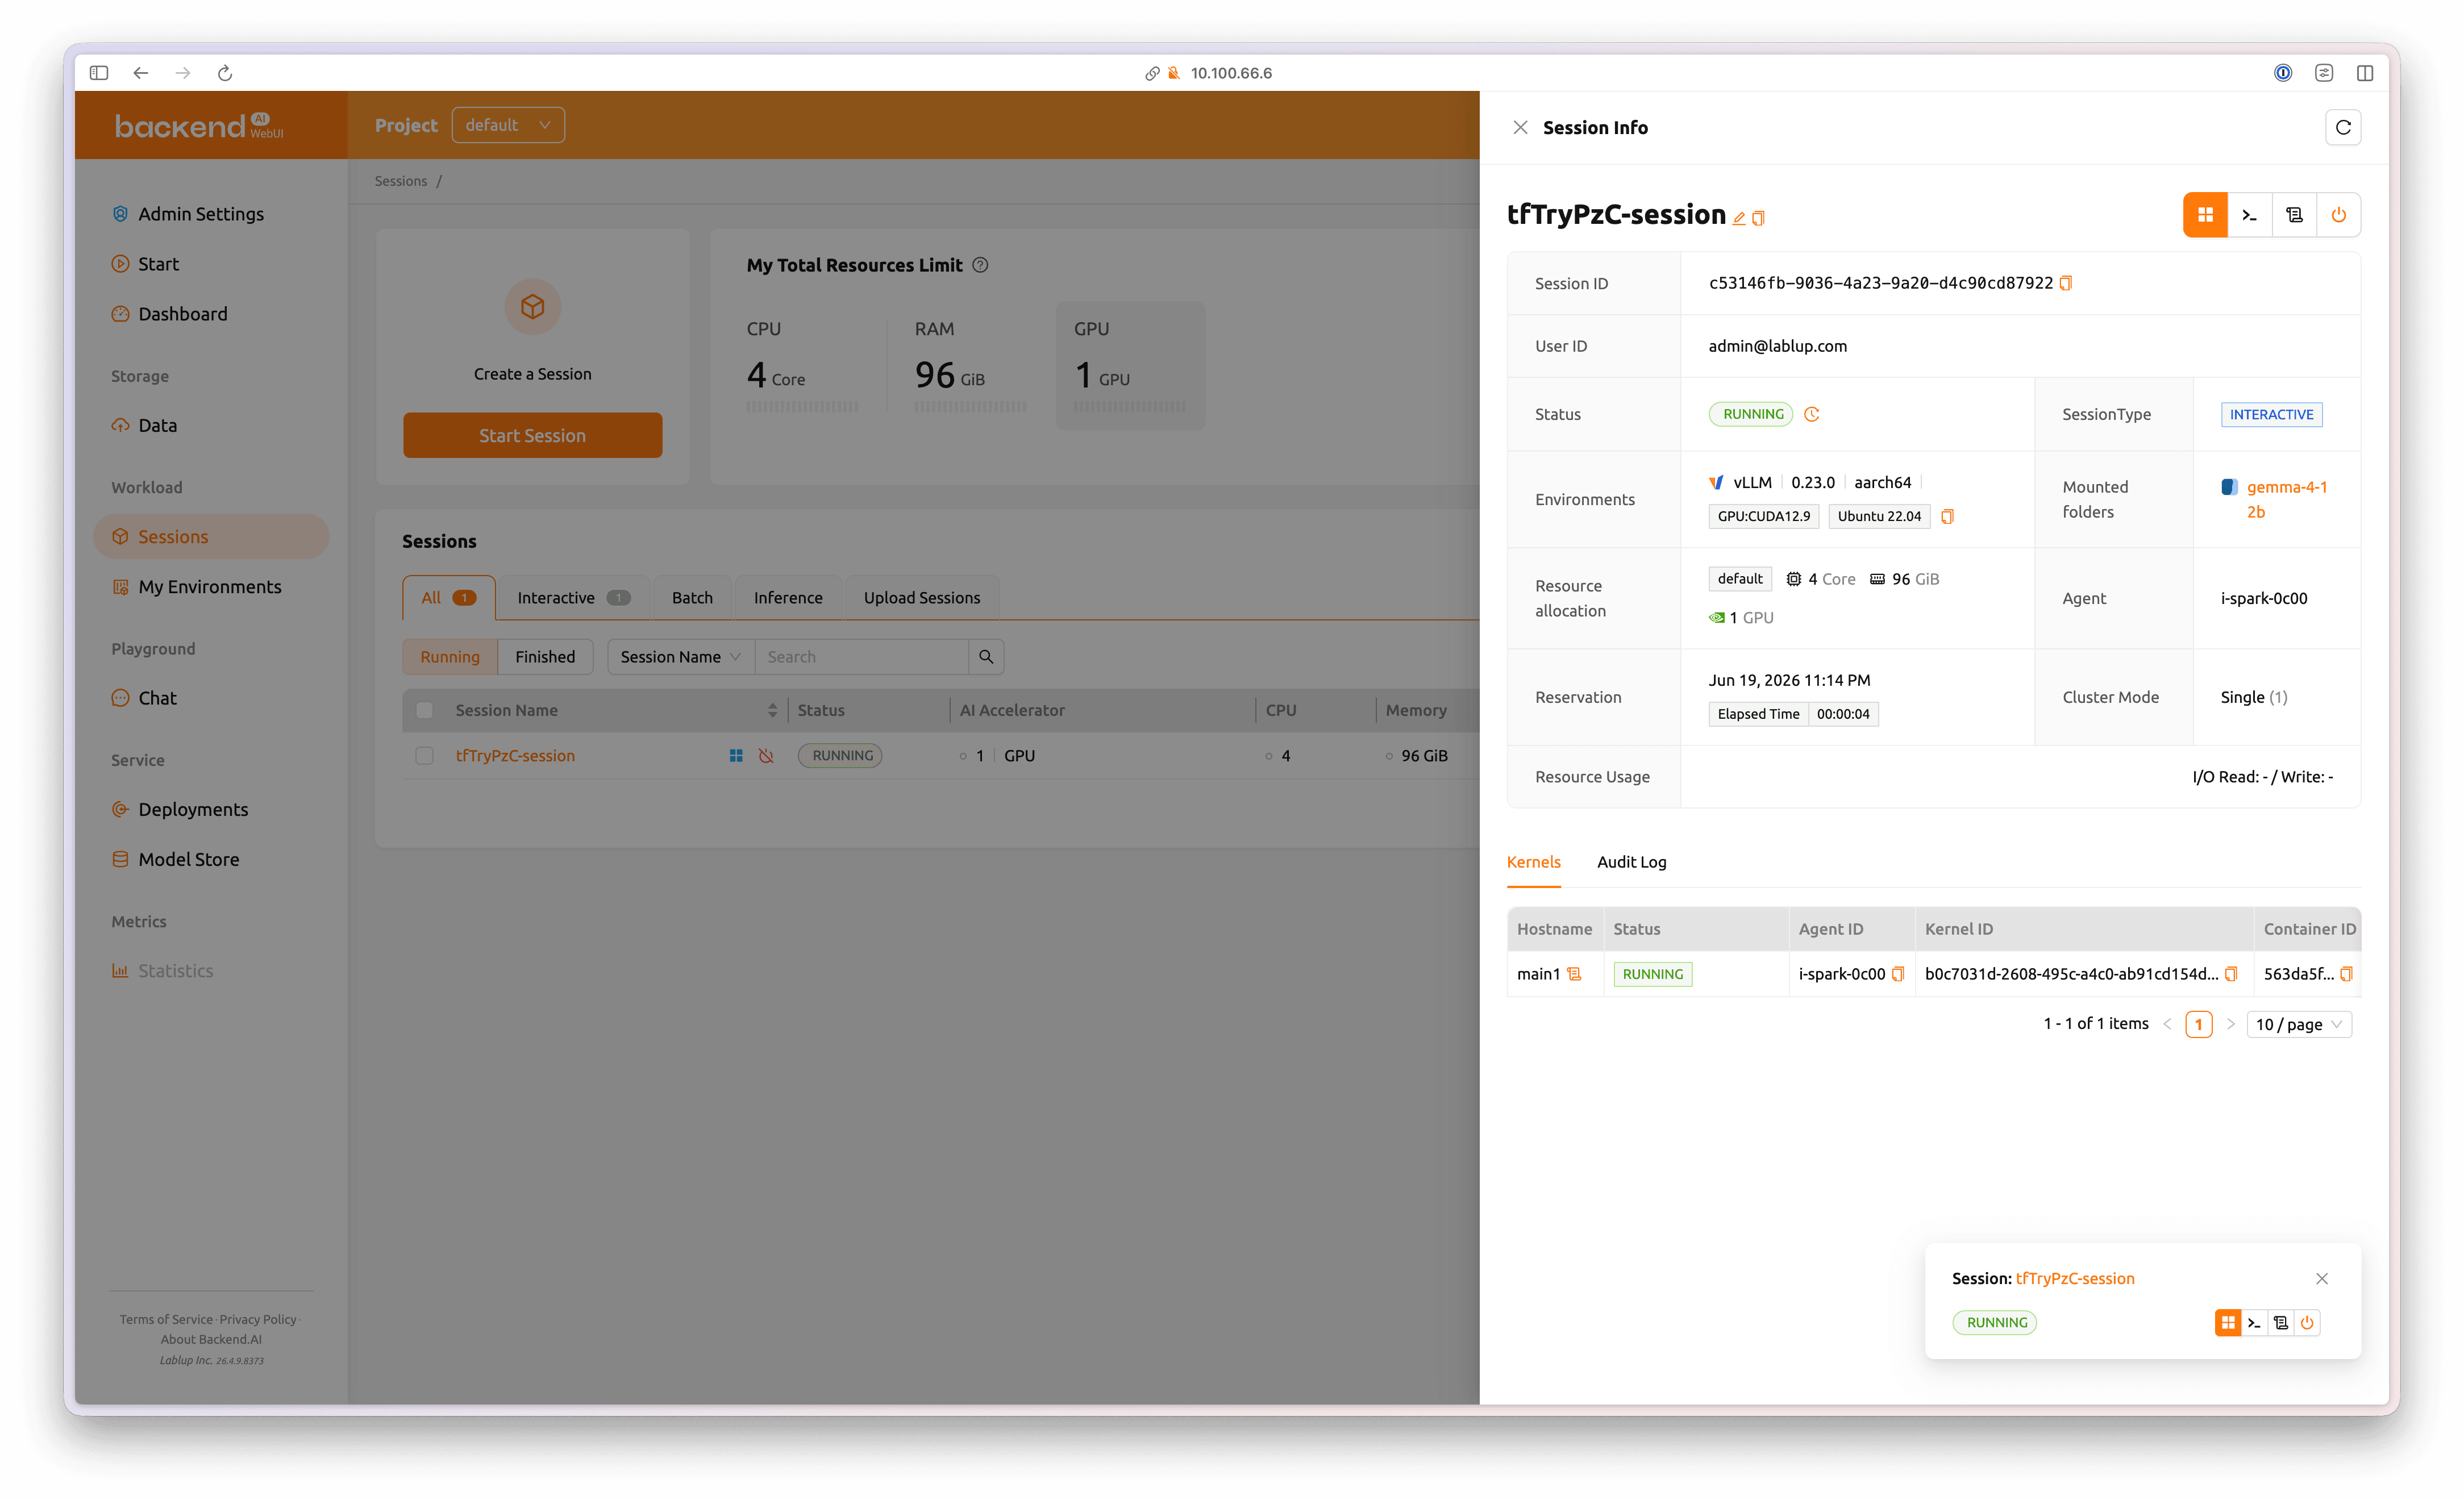
Once the session starts, its status changes to RUNNING.
4.3 Run vLLM
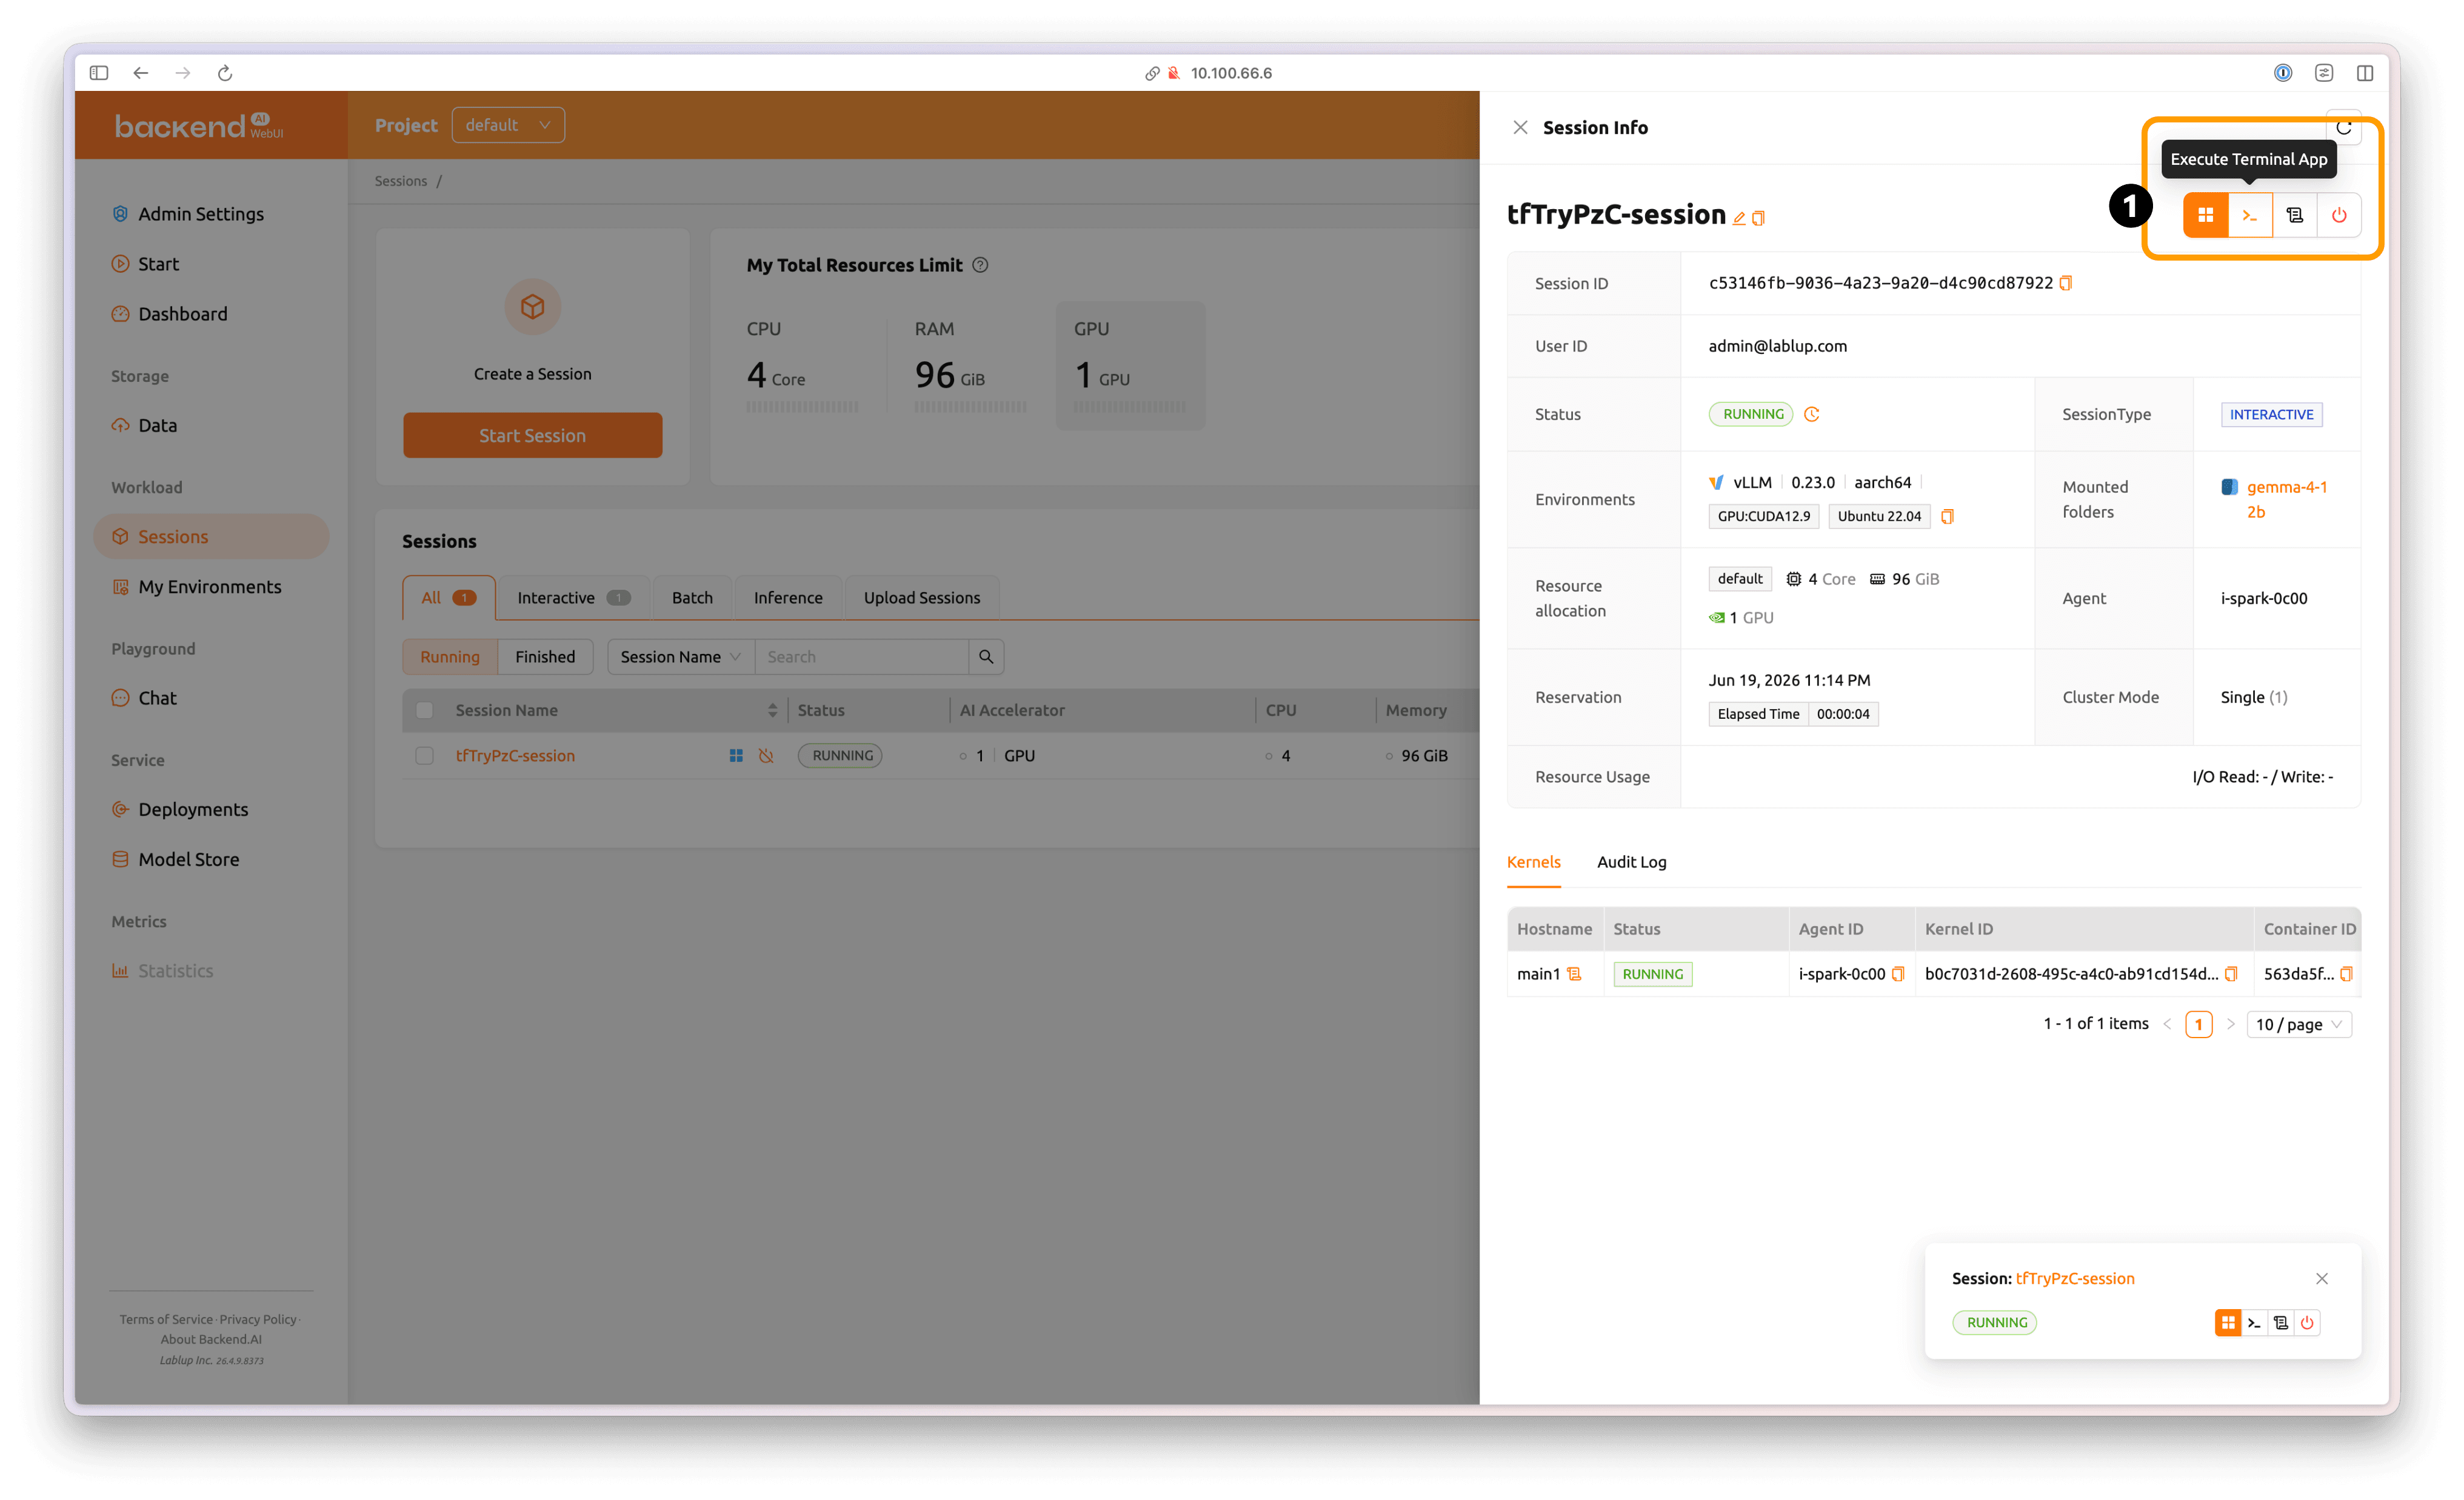
Click the Execute Terminal App button at the top-right of the session detail tab to enter the Linux shell inside the container environment.
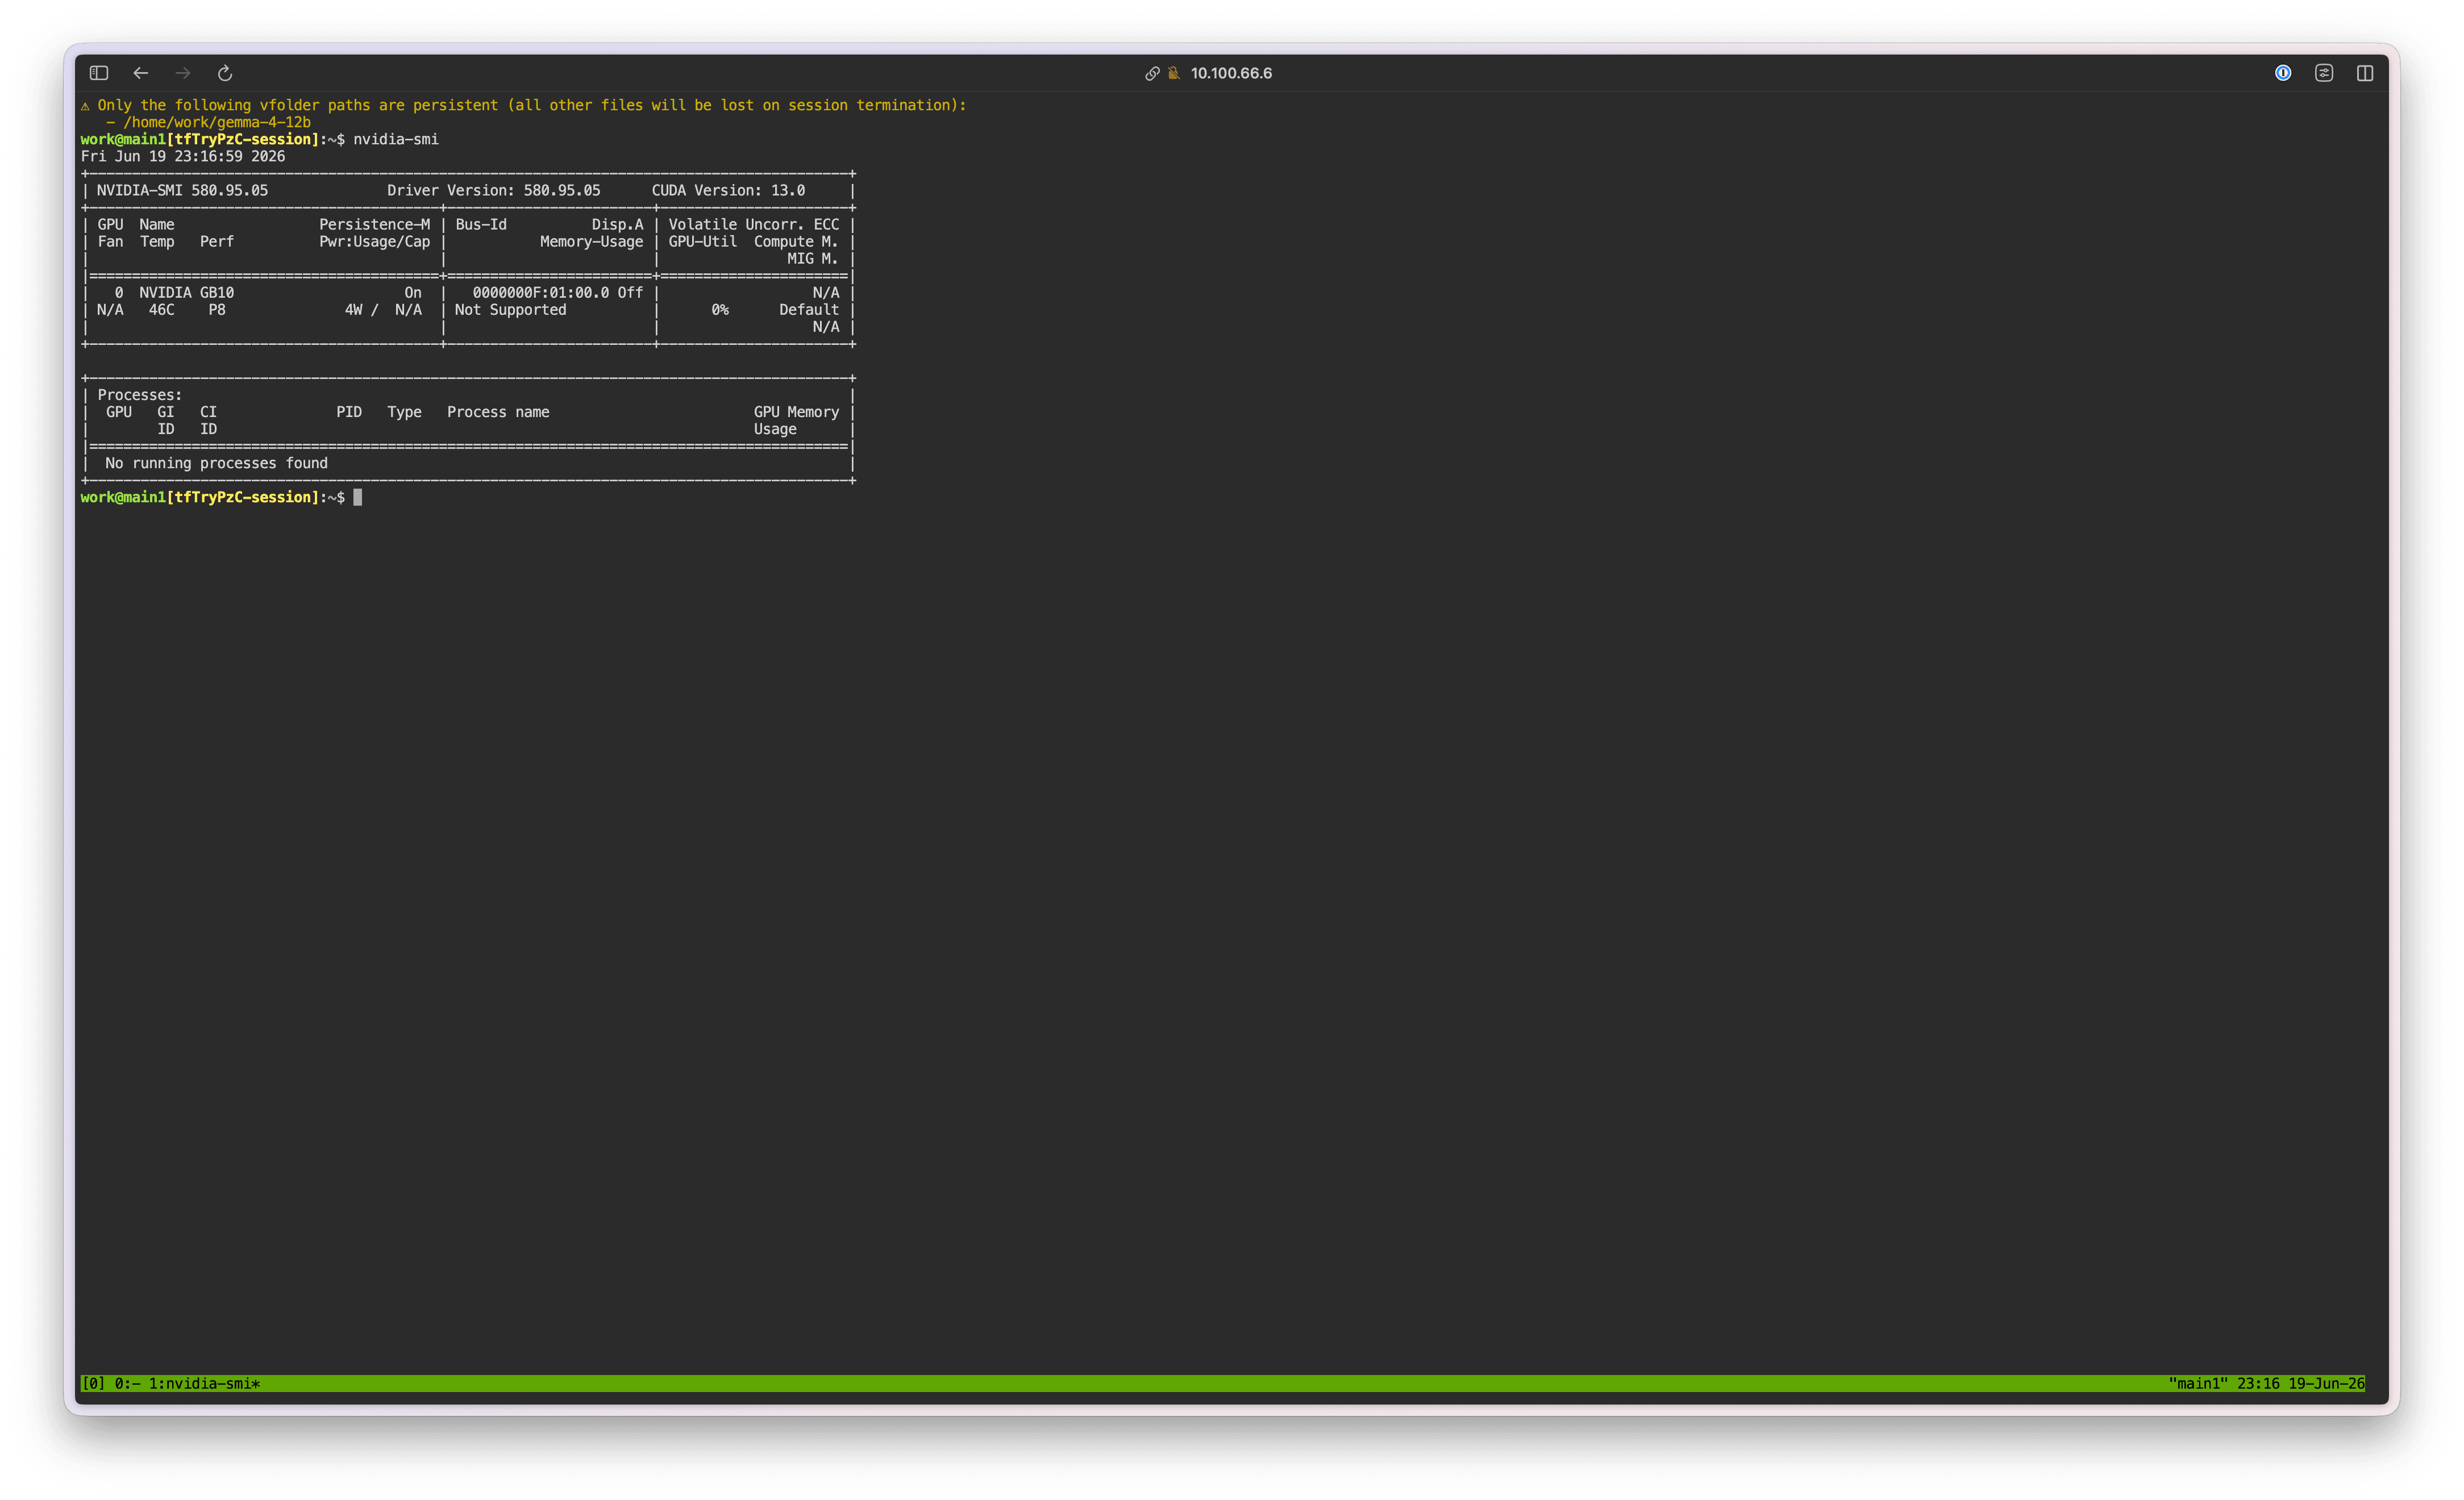
First, run nvidia-smi to confirm that the GPU is correctly recognized.
nvidia-smi
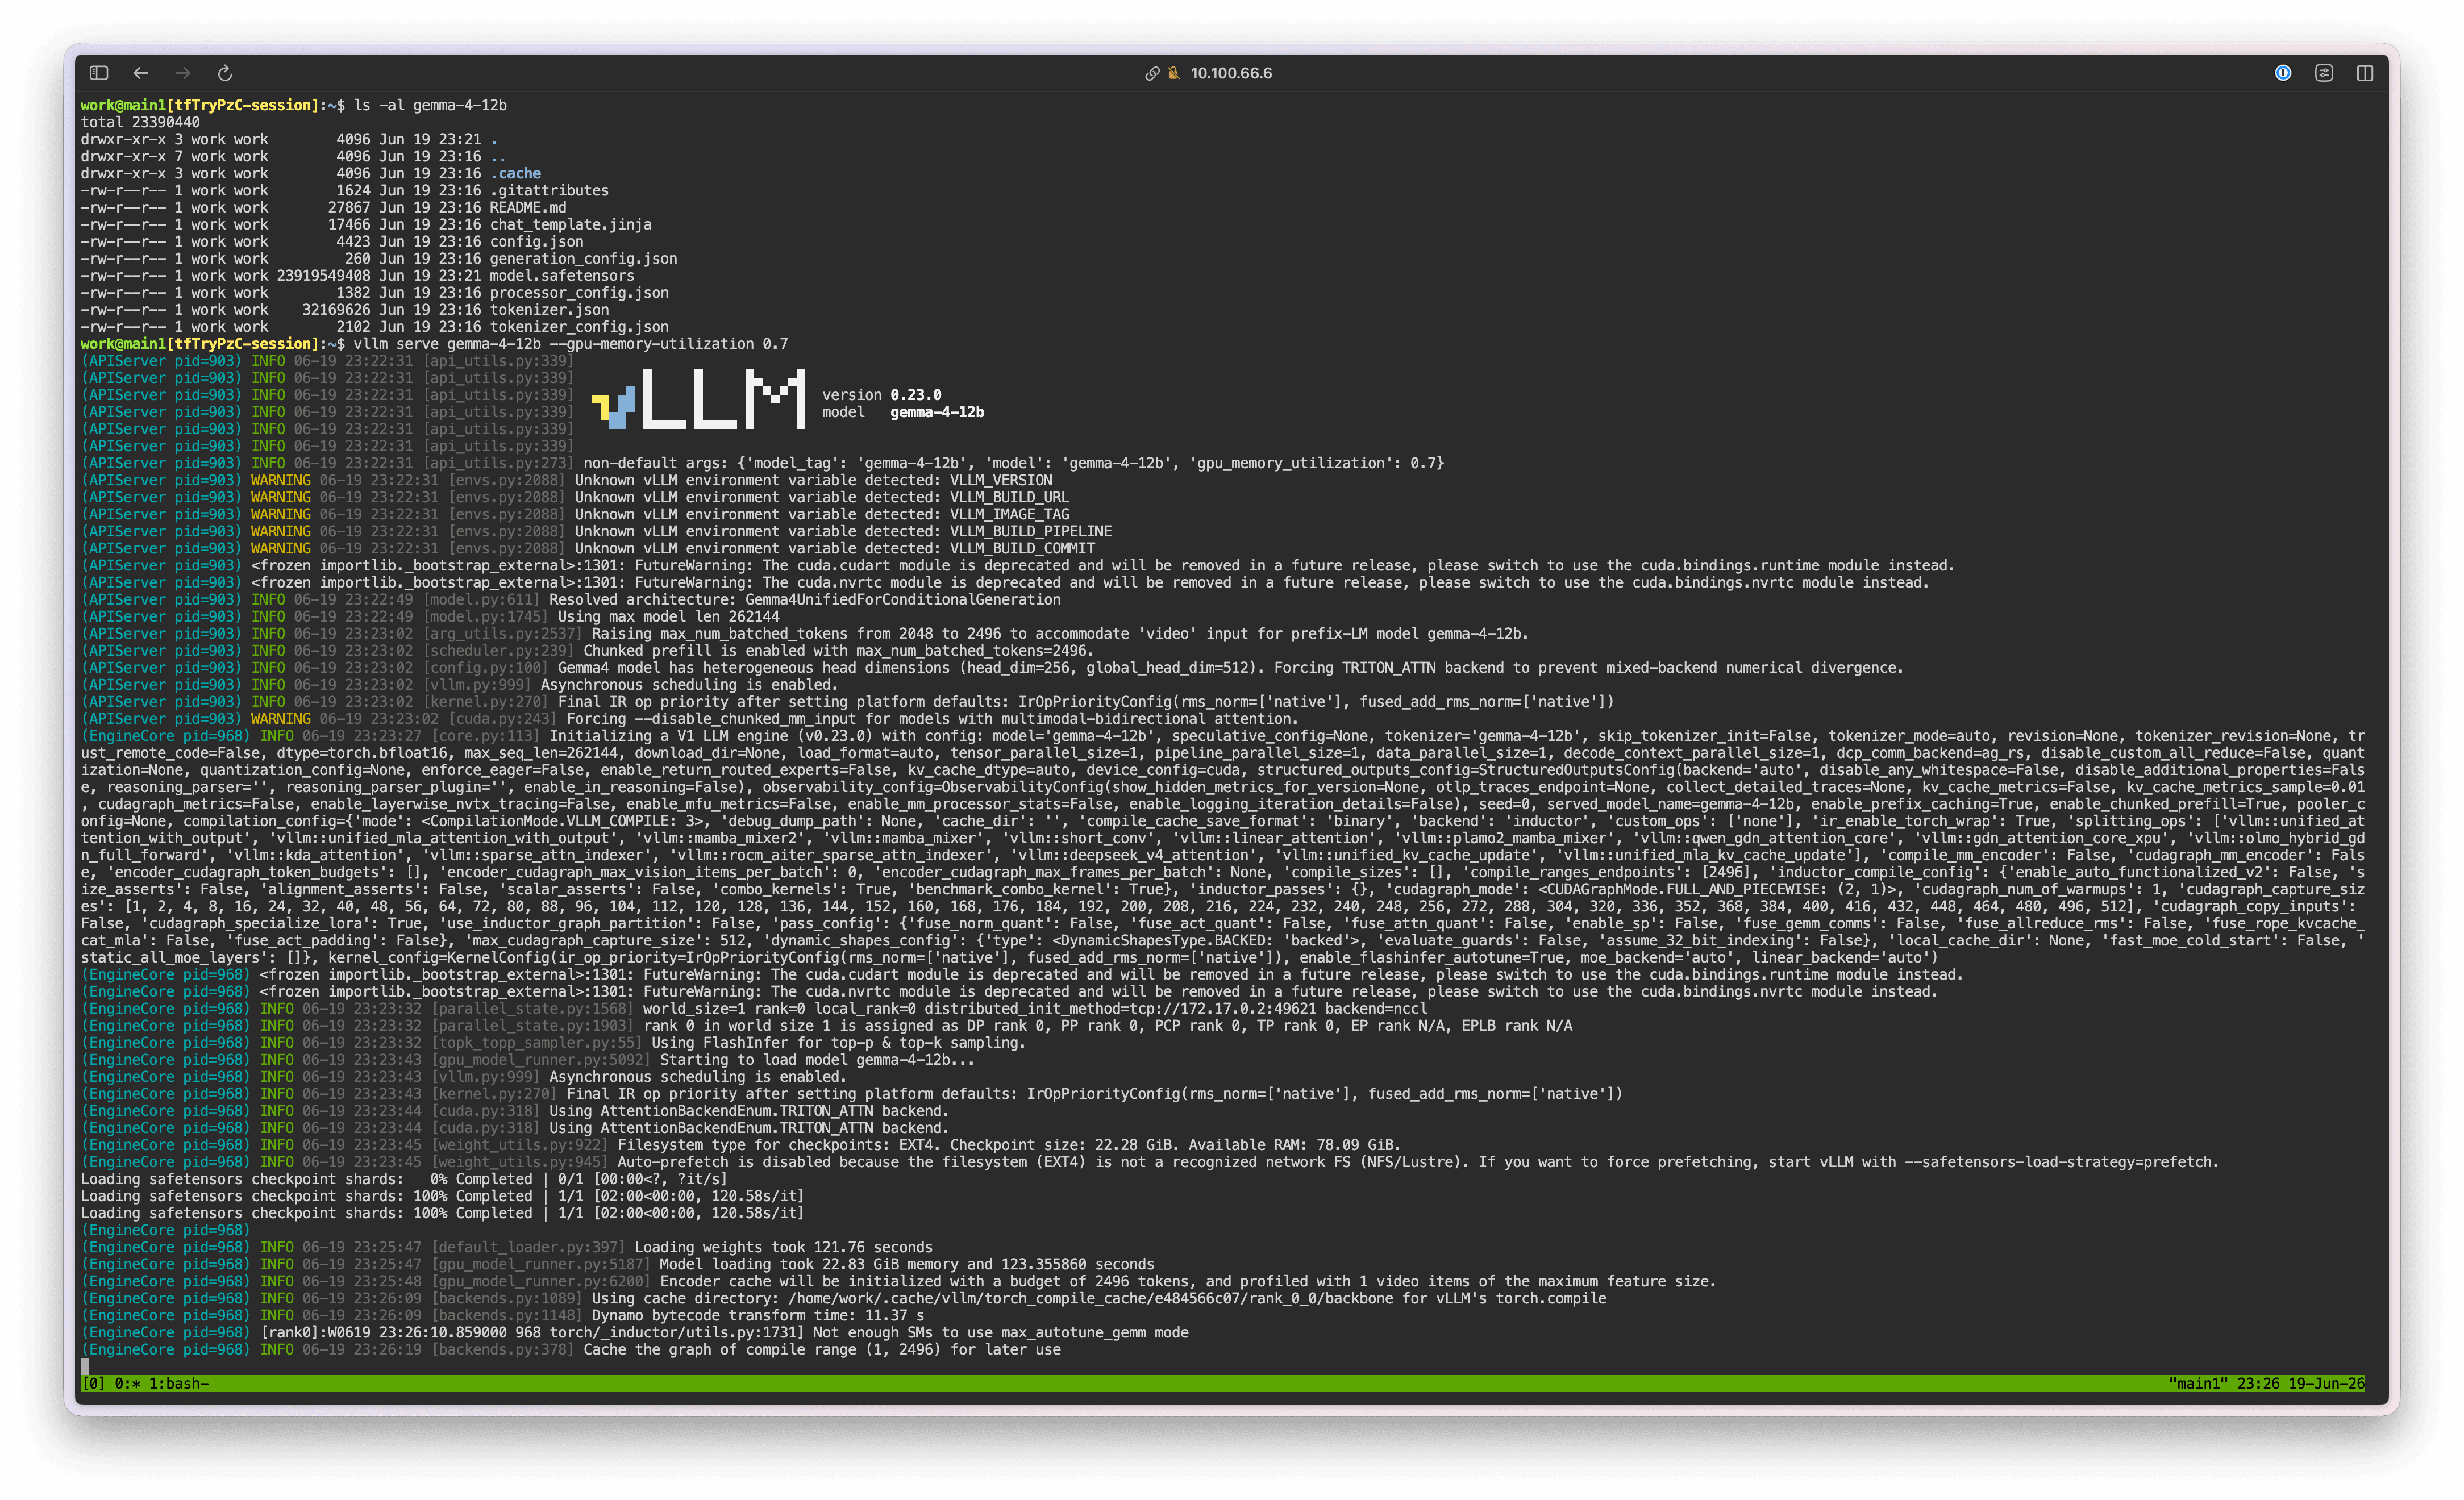
Then run the following command to download the Gemma 4 12B model:
hf download --local-dir gemma-4-12b google/gemma-4-12b-it
After the download completes, verify that the model was downloaded correctly:
ls -al gemma-4-12b
Next, start the vLLM server:
vllm serve gemma-4-12b --gpu-memory-utilization 0.5
Note: Why do we need to set a small GPU Memory Utilization value?
Due to a vLLM limitation, in the GB10 environment with Unified Memory applied, if the container memory is configured to be smaller than the total device memory, vLLM may not recognize it correctly and can trigger an Illegal Memory Access error.
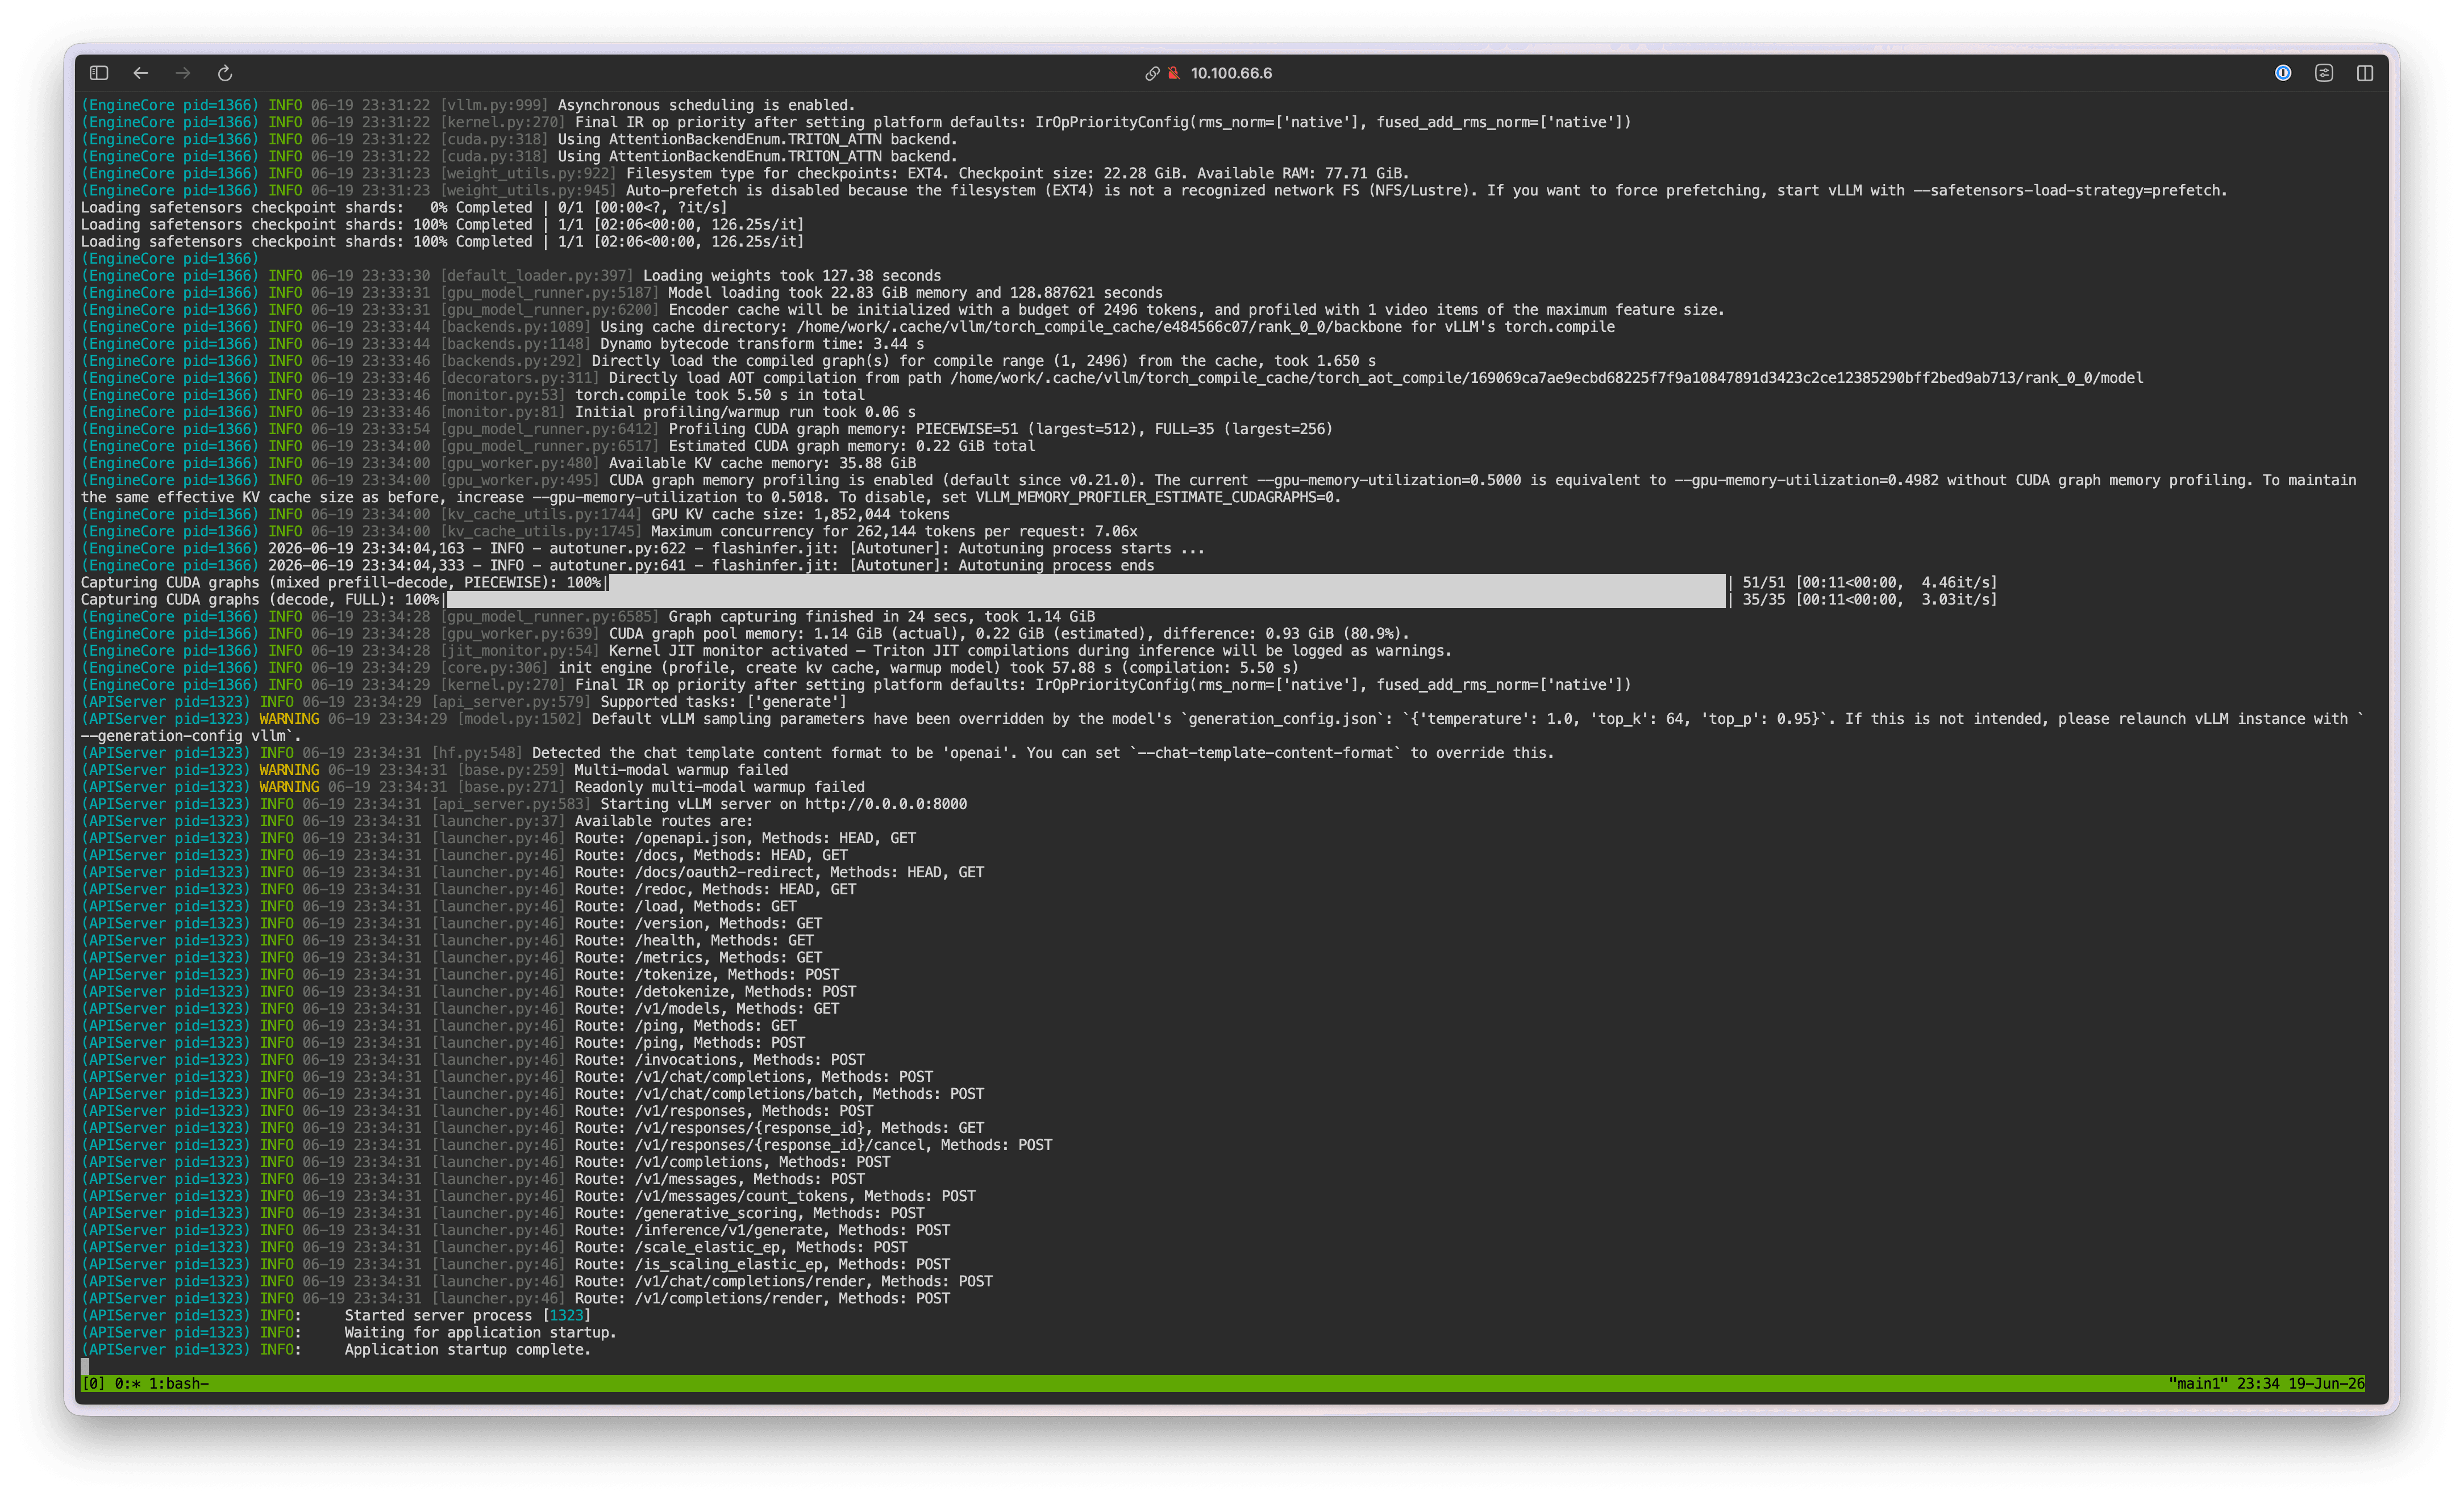
Once the vLLM server is running, you can test inference with the following curl command:
curl http://localhost:8000/v1/chat/completions \
 -H "Content-Type: application/json" \
 -d '{ "model": "gemma-4-12b", "messages": [ { "role": "user", "content": "Hello!" } ] }'
If values are returned successfully, close the terminal browser window.

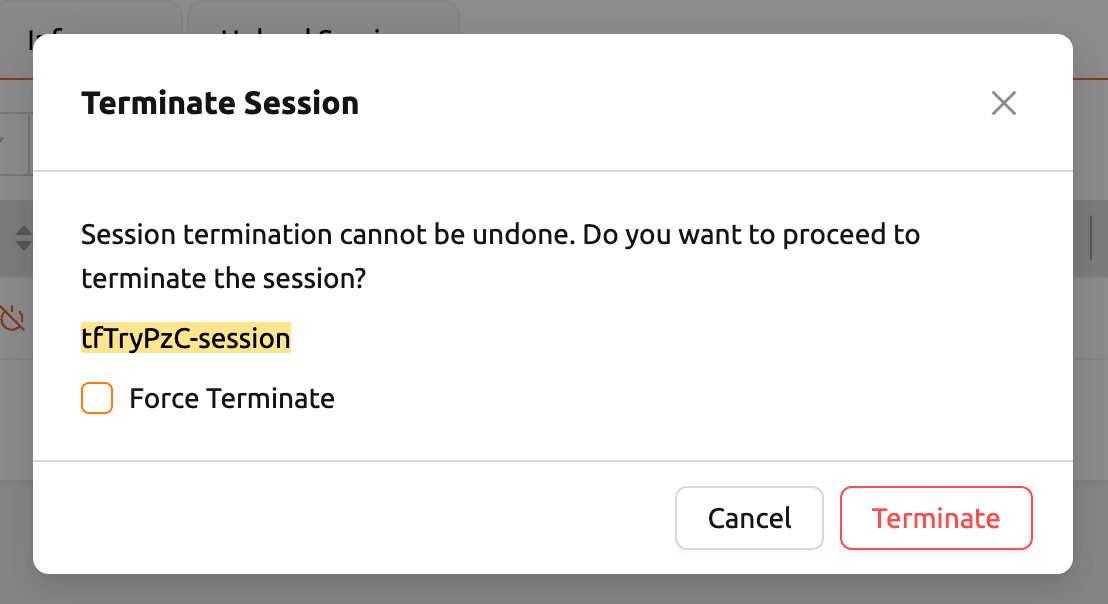
In the session list, select the session you ran and click Terminate Session to stop it.
5. Serve a Model with vLLM
5.1 Create a Deployment

Click the Deployments tab in the left panel to open the Deployments page.
Click the Create deployment button at the top-right of the page to create a new deployment.
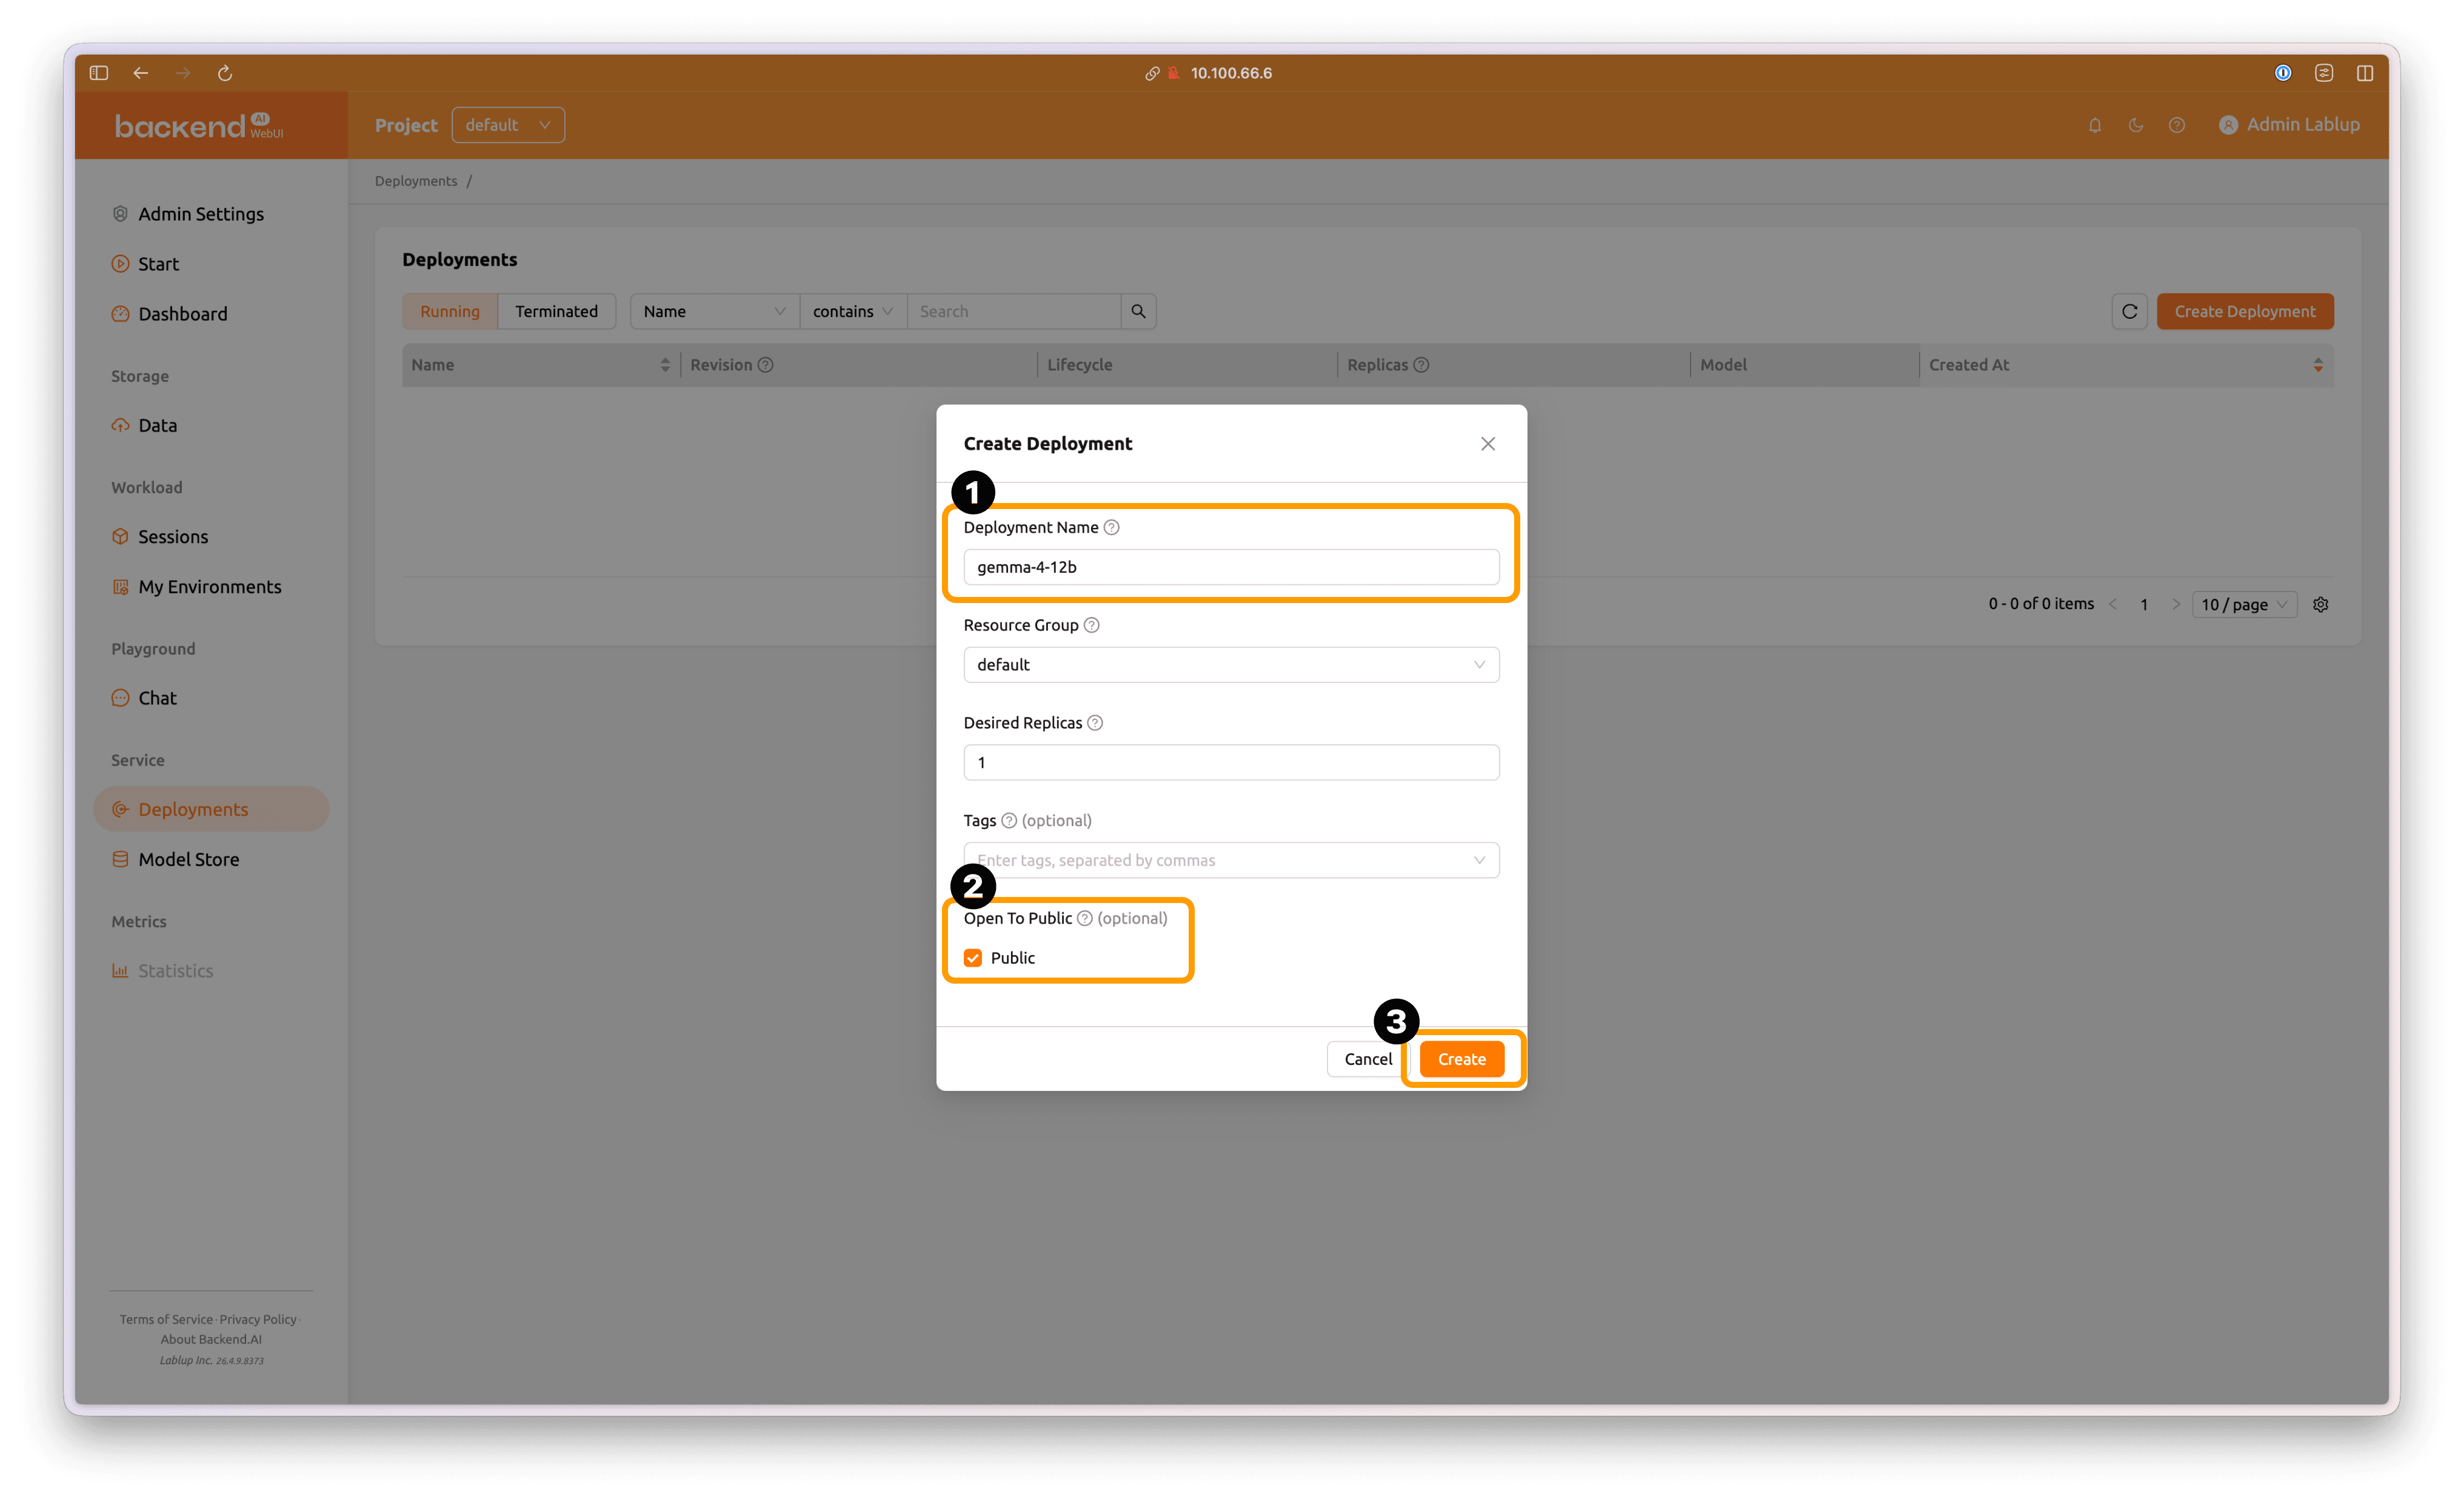
Enter an appropriate name for the deployment. Enable the Open To Public option, then click Create to create the new deployment.
If you do not enable Open To Public, you must include the Access Token generated on the Deployment page in your inference request using the
Authorization: BearerHTTP header to access the model service.
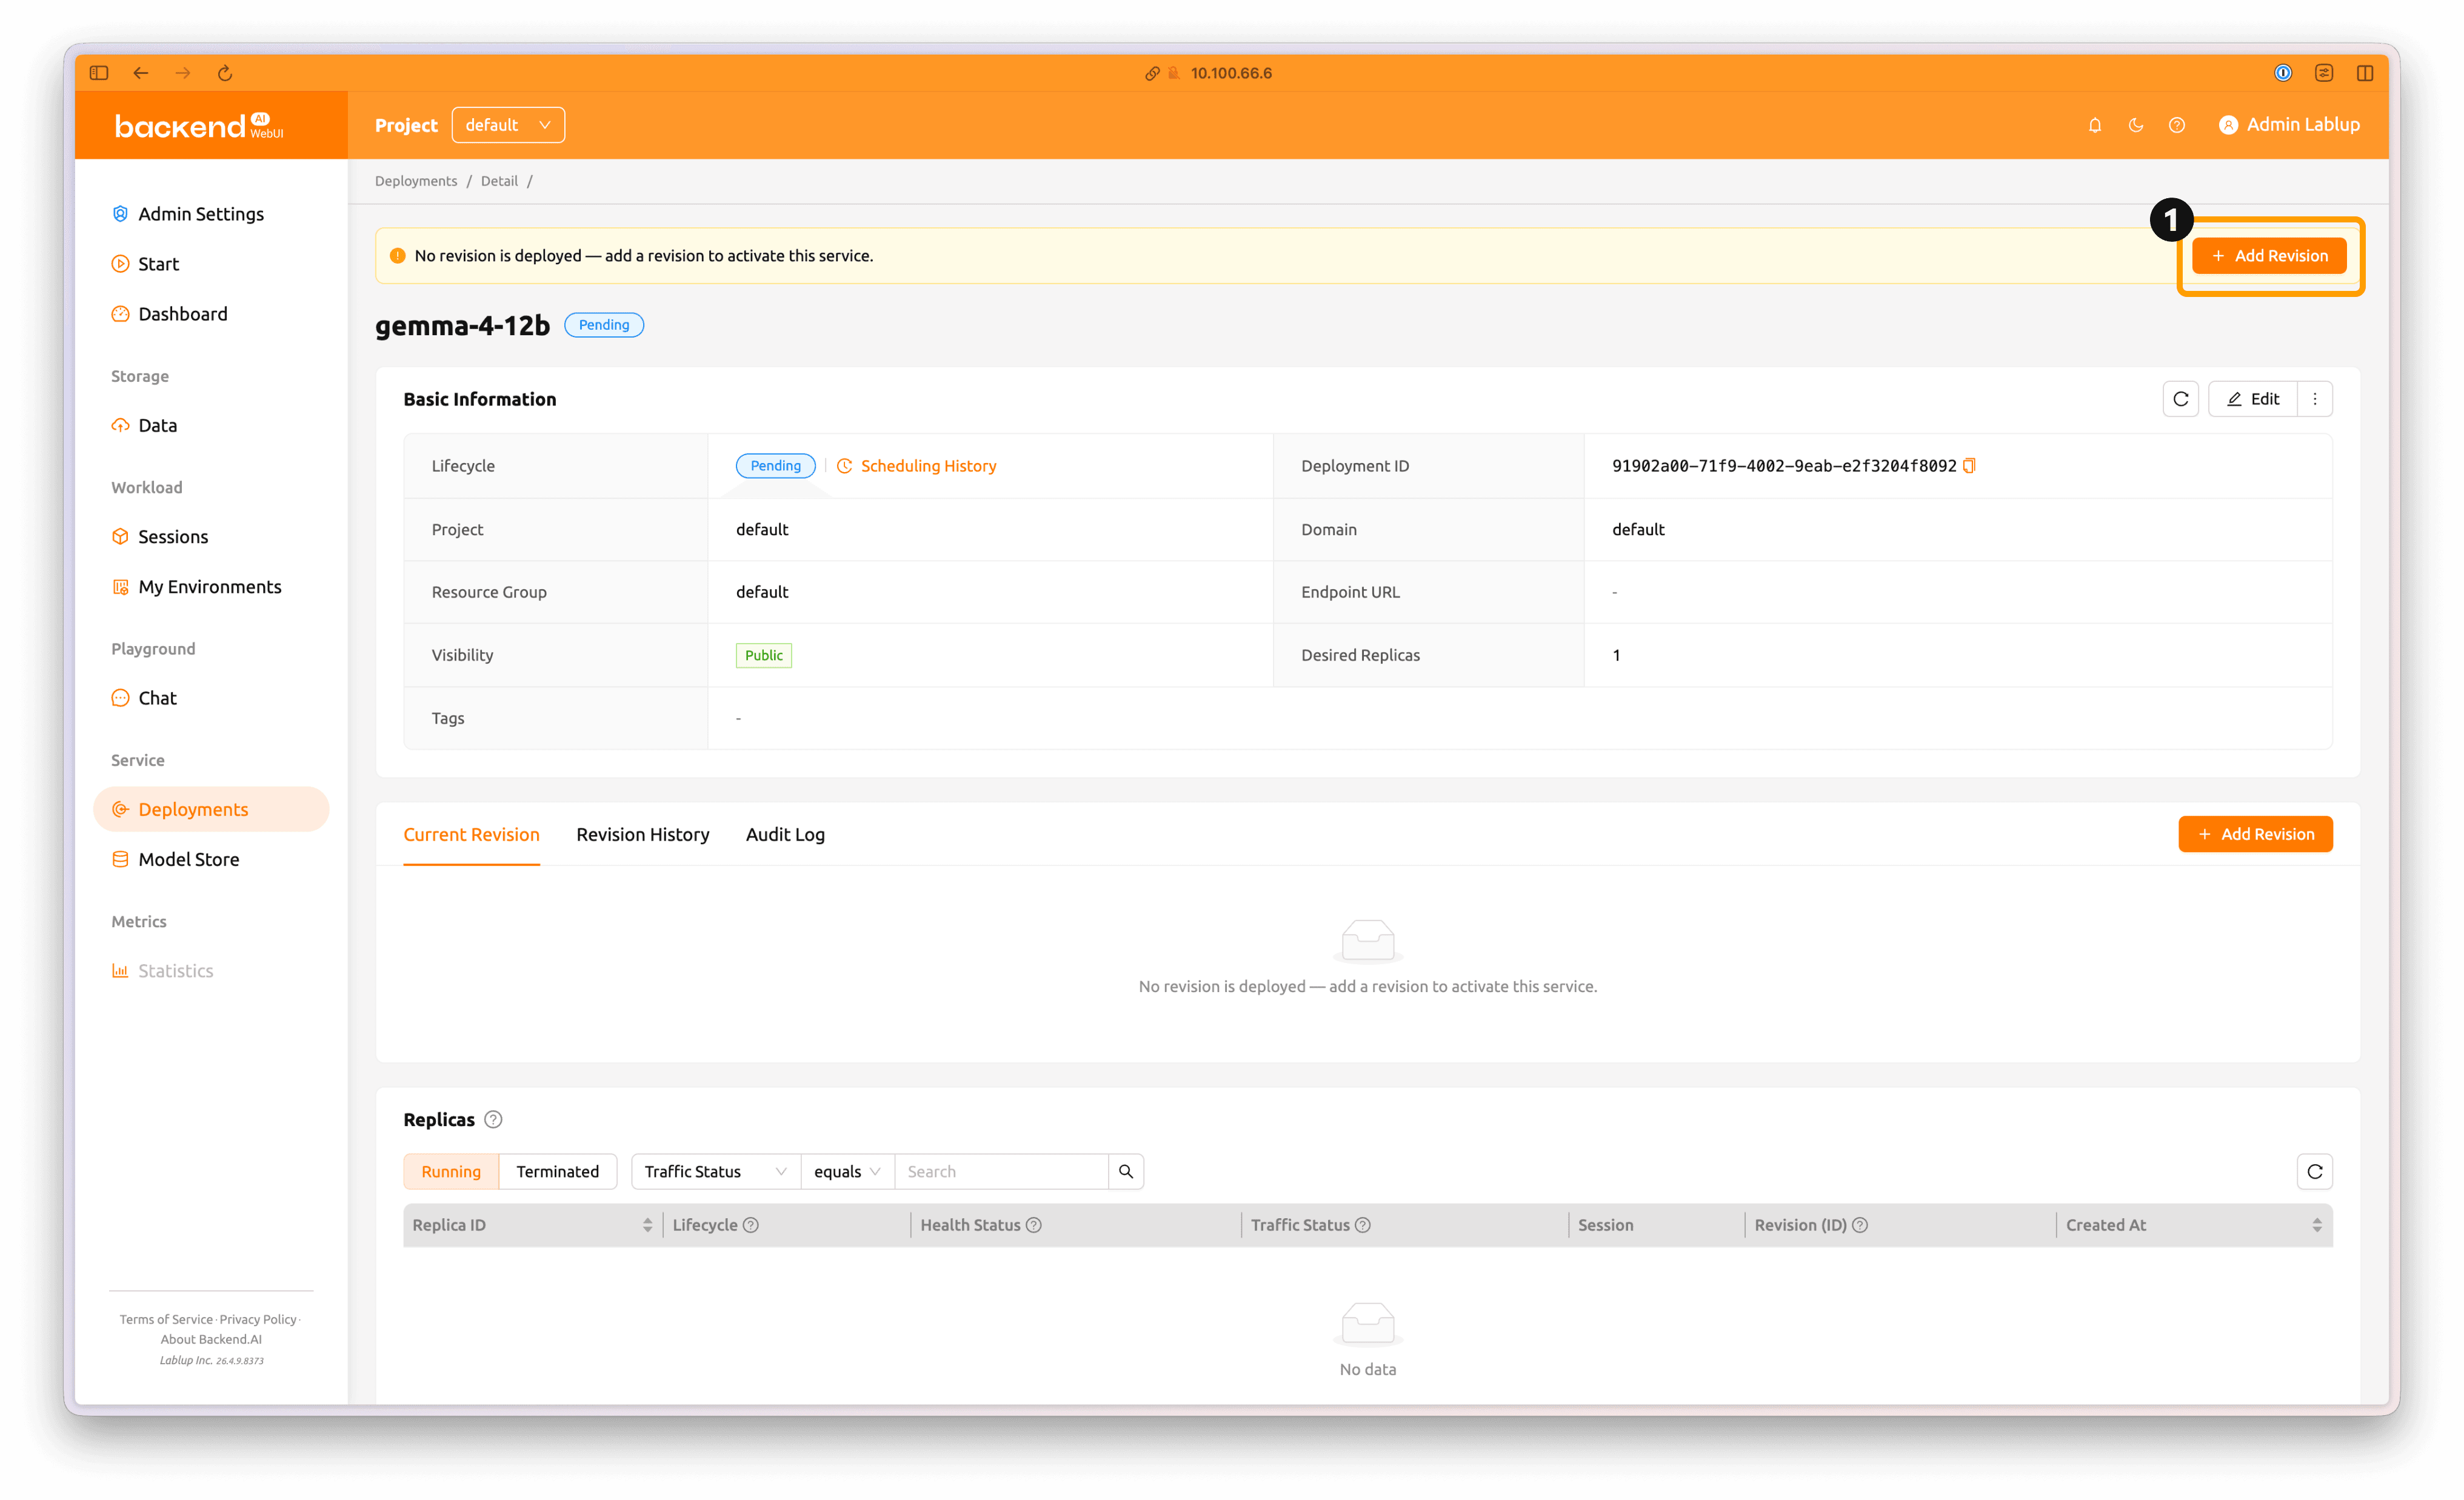
The new deployment has been created. Click Add Revision to create a revision.
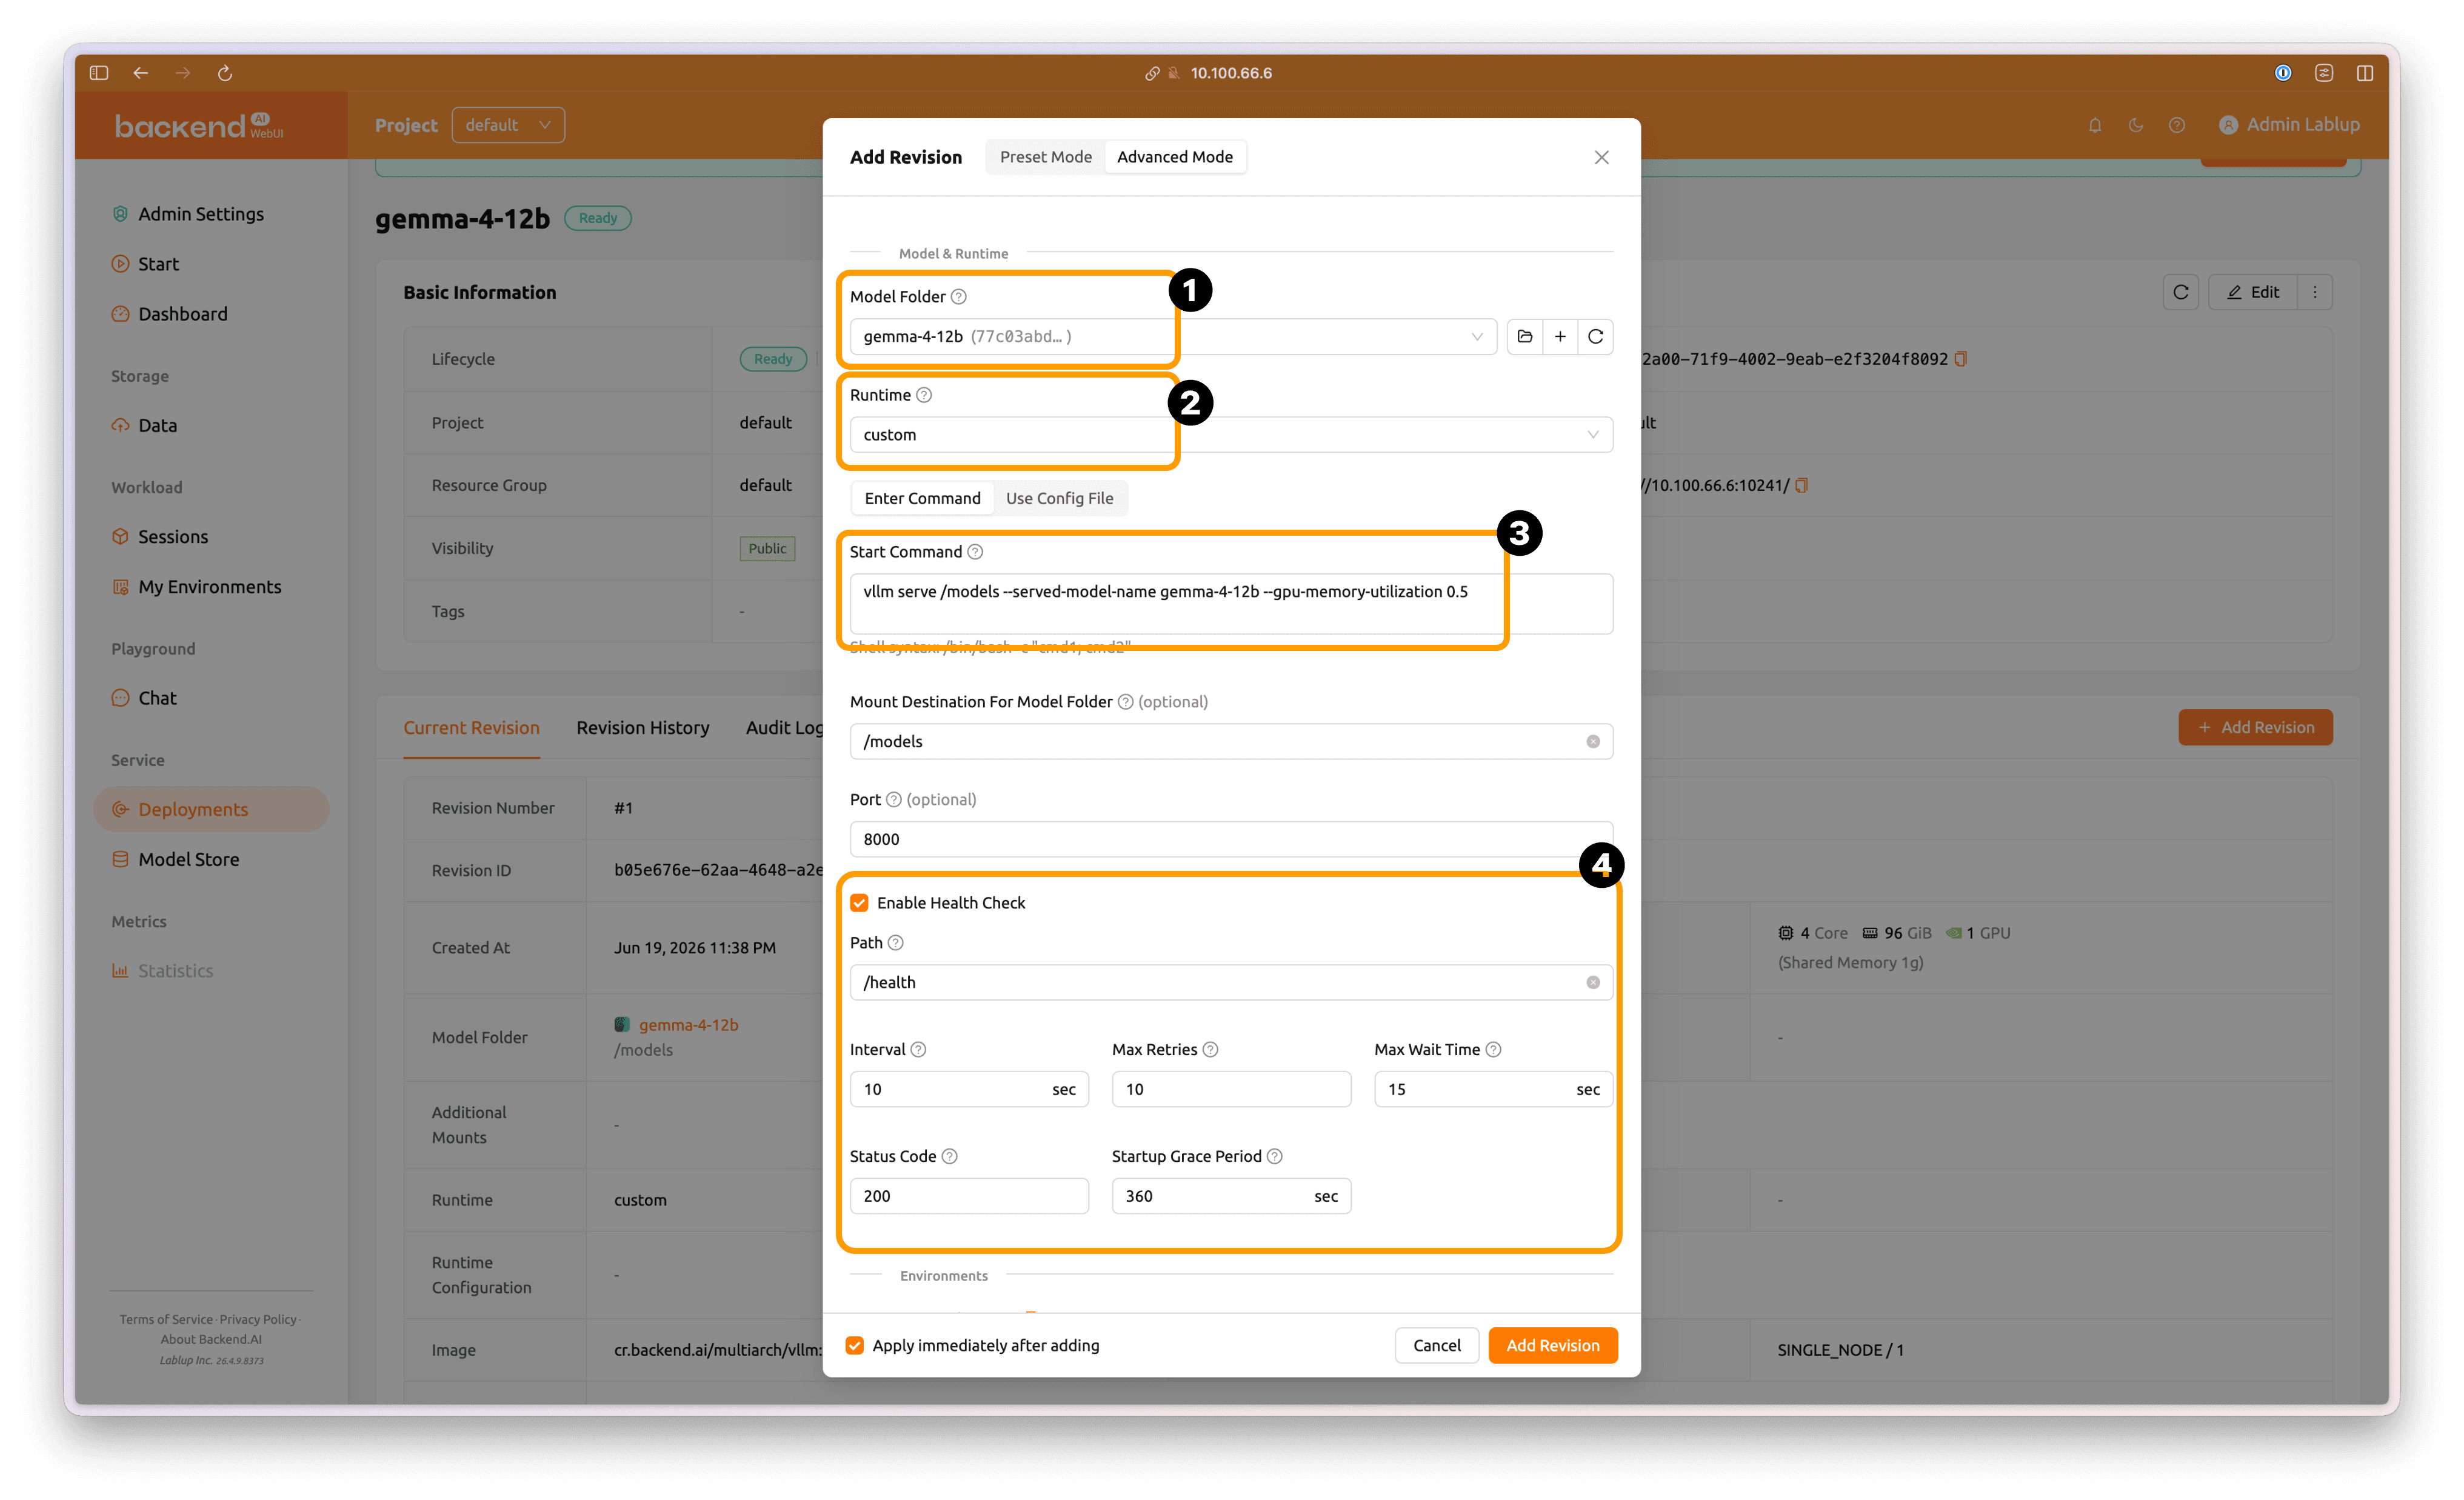
In Advanced Mode, keep Model Folder as gemma-4-12b and Runtime as custom, then enter the following execution command:
vllm serve /models --served-model-name gemma-4-12b --gpu-memory-utilization 0.5
Then enable Enable Health Check at the bottom.
Change Startup Grace Period to 600 seconds, which is the recommended default adjusted for the Gemma 4 12B model load time on DGX Spark.
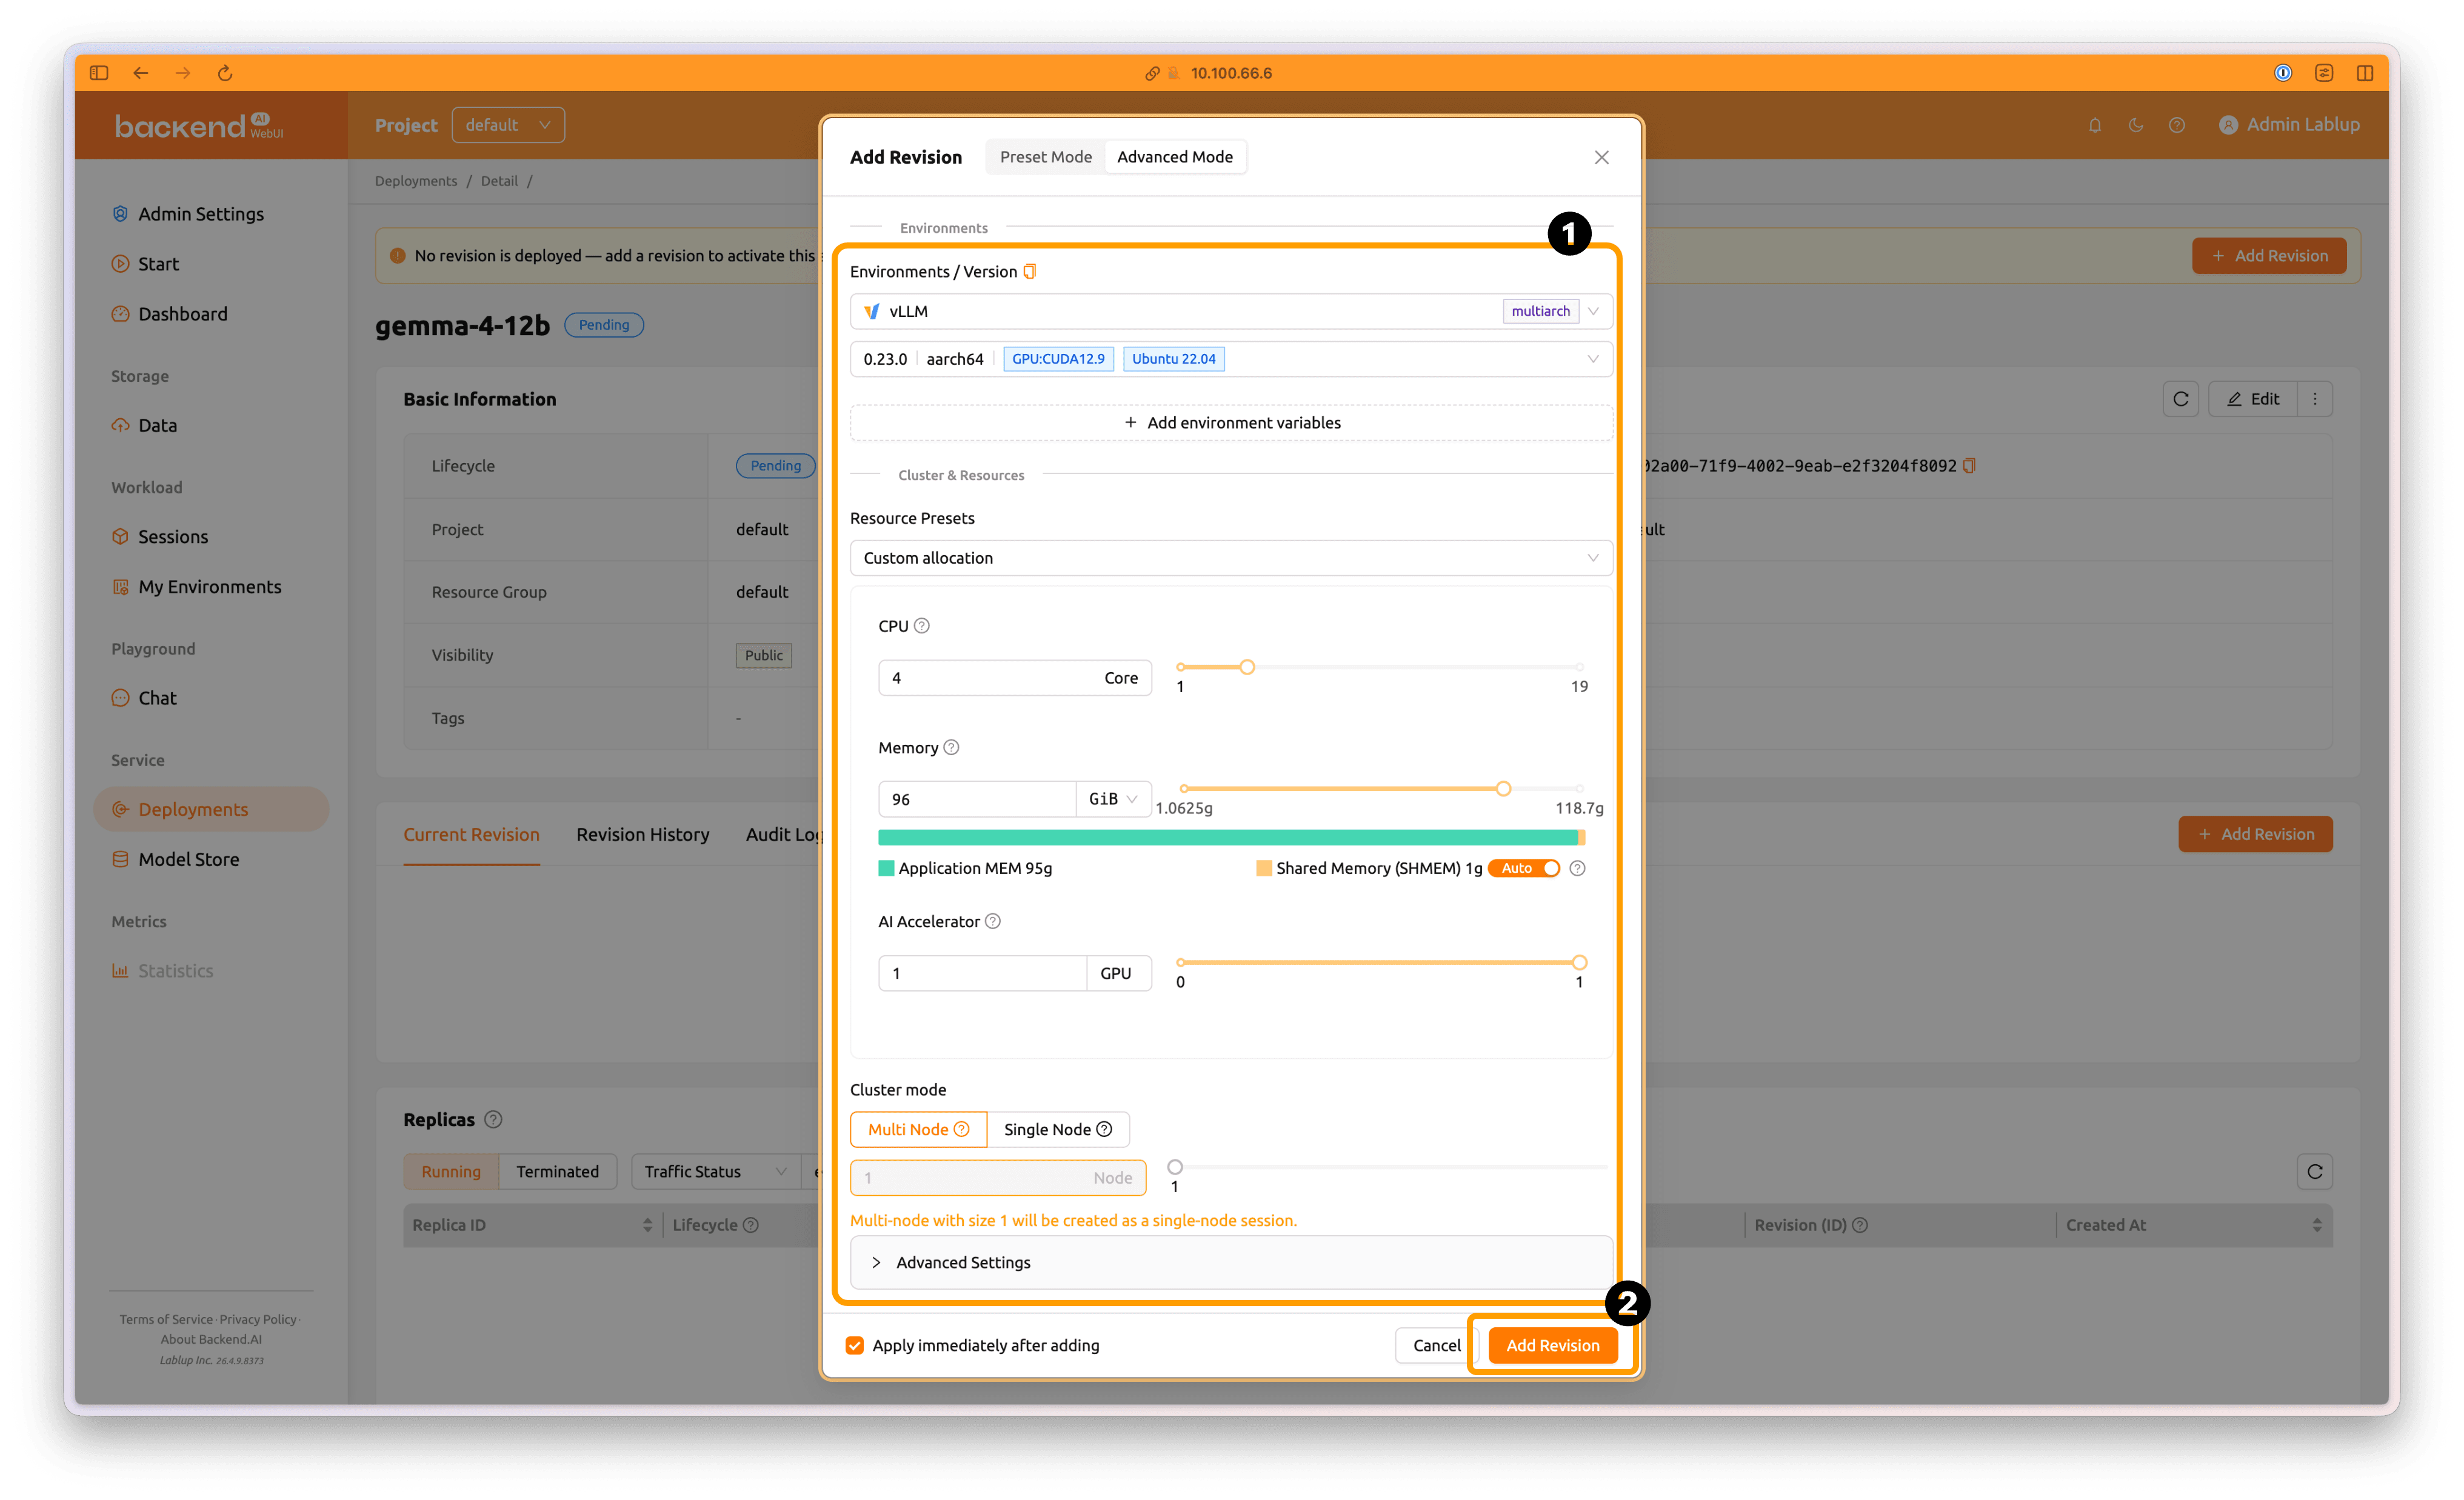
Configure the resource requirements as follows:
- Environments / Versions:
vLLM, 0.23.0 | aarch64 | CUDA 12.9 | Ubuntu 22.04 - Resource Group:
default - Resource Preset:
Custom allocation - GPU:
4Core - Memory:
96GiB - AI Accelerator:
1GPU - Cluster mode:
Multi-node/1Node
Then click Add Revision to create the new revision.
The new revision will now be deployed to the deployment.
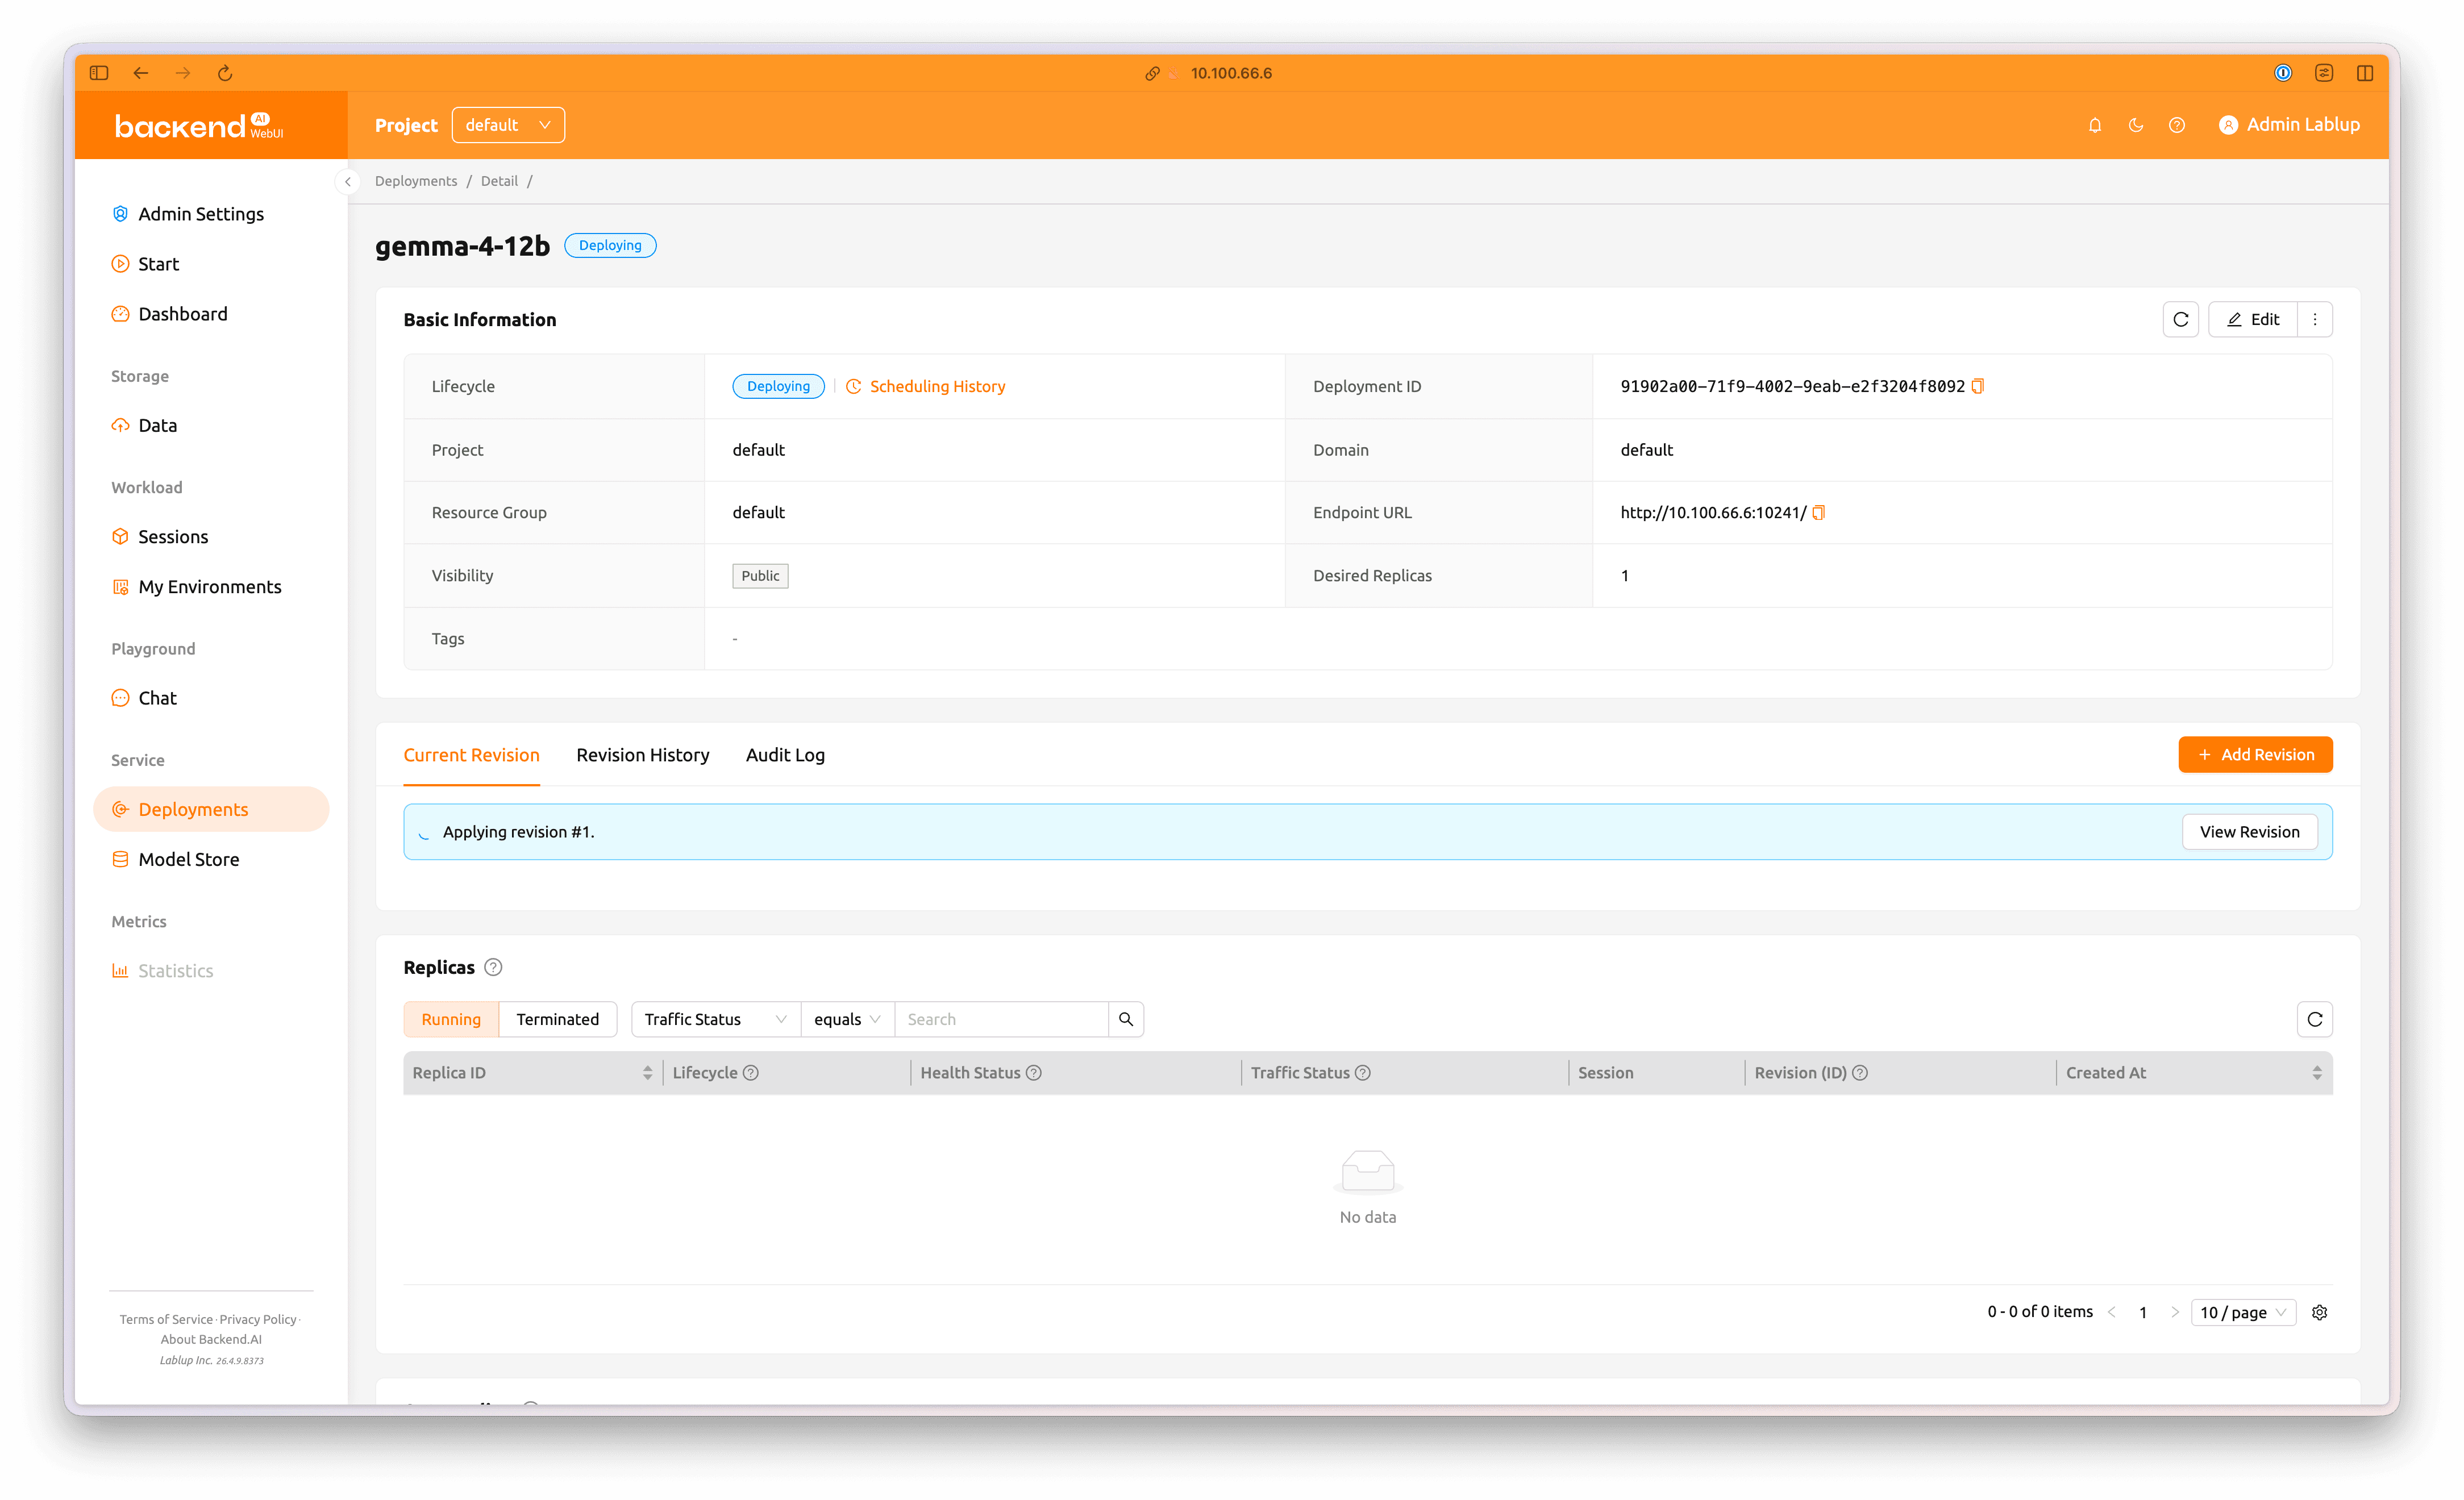
5.2 Check Deployment Status
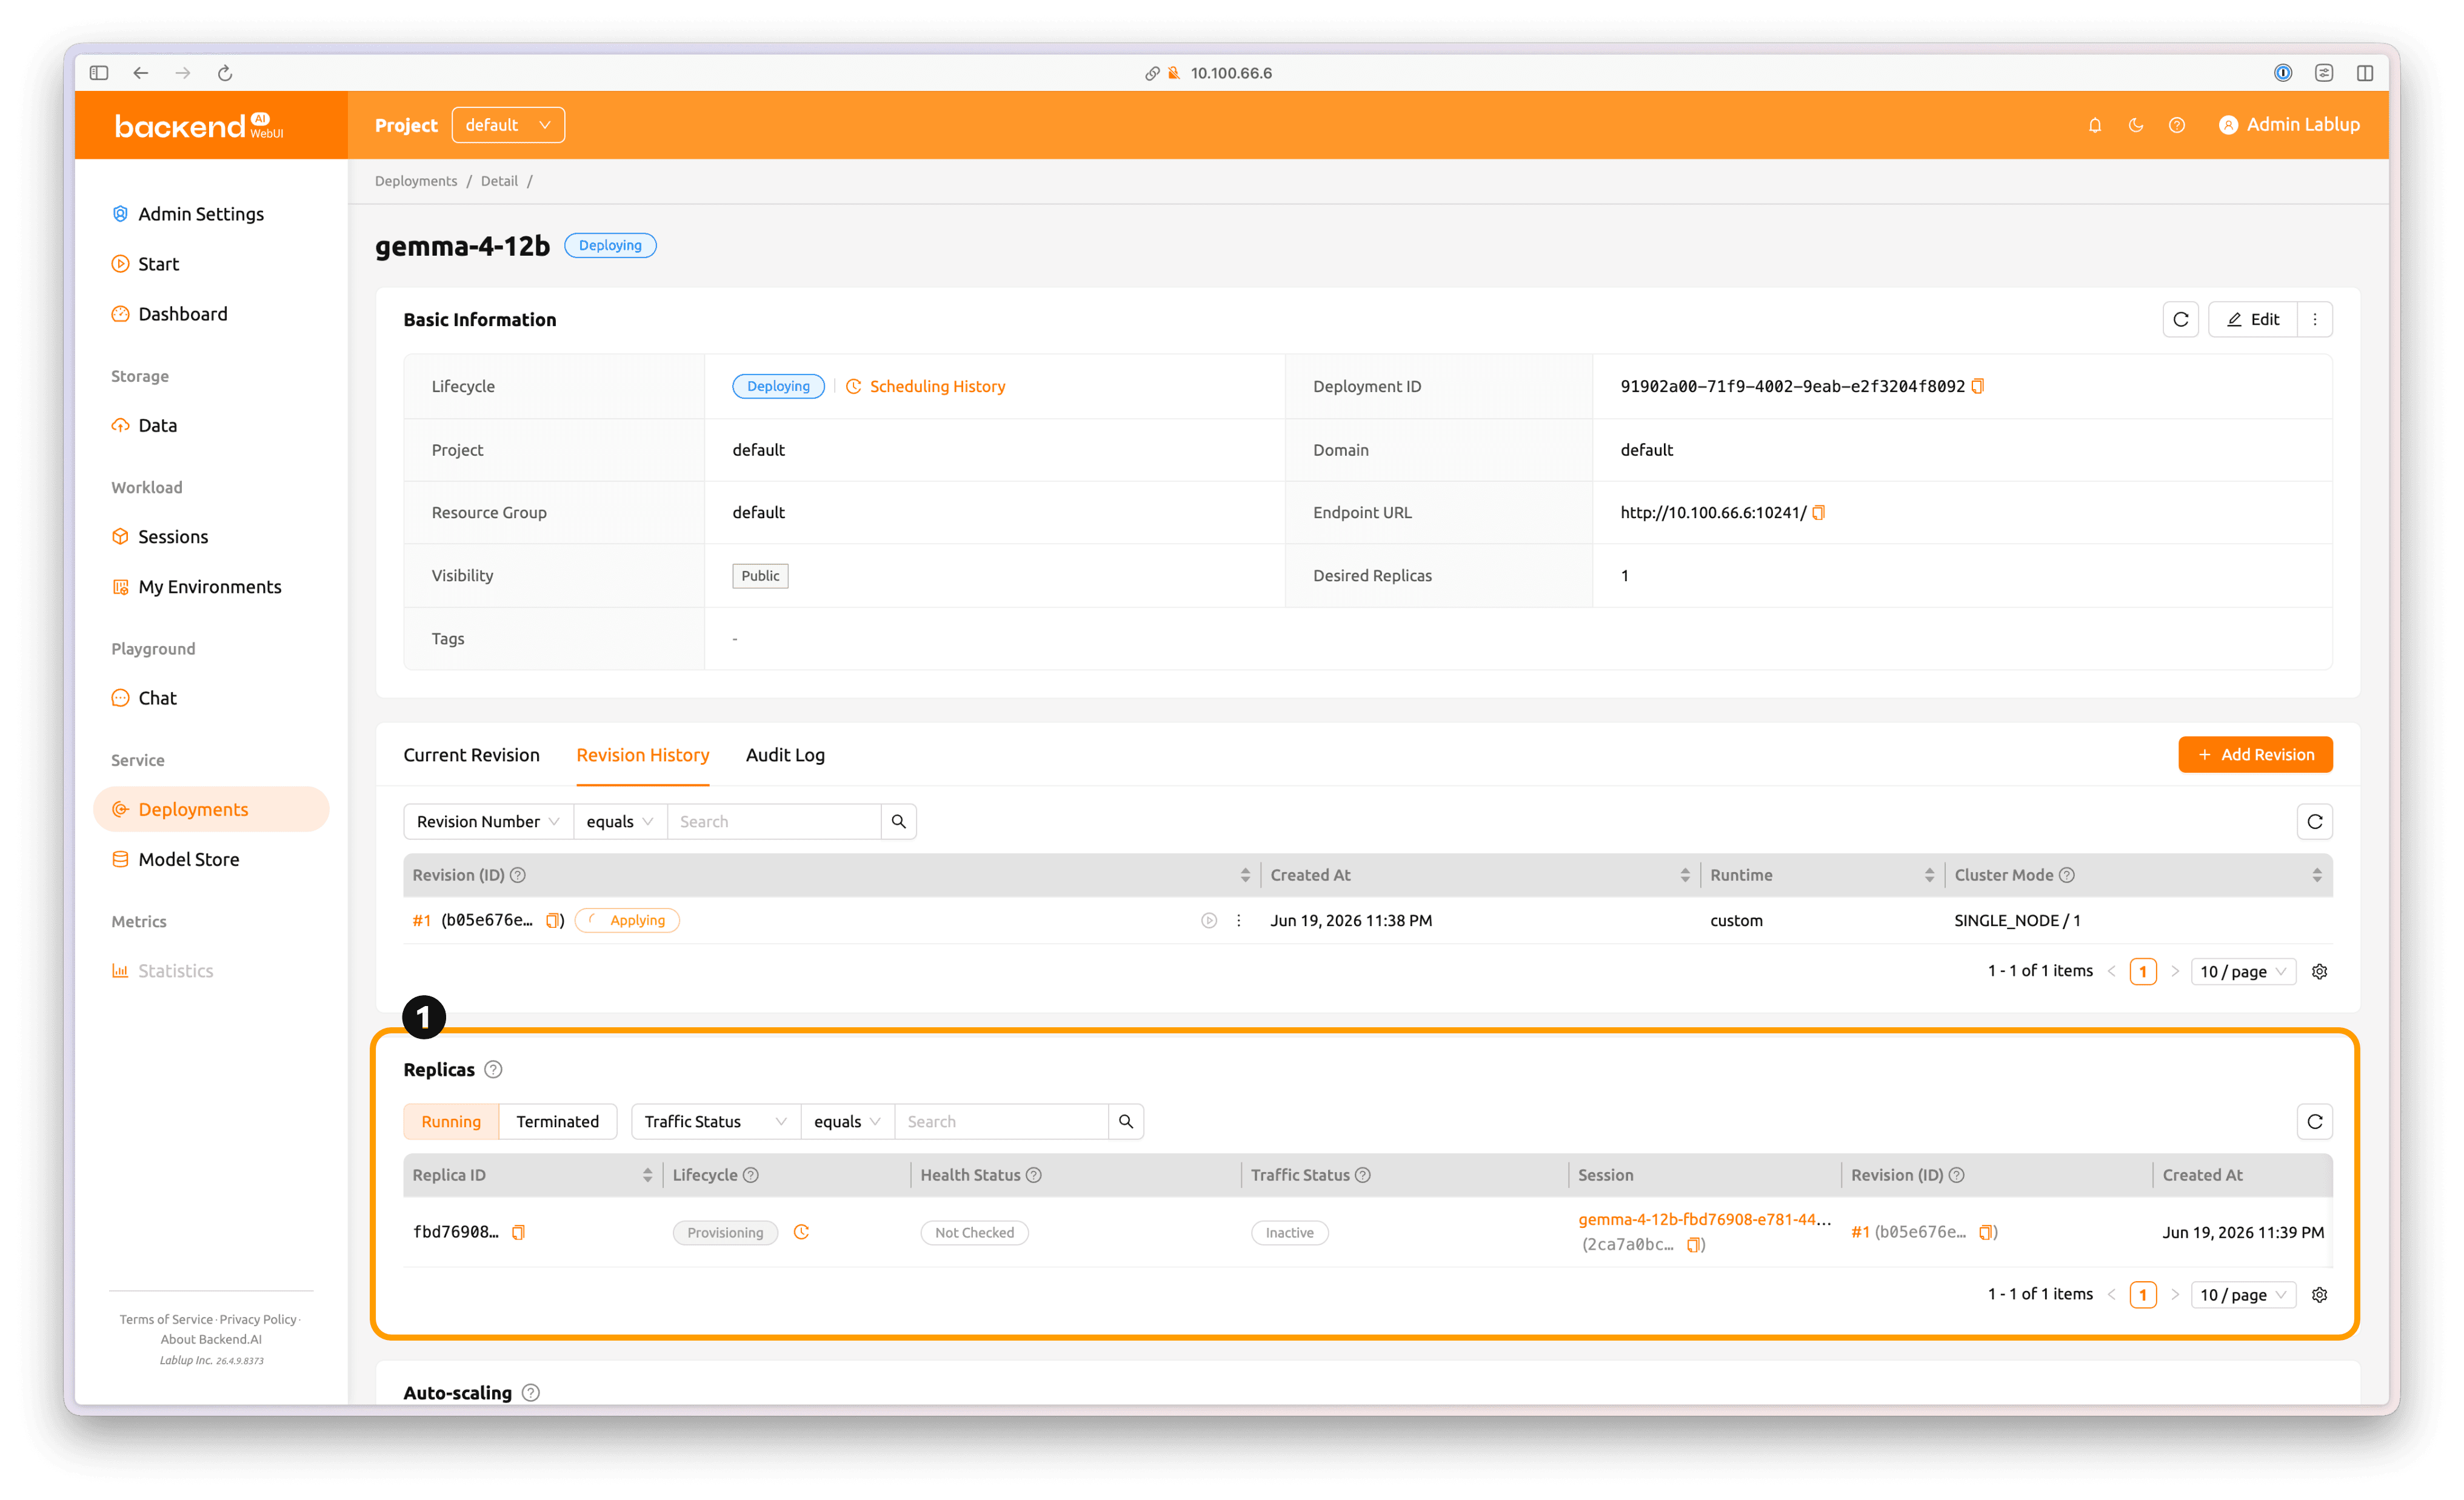
You can check the deployment status in the Replicas section.
To check the status of an individual deployment container, click the session name highlighted in orange in the Session tab under the Replicas section.
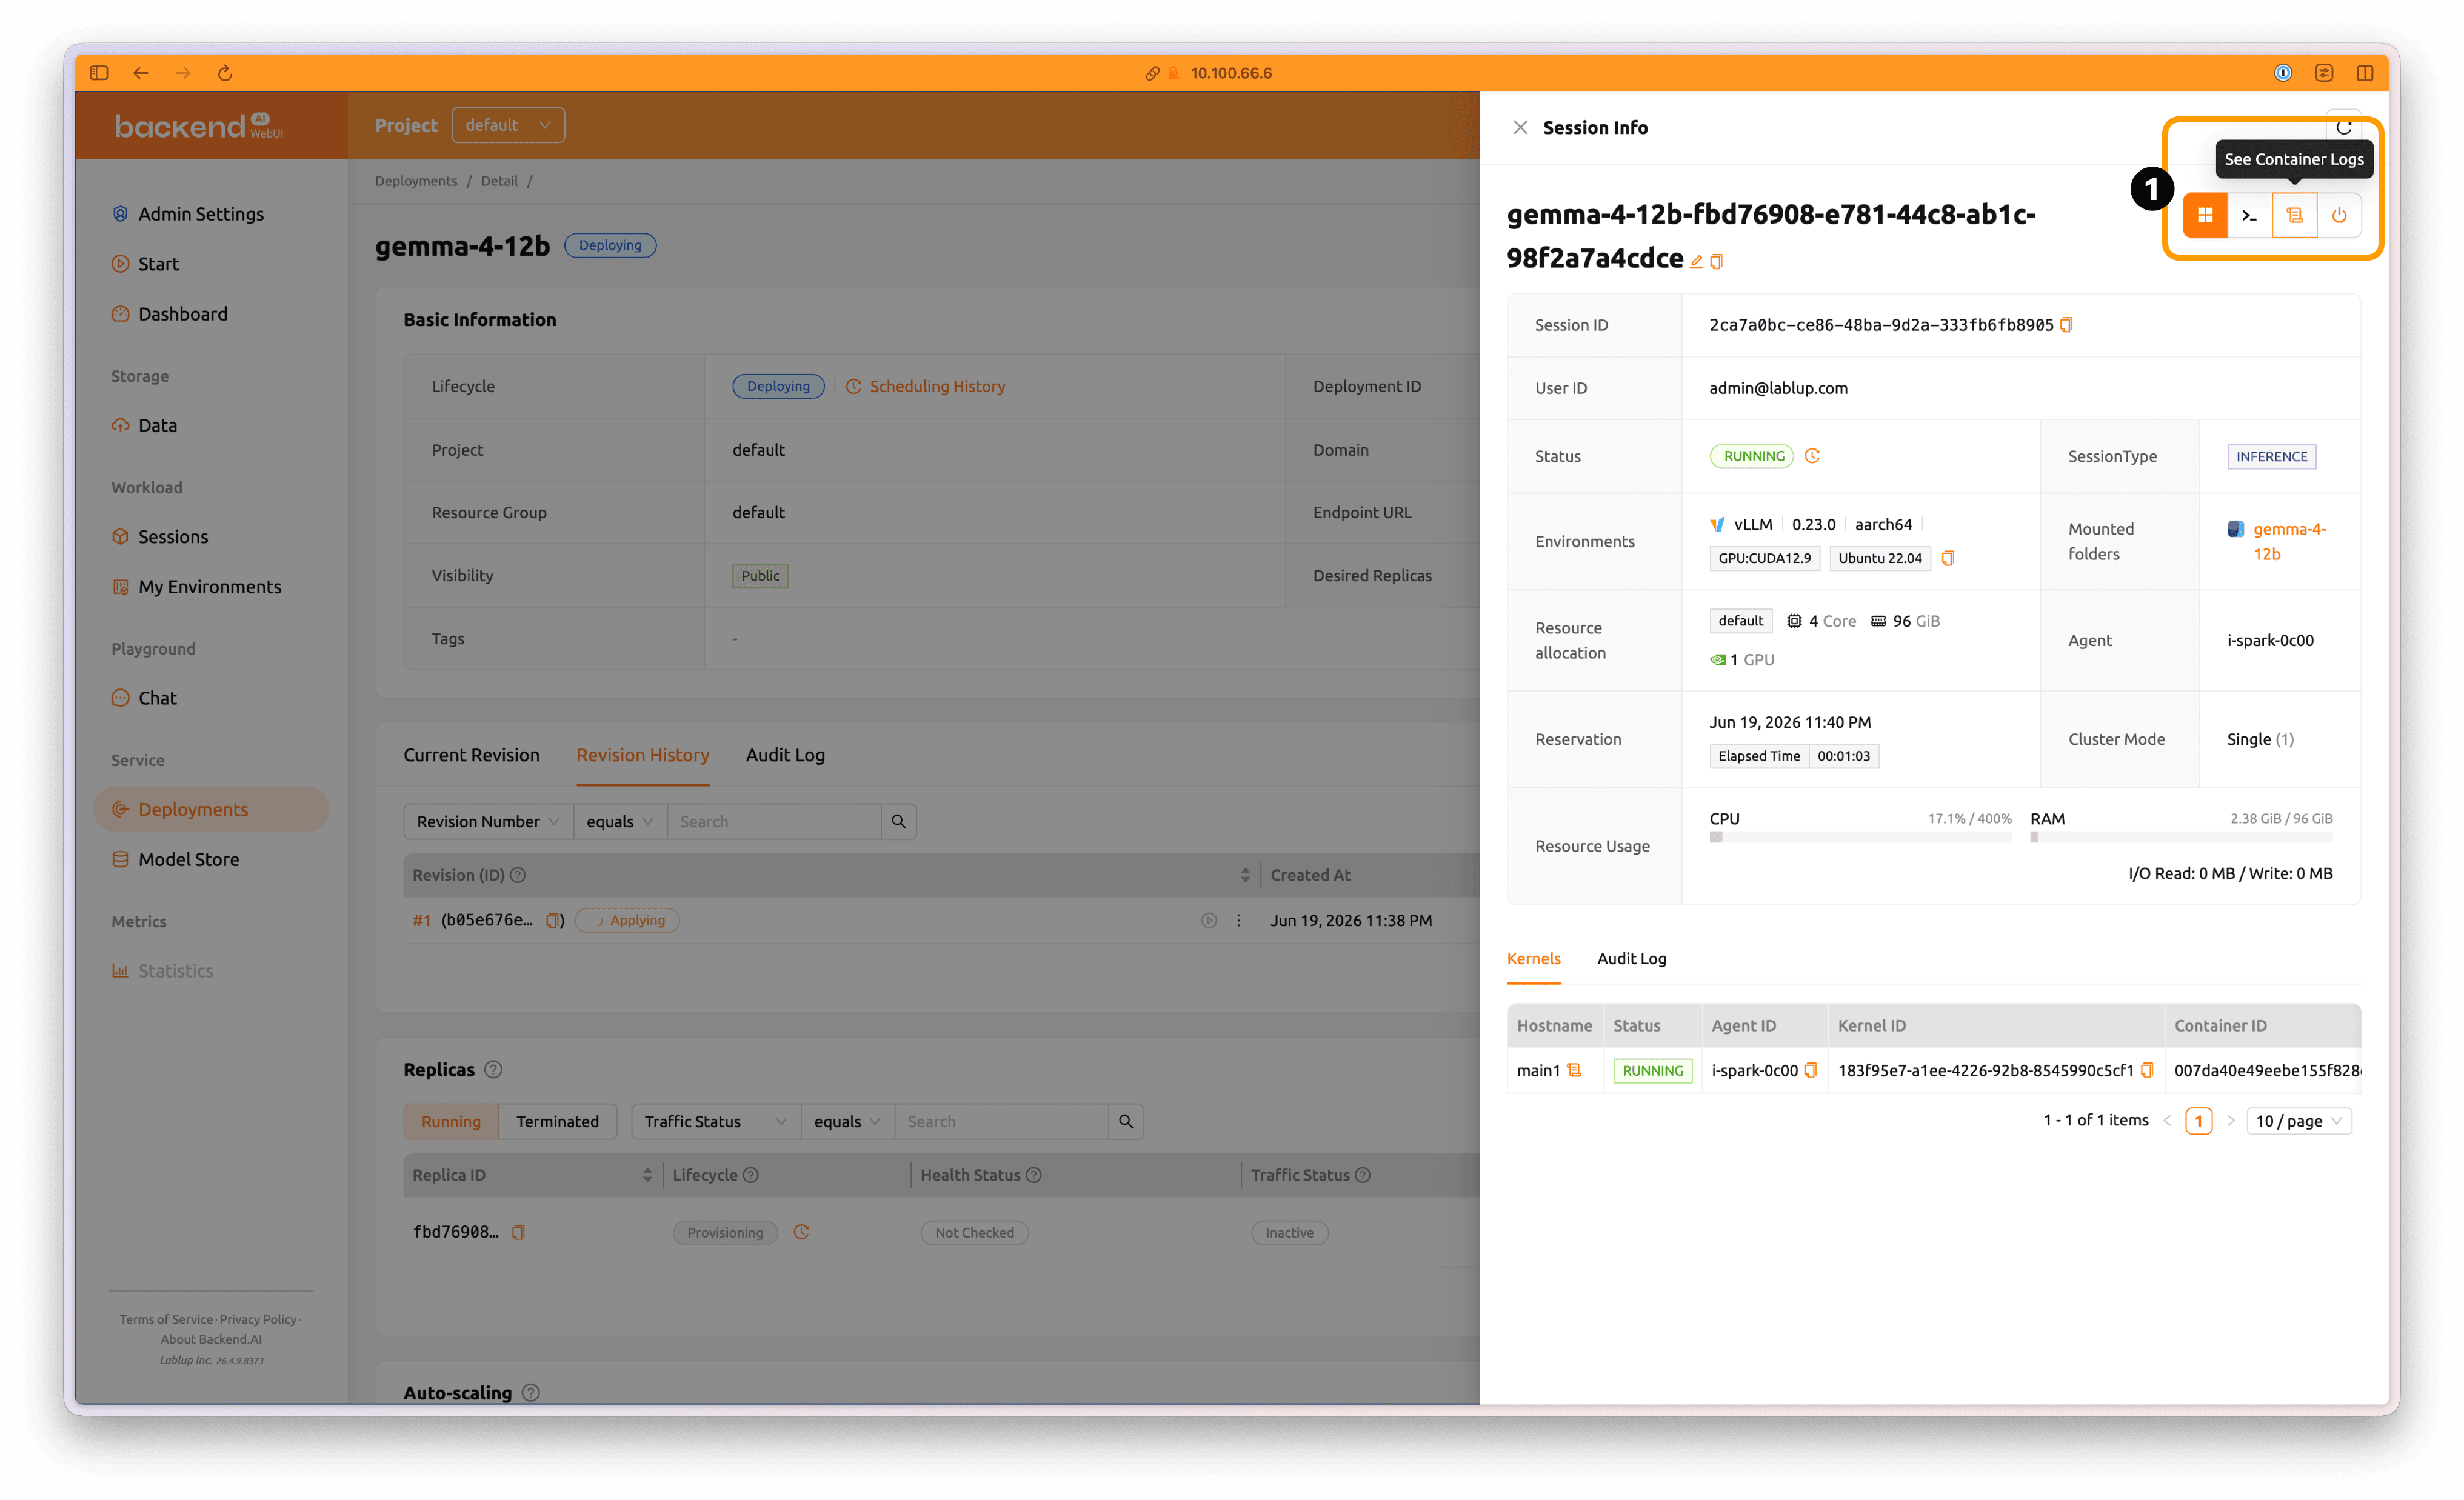
Click See Container Logs to view the progress of the model service container.
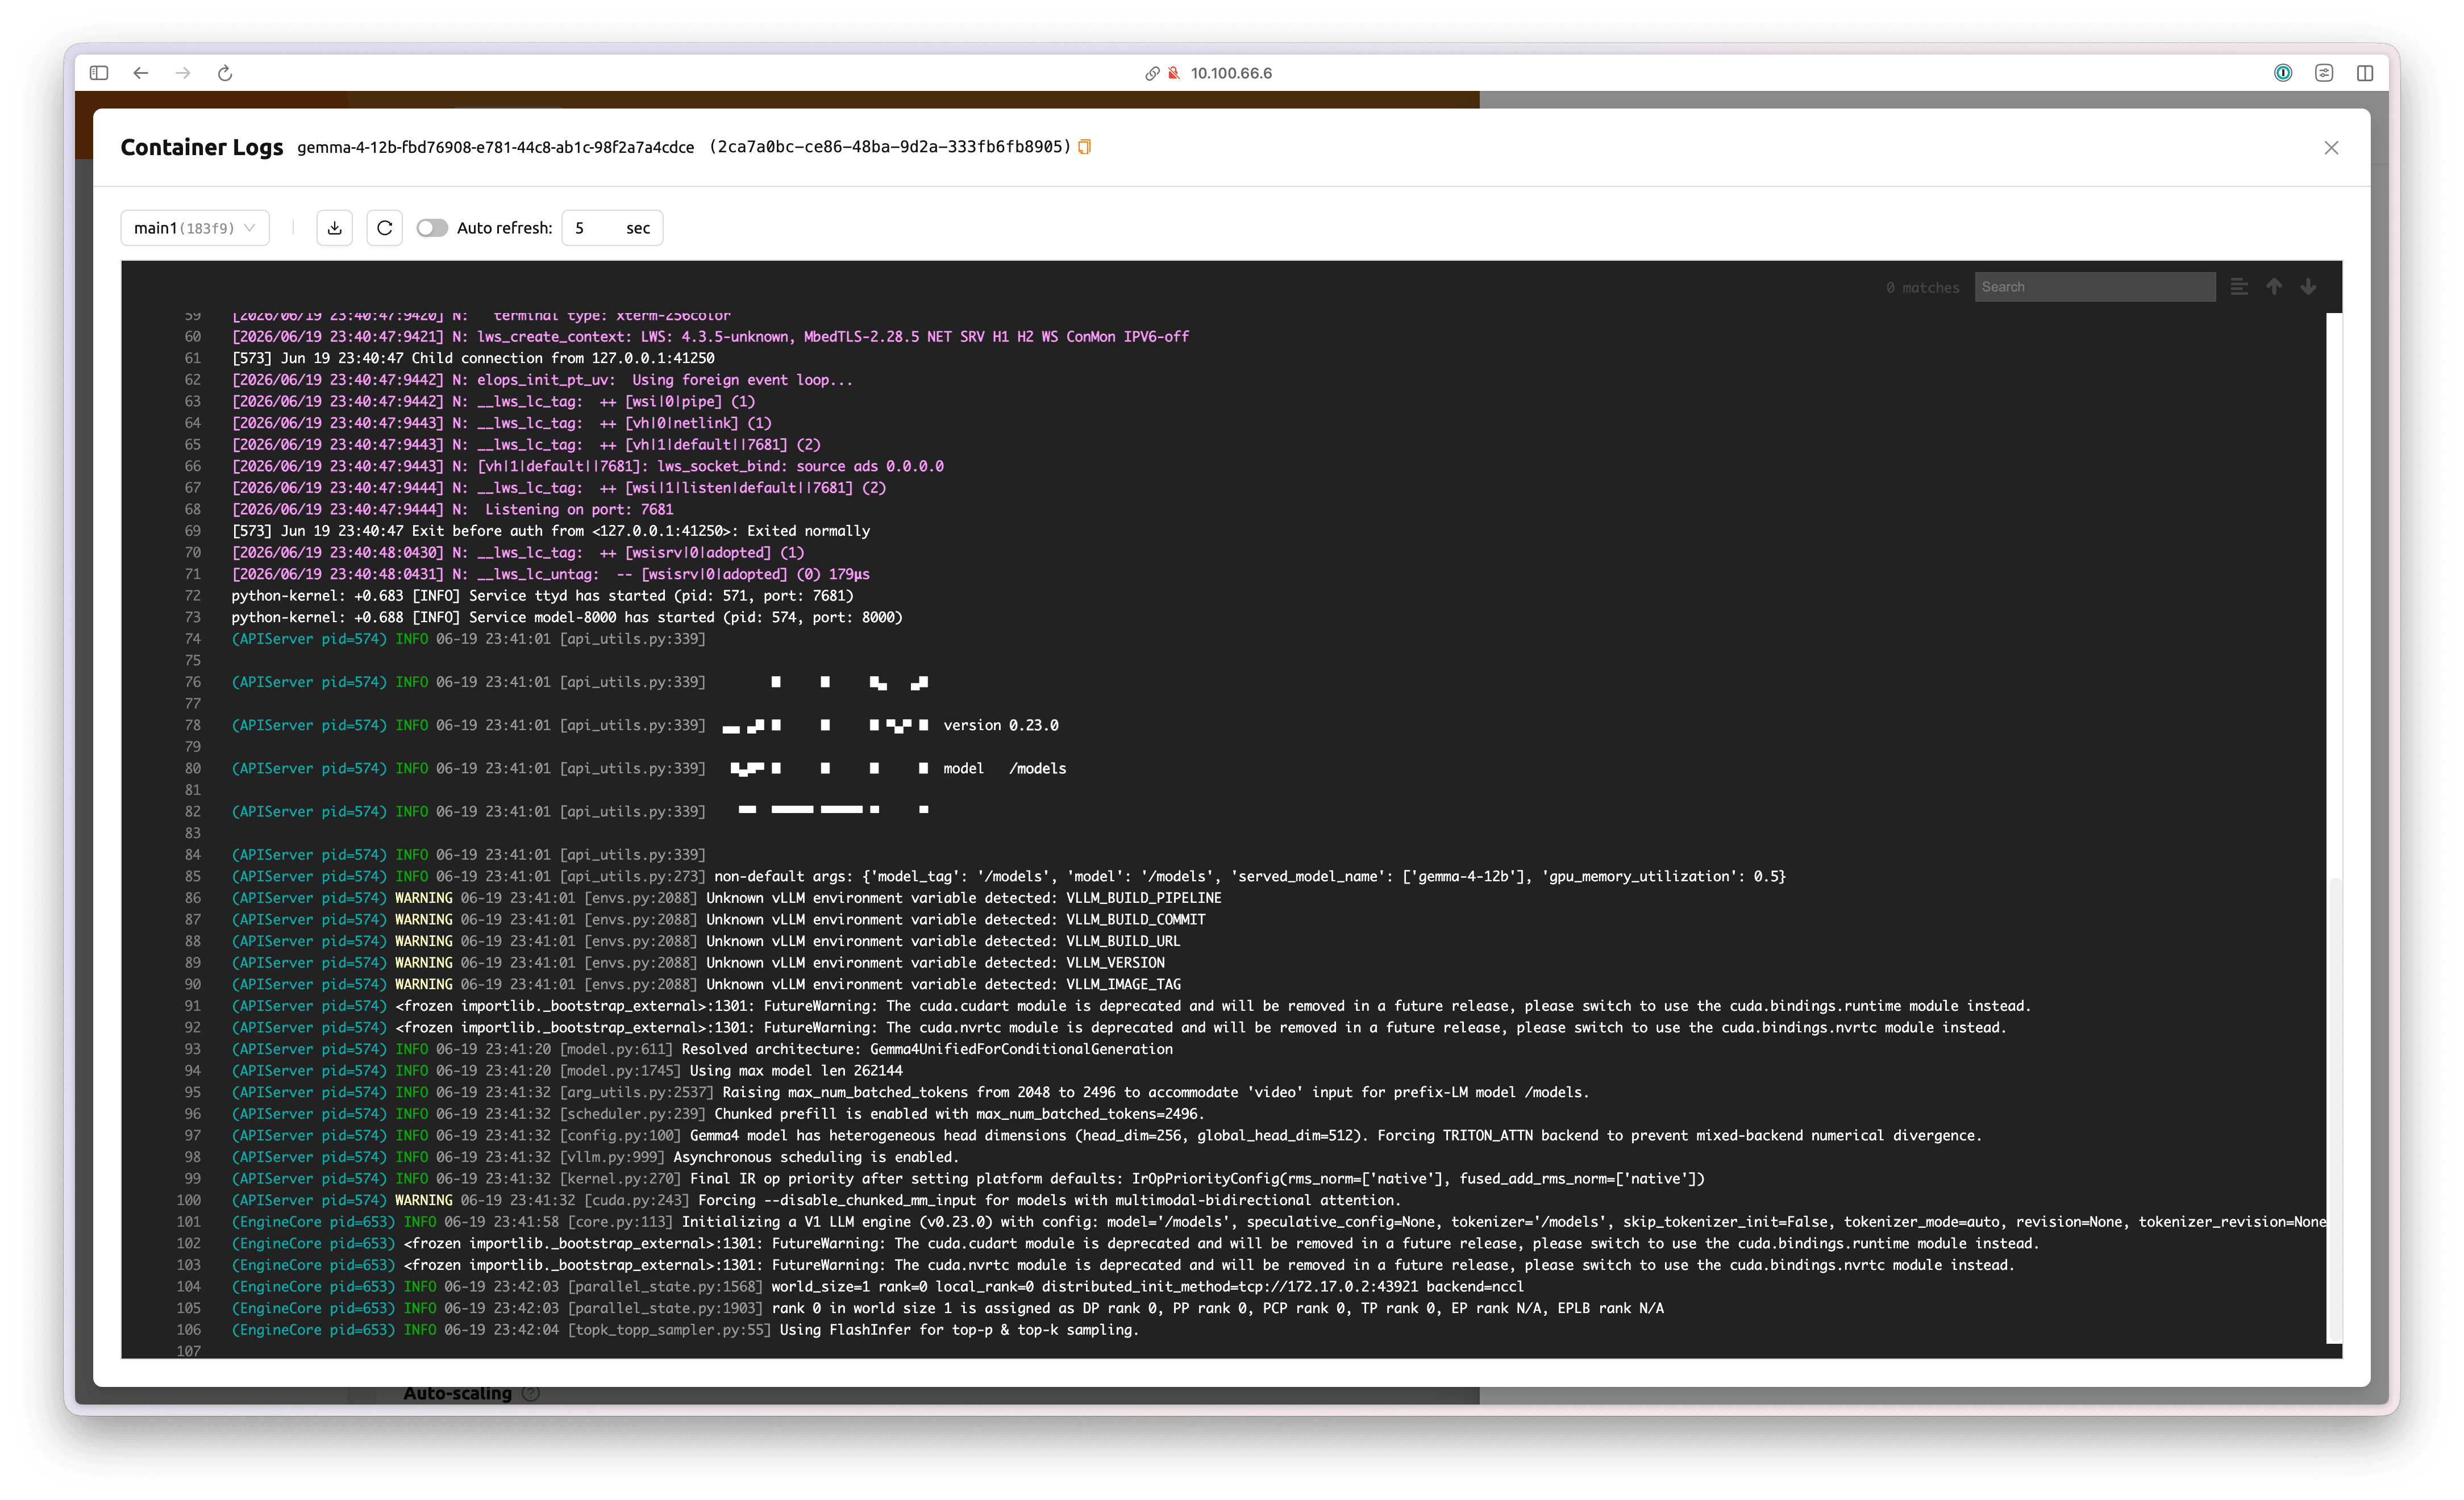
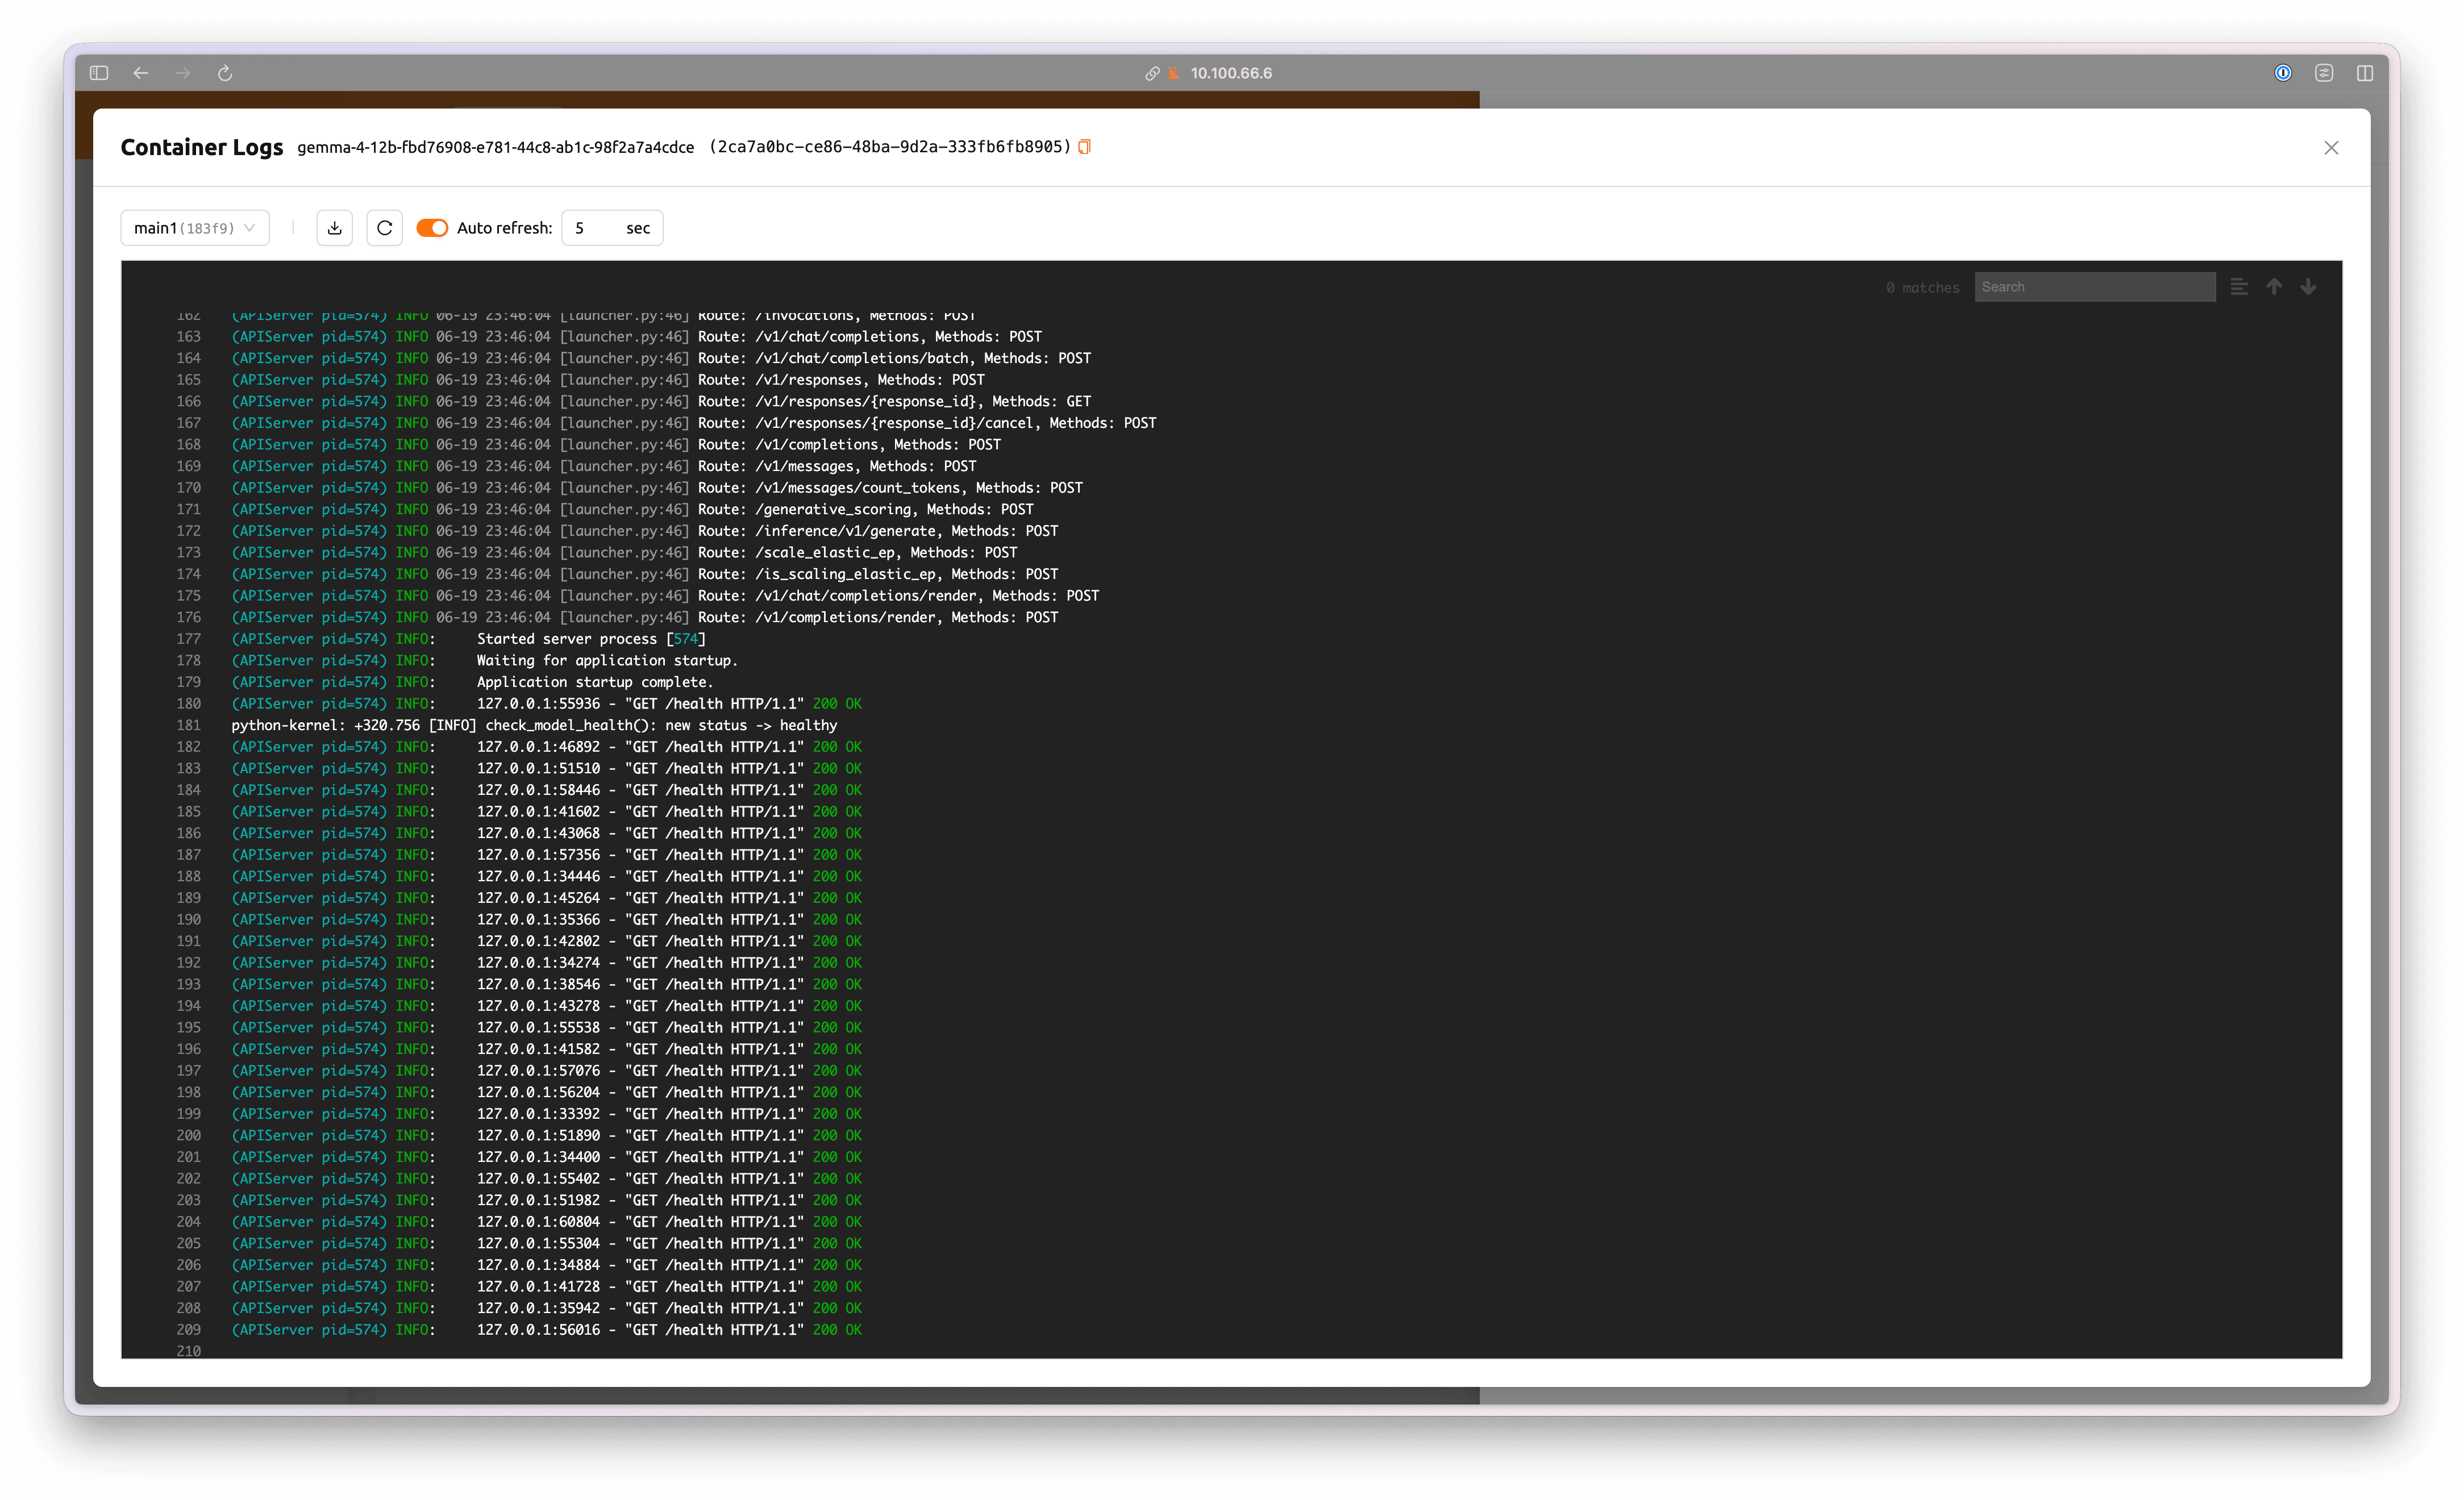
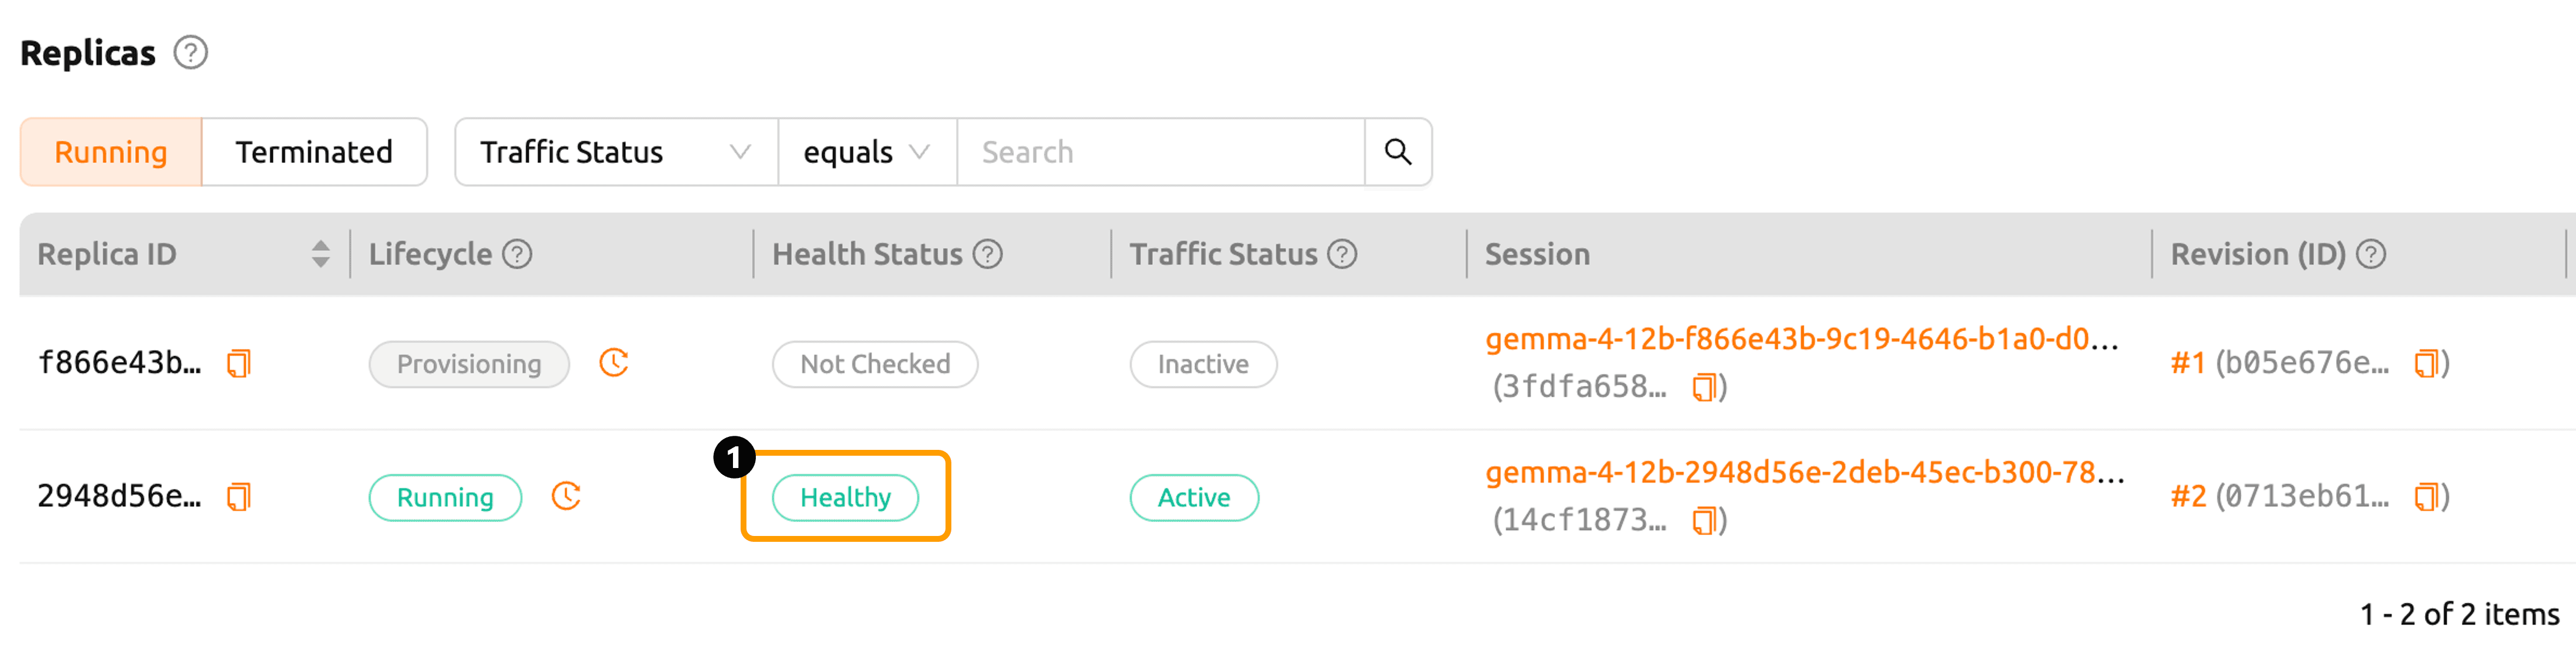
When vLLM is running and the health check completes successfully, the Health Status changes to Healthy.
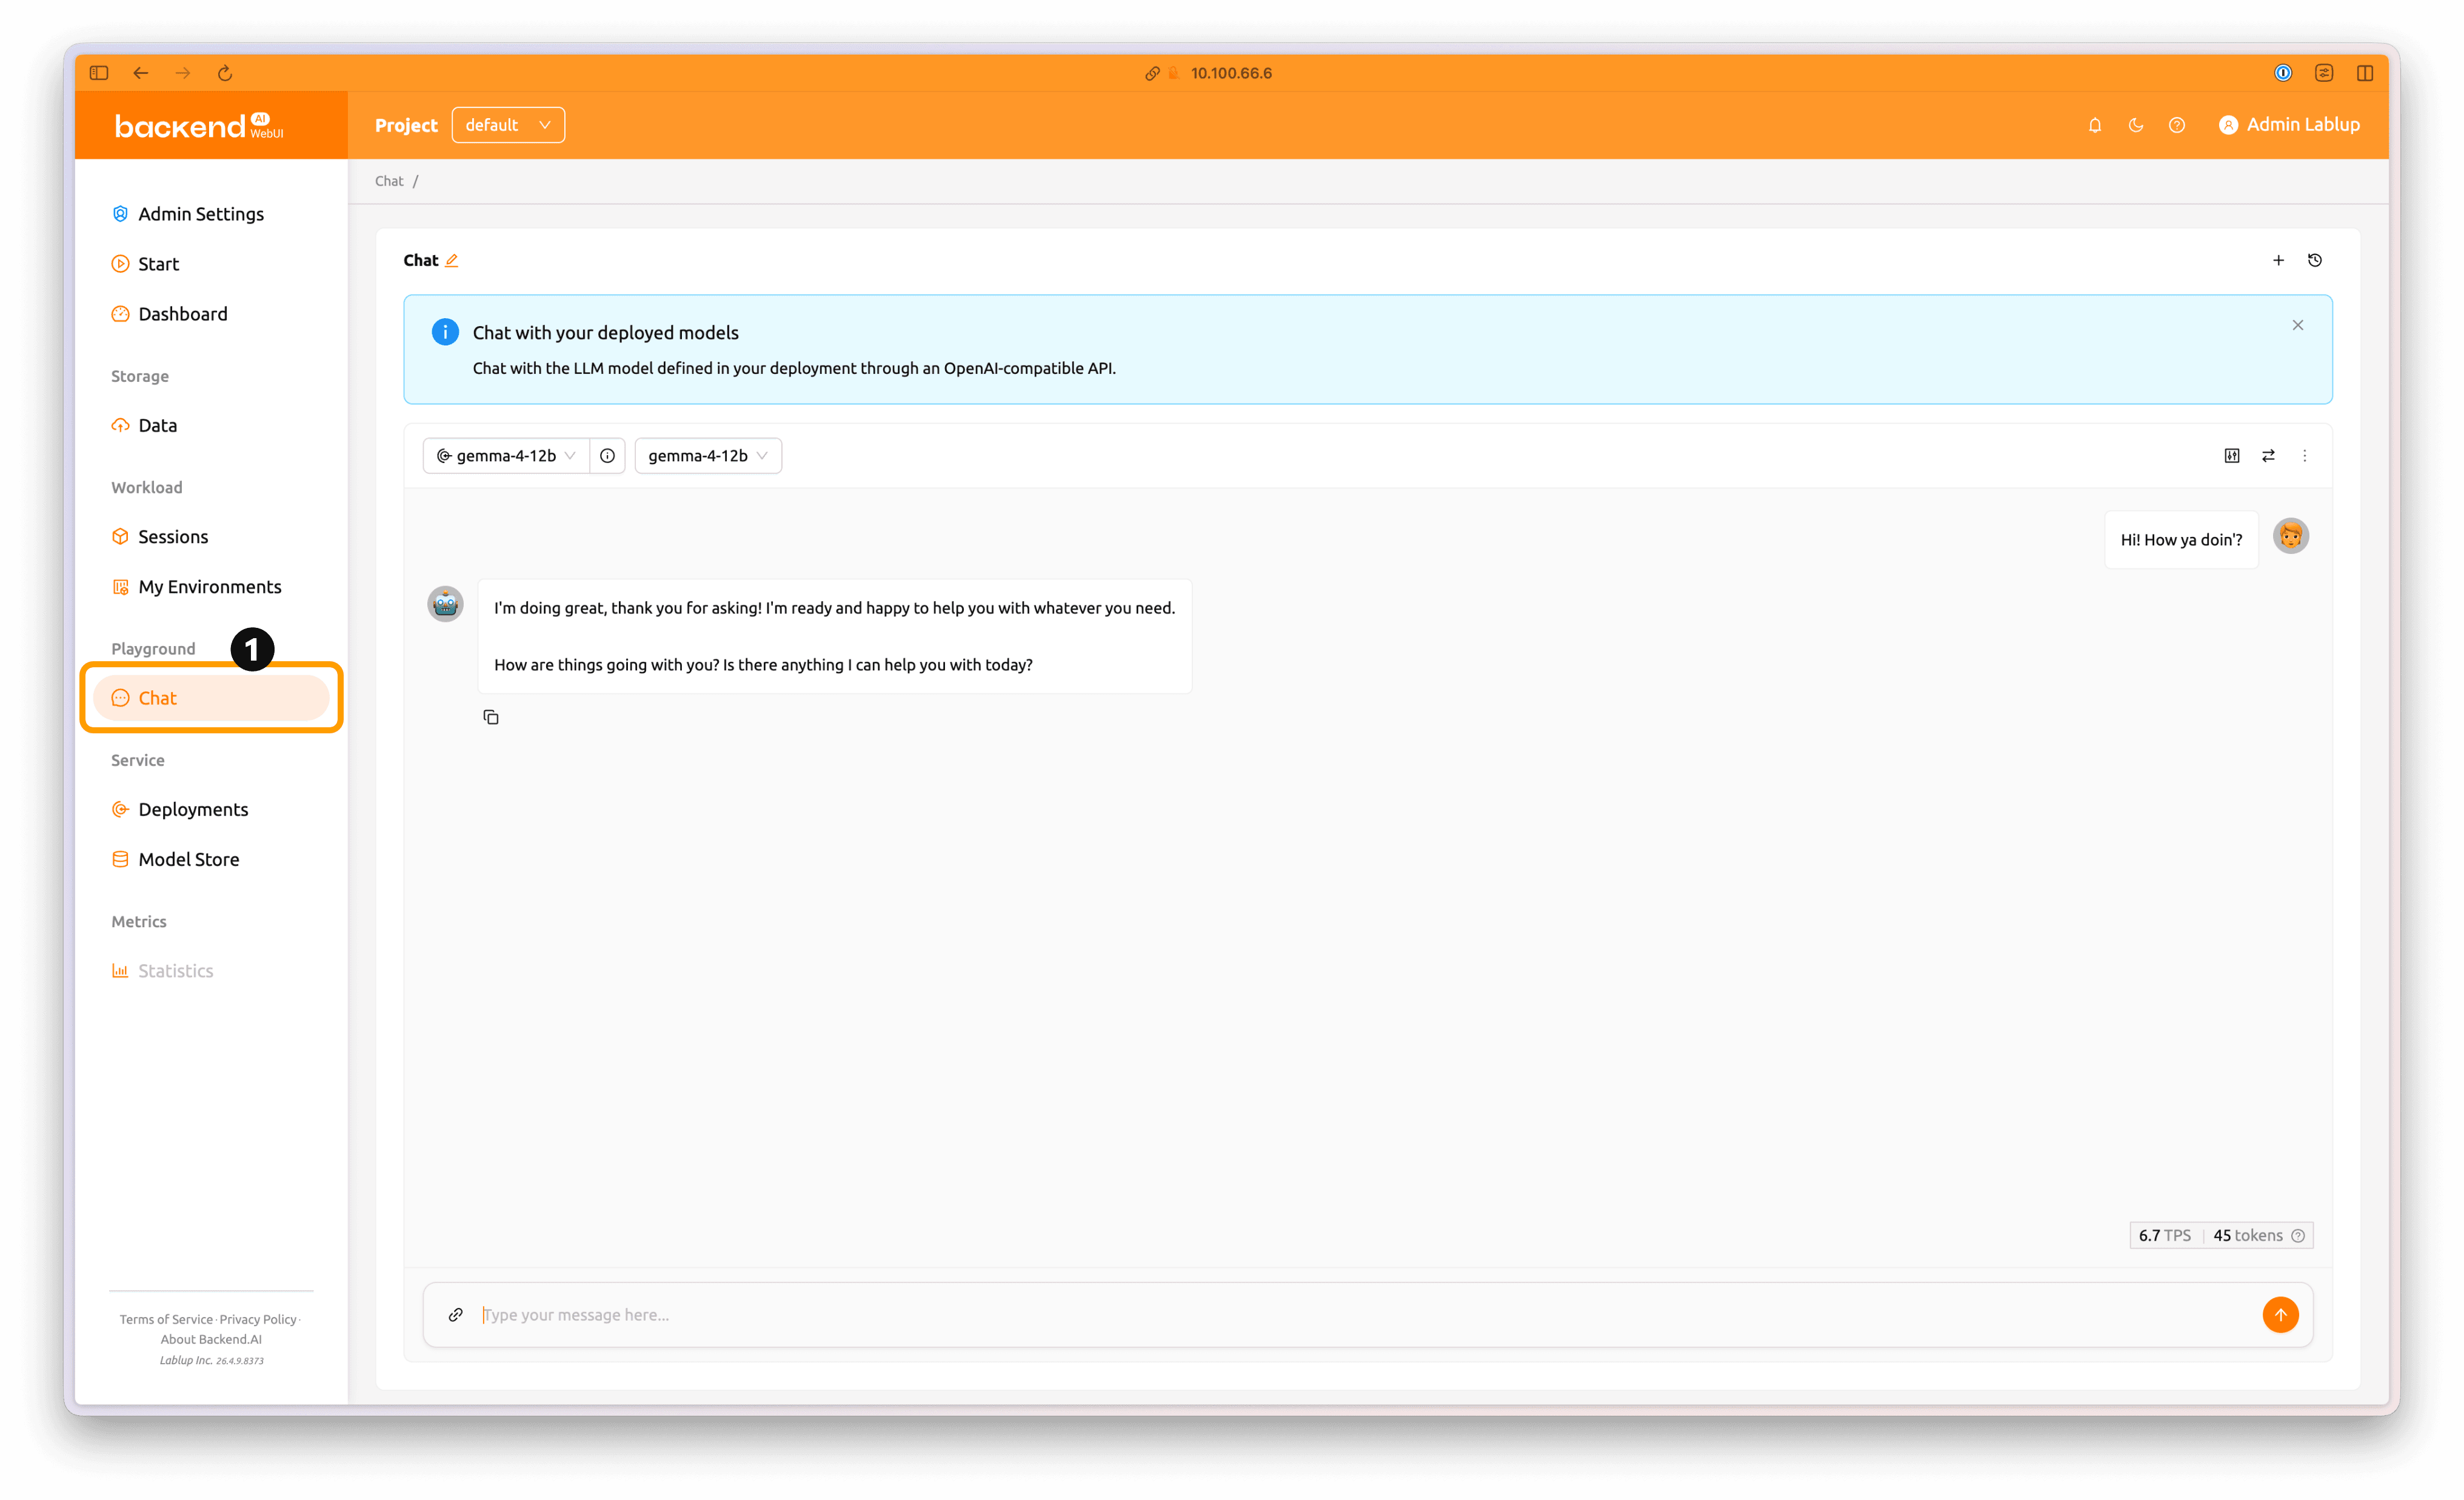
Once the model service deployment is complete, click the Chat tab in the left panel to send inference requests to the deployed model.
6. Troubleshooting
6.1 Warning in Agent
gather_node_measures(): LibraryError('NVML', 'nvmlDeviceGetMemoryInfo', 3)
This warning occurs because the CUDA plugin in Backend.AI Open Source does not officially support DGX Spark yet. It does not affect CUDA usage in Backend.AI. This will be fixed in a future release.
This instructions are based on Backend.AI 26.4.9. Note that the interface and steps may change slightly in future releases as the software evolves.


